后端管理系统开发(二):路由篇
2021/4/15 8:25:13
本文主要是介绍后端管理系统开发(二):路由篇,对大家解决编程问题具有一定的参考价值,需要的程序猿们随着小编来一起学习吧!
很久很久……以前,我们开始了vue-admin-pro之旅。通过 后端管理系统开发(一):登录篇 ,实现登录功能,我们打开了后台管理系统的大门。本节是路由篇的讲解,不管管理系统如何简单,都少不了路由,所以,学习这一节,很有必要。不过呢,对于我们来说,路由就是菜单。
下面开始我们本节——路由篇的学习之旅。
1 基础
读这篇文章的,我相信大多数都是后端开发人员,可能有些学过Vue,也可能没有,所以在之前,我们先一起学习下路由相关的知识。
如果你想了解更多,看:Vue Router 。
1.1 路由
路由就是跳转。
声明式:<router-link :to="...">
编程式:router.push(...)
1.2 router.push
如下示例:
// 字符串
router.push('home')

// 对象
router.push({ path: 'home' })

// 命名的路由
router.push({ name: 'user', params: { userId: '123' }})
router.push({ path: `/user/${userId}` }) // -> /user/123

// 带查询参数,变成 /register?plan=private
router.push({ path: 'register', query: { plan: 'private' }})
router.replace 不会向 history 添加新记录 = <router-link :to="..." replace>
1.3 router.go(n)
后退多少步,等于 window.history.go(n)
如下示例:
// 在浏览器记录中前进一步,等同于 history.forward()
router.go(1)

// 后退一步记录,等同于 history.back()
router.go(-1)

// 前进 3 步记录
router.go(3)

// 如果 history 记录不够用,那就默默地失败呗
router.go(-100)
router.go(100)
1.4 命名路由
router.push({ name: 'user', params: { userId: 123 } })
1.5 重定向
重定向也是通过 routes 配置来完成,下面例子是从 /a 重定向到 /b:
const router = new VueRouter({
  routes: [
    { path: '/a', redirect: '/b' }
  ]
})
重定向的目标也可以是一个命名的路由:
const router = new VueRouter({
  routes: [
    { path: '/a', redirect: { name: 'foo' }}
  ]
})
甚至是一个方法,动态返回重定向目标:
const router = new VueRouter({
  routes: [
    { path: '/a', redirect: to => {
      // 方法接收 目标路由 作为参数
      // return 重定向的 字符串路径/路径对象
    }}
  ]
})
注意导航守卫并没有应用在跳转路由上,而仅仅应用在其目标上。在下面这个例子中,为 /a 路由添加一个 beforeEnter 守卫并不会有任何效果。
别名:
const router = new VueRouter({
  routes: [
    { path: '/a', component: A, alias: '/b' }
  ]
})
1.6 路由传参
1.6.1 通过path传参
参数会显示在URL上,页面刷新,数据不会丢失。
路由配置
{
  path: '/particulars/:id',
  name: 'particulars',
  component: particulars
}
传递参数
//直接调用$router.push 实现携带参数的跳转
this.$router.push({
  path: `/particulars/${id}`,
})
接收参数
this.$route.params.id
1.6.2 通过params传参
参数不会显示在URL上
页面刷新,数据会丢失
路由配置
{
  path: '/particulars',
  name: 'particulars',
  component: particulars
}
传递参数
this.$router.push({
  name: 'particulars',
  params: {
    id: id
  }
})
接收参数
this.$route.params.id
1.6.3 通过query传参
使用path来匹配路由,然后通过query来传递参数
这种情况下 query传递的参数会显示在url后面?id=?
路由配置
{
  path: '/particulars',
  name: 'particulars',
  component: particulars
}
传递参数
this.$router.push({
  path: '/particulars',
  query: {
    id: id
  }
})
接收参数
this.$route.query.id
1.7 完整导航解析流程
- 导航被触发。
- 在失活的组件里调用
beforeRouteLeave守卫。 - 调用全局的
beforeEach守卫。 - 在重用的组件里调用
beforeRouteUpdate守卫 (2.2+)。 - 在路由配置里调用
beforeEnter。 - 解析异步路由组件。
- 在被激活的组件里调用
beforeRouteEnter。 - 调用全局的
beforeResolve守卫 (2.5+)。 - 导航被确认。
- 调用全局的
afterEach钩子。 - 触发 DOM 更新。
- 调用
beforeRouteEnter守卫中传给next的回调函数,创建好的组件实例会作为回调函数的参数传入。
2 目录结构
.
└── src
    └── router              	// 路由目录
        ├── before-close.js     // 页面关闭前需要做的操作,写在这里
        ├── index.js        	// 路由策略
        └── routers.js      	// 路由配置
3 标签
path
路劲
name
名字
meta
页面信息配置,这是一个对象
title
标题
hideInMenu
是否在菜单中隐藏,布尔类型,true:隐藏;false:显示。默认:显示。
component
组件
notCache
不要缓存
icon
图标
hideInBread
设为true后此级路由将不会出现在面包屑中
redirect
跳转
4 图标
你可以去 这里 筛选想要的图标
如果无法满足我们的需求,可以自定义图标。
自定义图标,需要在图标名称前加下划线 _ 。
后面会用一个篇章,单独说自定义图标。
5 多语言
如果你的系统要支持多语言,首先你要开启多语言。
1:将 ./src/config/index.js 配置文件中的多语言支持开启: useI18n=true 。
2:多语言文件在 ./src/local 目录下。
6 单独页
export default [
  {
    path: '/login',
    name: 'login',
    meta: {
      title: 'Login - 登录',
      hideInMenu: true
    },
    component: () => import('@/view/Login/Login')
  }
]
7 一级菜单
export default [
  {
    path: '/tools_methods',
    name: 'tools_methods',
    meta: {
      hideInBread: true
    },
    component: Main,
    children: [
      {
        path: 'tools_methods_page',
        name: 'tools_methods_page',
        meta: {
          icon: 'ios-hammer',
          title: '工具方法',
          beforeCloseName: 'before_close_normal'
        },
        component: () => import('@/view/tools-methods/tools-methods.vue')
      }
    ]
  },
]
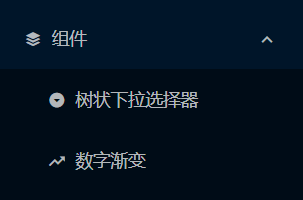
8 二级菜单
export default [
  {
    path: '/components',
    name: 'components',
    meta: {
      icon: 'logo-buffer',
      title: '组件'
    },
    component: Main,
    children: [
      {
        path: 'tree_select_page',
        name: 'tree_select_page',
        meta: {
          icon: 'md-arrow-dropdown-circle',
          title: '树状下拉选择器'
        },
        component: () => import('@/view/components/tree-select/index.vue')
      },
      {
        path: 'count_to_page',
        name: 'count_to_page',
        meta: {
          icon: 'md-trending-up',
          title: '数字渐变'
        },
        component: () => import('@/view/components/count-to/count-to.vue')
      }
    ]
  }
]
效果示例:
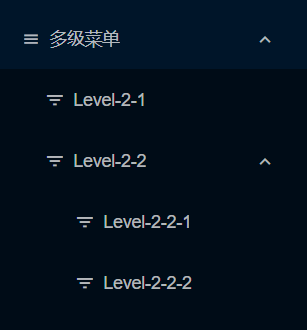
9 多级菜单
export default [
  {
    path: '/multilevel',
    name: 'multilevel',
    meta: {
      icon: 'md-menu',
      title: '多级菜单'
    },
    component: Main,
    children: [
      {
        path: 'level_2_1',
        name: 'level_2_1',
        meta: {
          icon: 'md-funnel',
          title: '二级-1'
        },
        component: () => import('@/view/multilevel/level-2-1.vue')
      },
      {
        path: 'level_2_2',
        name: 'level_2_2',
        meta: {
          access: ['super_admin'],
          icon: 'md-funnel',
          showAlways: true,
          title: '二级-2'
        },
        component: parentView,
        children: [
          {
            path: 'level_2_2_1',
            name: 'level_2_2_1',
            meta: {
              icon: 'md-funnel',
              title: '三级'
            },
            component: () => import('@/view/multilevel/level-2-2/level-2-2-1.vue')
          },
          {
            path: 'level_2_2_2',
            name: 'level_2_2_2',
            meta: {
              icon: 'md-funnel',
              title: '三级'
            },
            component: () => import('@/view/multilevel/level-2-2/level-2-2-2.vue')
          }
        ]
      },
      {
        path: 'level_2_3',
        name: 'level_2_3',
        meta: {
          icon: 'md-funnel',
          title: '二级-3'
        },
        component: () => import('@/view/multilevel/level-2-3.vue')
      }
    ]
  }
]
效果示例:
这篇关于后端管理系统开发(二):路由篇的文章就介绍到这儿,希望我们推荐的文章对大家有所帮助,也希望大家多多支持为之网!
- 2024-11-23Springboot应用的多环境打包入门
- 2024-11-23Springboot应用的生产发布入门教程
- 2024-11-23Python编程入门指南
- 2024-11-23Java创业入门:从零开始的编程之旅
- 2024-11-23Java创业入门:新手必读的Java编程与创业指南
- 2024-11-23Java对接阿里云智能语音服务入门详解
- 2024-11-23Java对接阿里云智能语音服务入门教程
- 2024-11-23JAVA对接阿里云智能语音服务入门教程
- 2024-11-23Java副业入门:初学者的简单教程
- 2024-11-23JAVA副业入门:初学者的实战指南


