Kafka成长记9:Kafka内存缓冲区中的消息最终如何发送出去的?
2021/10/12 13:14:37
本文主要是介绍Kafka成长记9:Kafka内存缓冲区中的消息最终如何发送出去的?,对大家解决编程问题具有一定的参考价值,需要的程序猿们随着小编来一起学习吧!
之前三节我们主要分析了KafkaProducer是如何将消息放入到内存缓冲区的。
上面的逻辑只是Accumulator.append()的一段核心逻辑而已,还记得之前我们分析过的KafkaProducerHelloWorld的整体逻辑么?
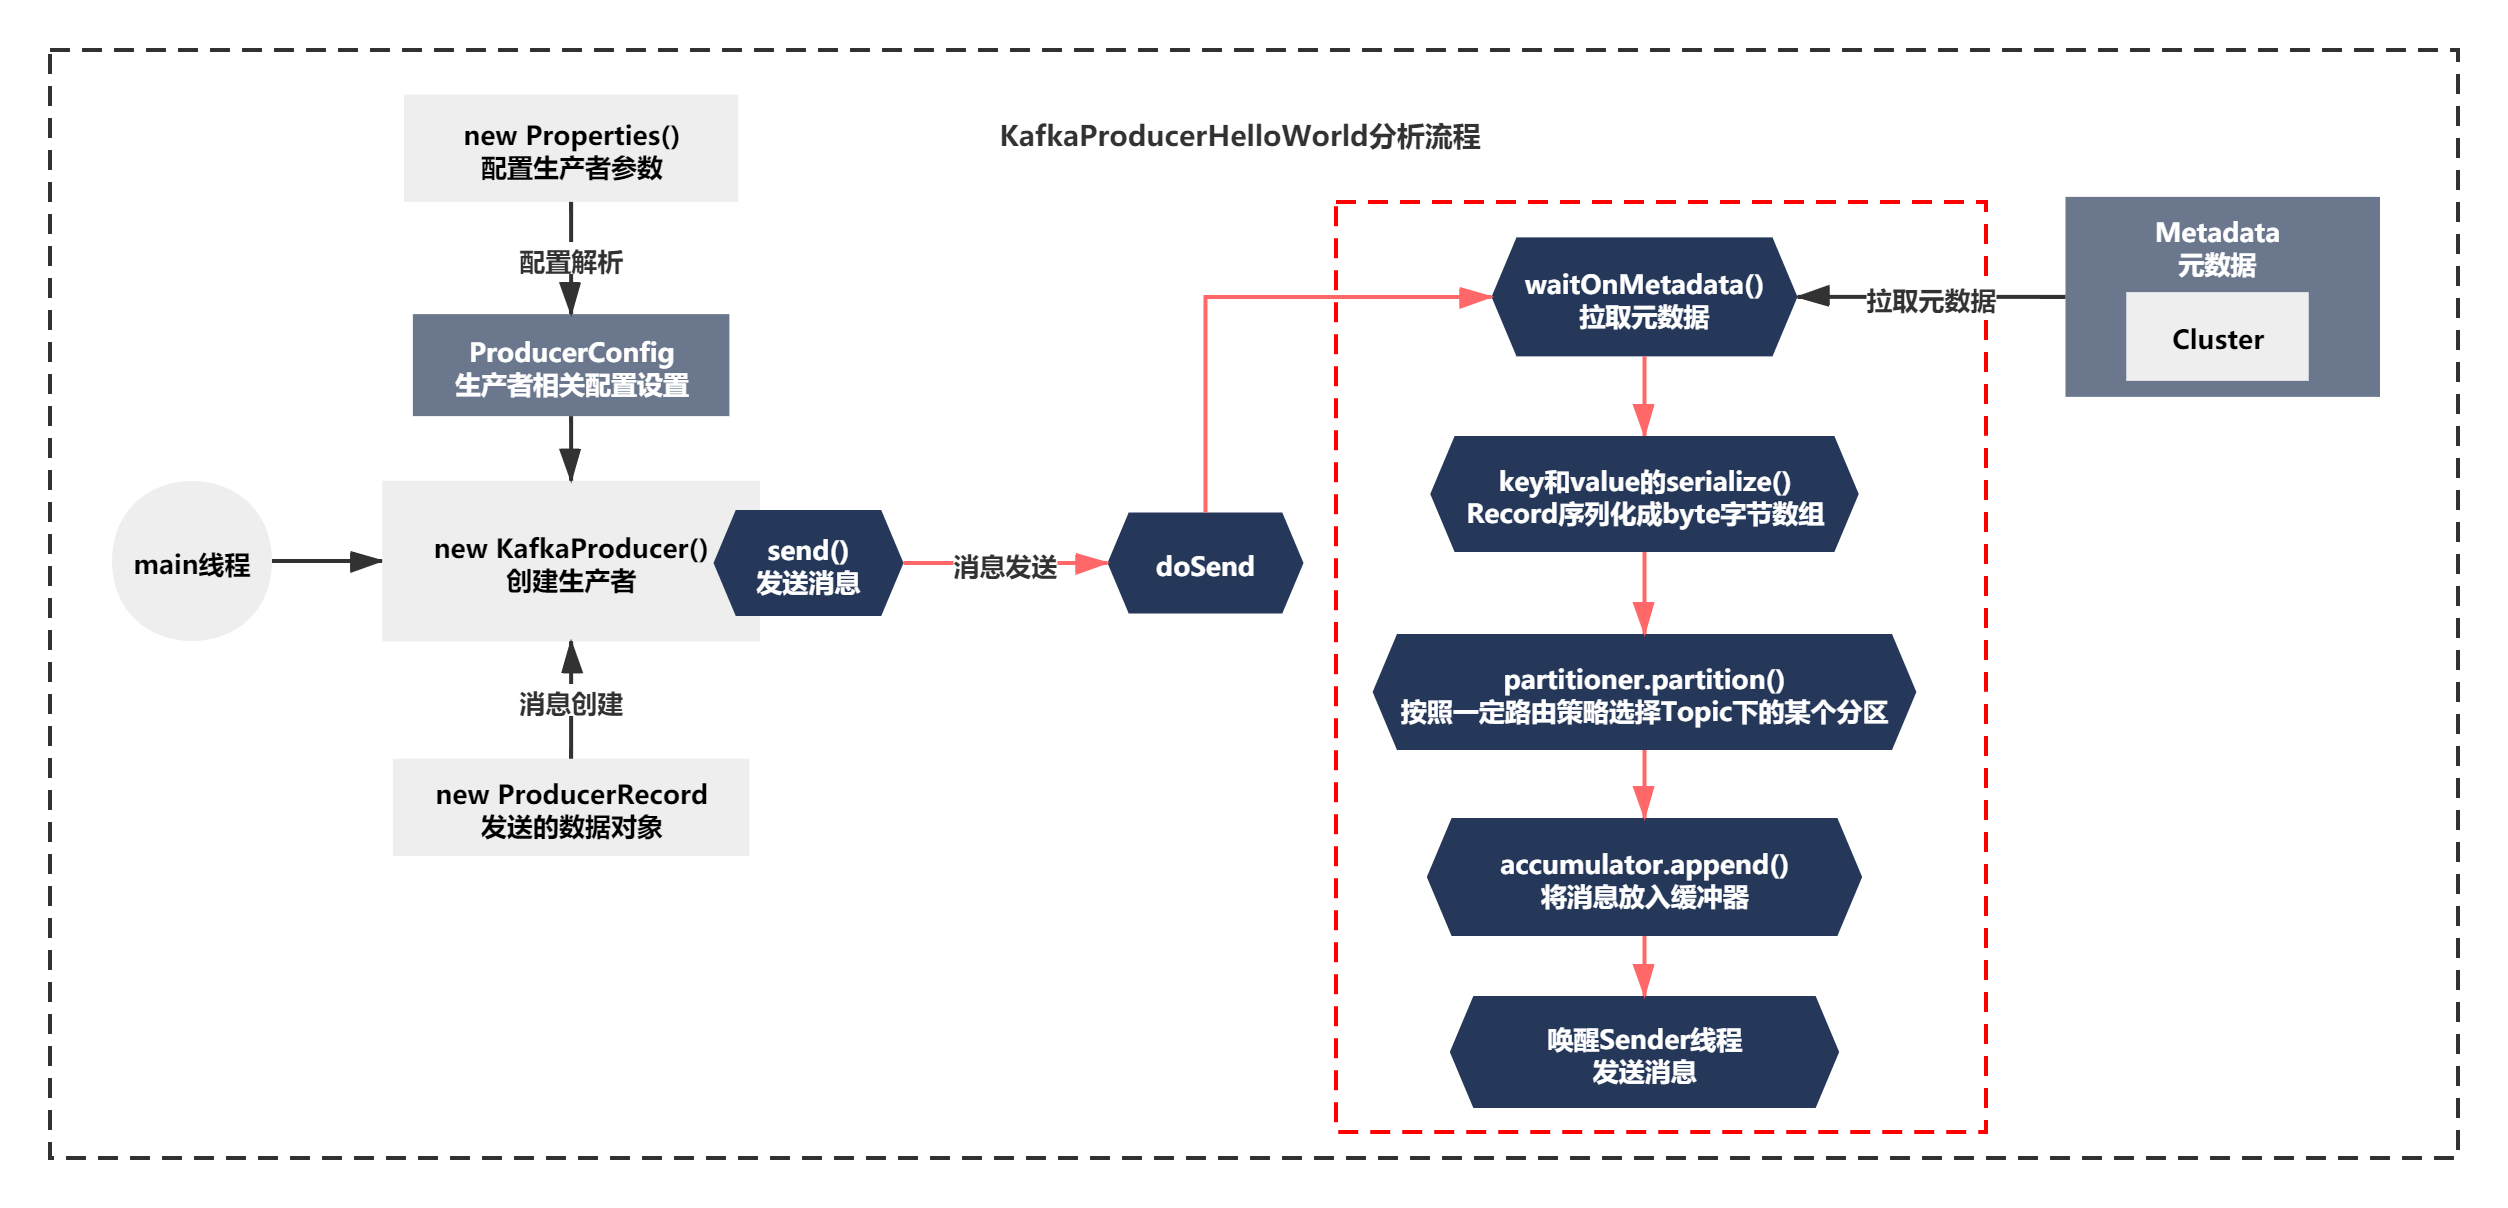
之前分析的代码逻辑如下图所示:
从最开始配置解析,消息对象Record的创建,到元数据拉取、key和value的最初序列化、Product分区路由的原理、消息如何放入内存缓冲区的原理。
之前我们已经分析到了图中红线的部分的结尾了—唤醒Sender线程发送消息。
这一节我们就继续分析,消息放入了内存缓冲中之后,触发唤醒Sender线程,之后Sender线程如何将打包好Batch发送出去的。
什么条件会唤醒Sender线程
从上面的流程图可以看到,在producer.send()执行doSend()的时候,accumulator.append()将消息内存缓冲器之后,会唤醒Sender线程。
那我们来看下RecordBatch放入缓冲器后,什么条件会唤醒Sender线程呢?
private Future<RecordMetadata> doSend(ProducerRecord<K, V> record, Callback callback) {
    TopicPartition tp = null;
    try {
      // 1.waitOnMetadata 等待元数据拉取
      // 2.keySerializer.serialize和valueSerializer.serialize,很明显就是将Record序列化成byte字节数组
      // 3.通过partition进行路由分区,按照一定路由策略选择Topic下的某个分区
      //省略代码...
      // 4.accumulator.append将消息放入缓冲器中
        RecordAccumulator.RecordAppendResult result = accumulator.append(tp, timestamp, serializedKey, serializedValue, interceptCallback, remainingWaitMs);
        if (result.batchIsFull || result.newBatchCreated) {
            log.trace("Waking up the sender since topic {} partition {} is either full or getting a new batch", record.topic(), partition);
            //5.唤醒Sender线程的selector.select()的阻塞,开始处理内存缓冲器中的数据。
            this.sender.wakeup();
        }
        return result.future;
    } catch (ApiException e) {
        log.debug("Exception occurred during message send:", e);
        if (callback != null)
            callback.onCompletion(null, e);
        this.errors.record();
        if (this.interceptors != null)
            this.interceptors.onSendError(record, tp, e);
        return new FutureFailure(e);
    } catch (Exception e) {
        throw e;
    }
    //省略其他各种异常捕获
}
从上面代码,可以很清楚的看到,唤醒sender线程的逻辑很简单,就是当前Batch已经写满,或者是新的batch创建了。
result.batchIsFull || result.newBatchCreated
那么这两变量什么时候设置的呢?
在上一节中RecordBatch.tryAppned是创建新的batch,而RecordAccumulator.tryAppend()主要是追加写batch。他们会设置batchIsFull和newBatchCreated的标记。表示是新创建还是写满的batch。
主要代码如下:
new RecordAppendResult(future, deque.size() > 1 || last.records.isFull(), false);
new RecordAppendResult(future, dq.size() > 1 || batch.records.isFull(), true)
public final static class RecordAppendResult {
    public final FutureRecordMetadata future;
    public final boolean batchIsFull;
    public final boolean newBatchCreated;

    public RecordAppendResult(FutureRecordMetadata future, boolean batchIsFull, boolean newBatchCreated) {
        this.future = future;
        this.batchIsFull = batchIsFull;
        this.newBatchCreated = newBatchCreated;
    }
}


public boolean isFull() {
    return !this.writable || this.writeLimit <= this.compressor.estimatedBytesWritten();
}
当满足条件后,最终会触发到sender.wakeup() 唤醒之前while循环阻塞的Selector(),准备发送消息。整个过程如下所示:
唤醒的Sender线程如何发送batch消息的?
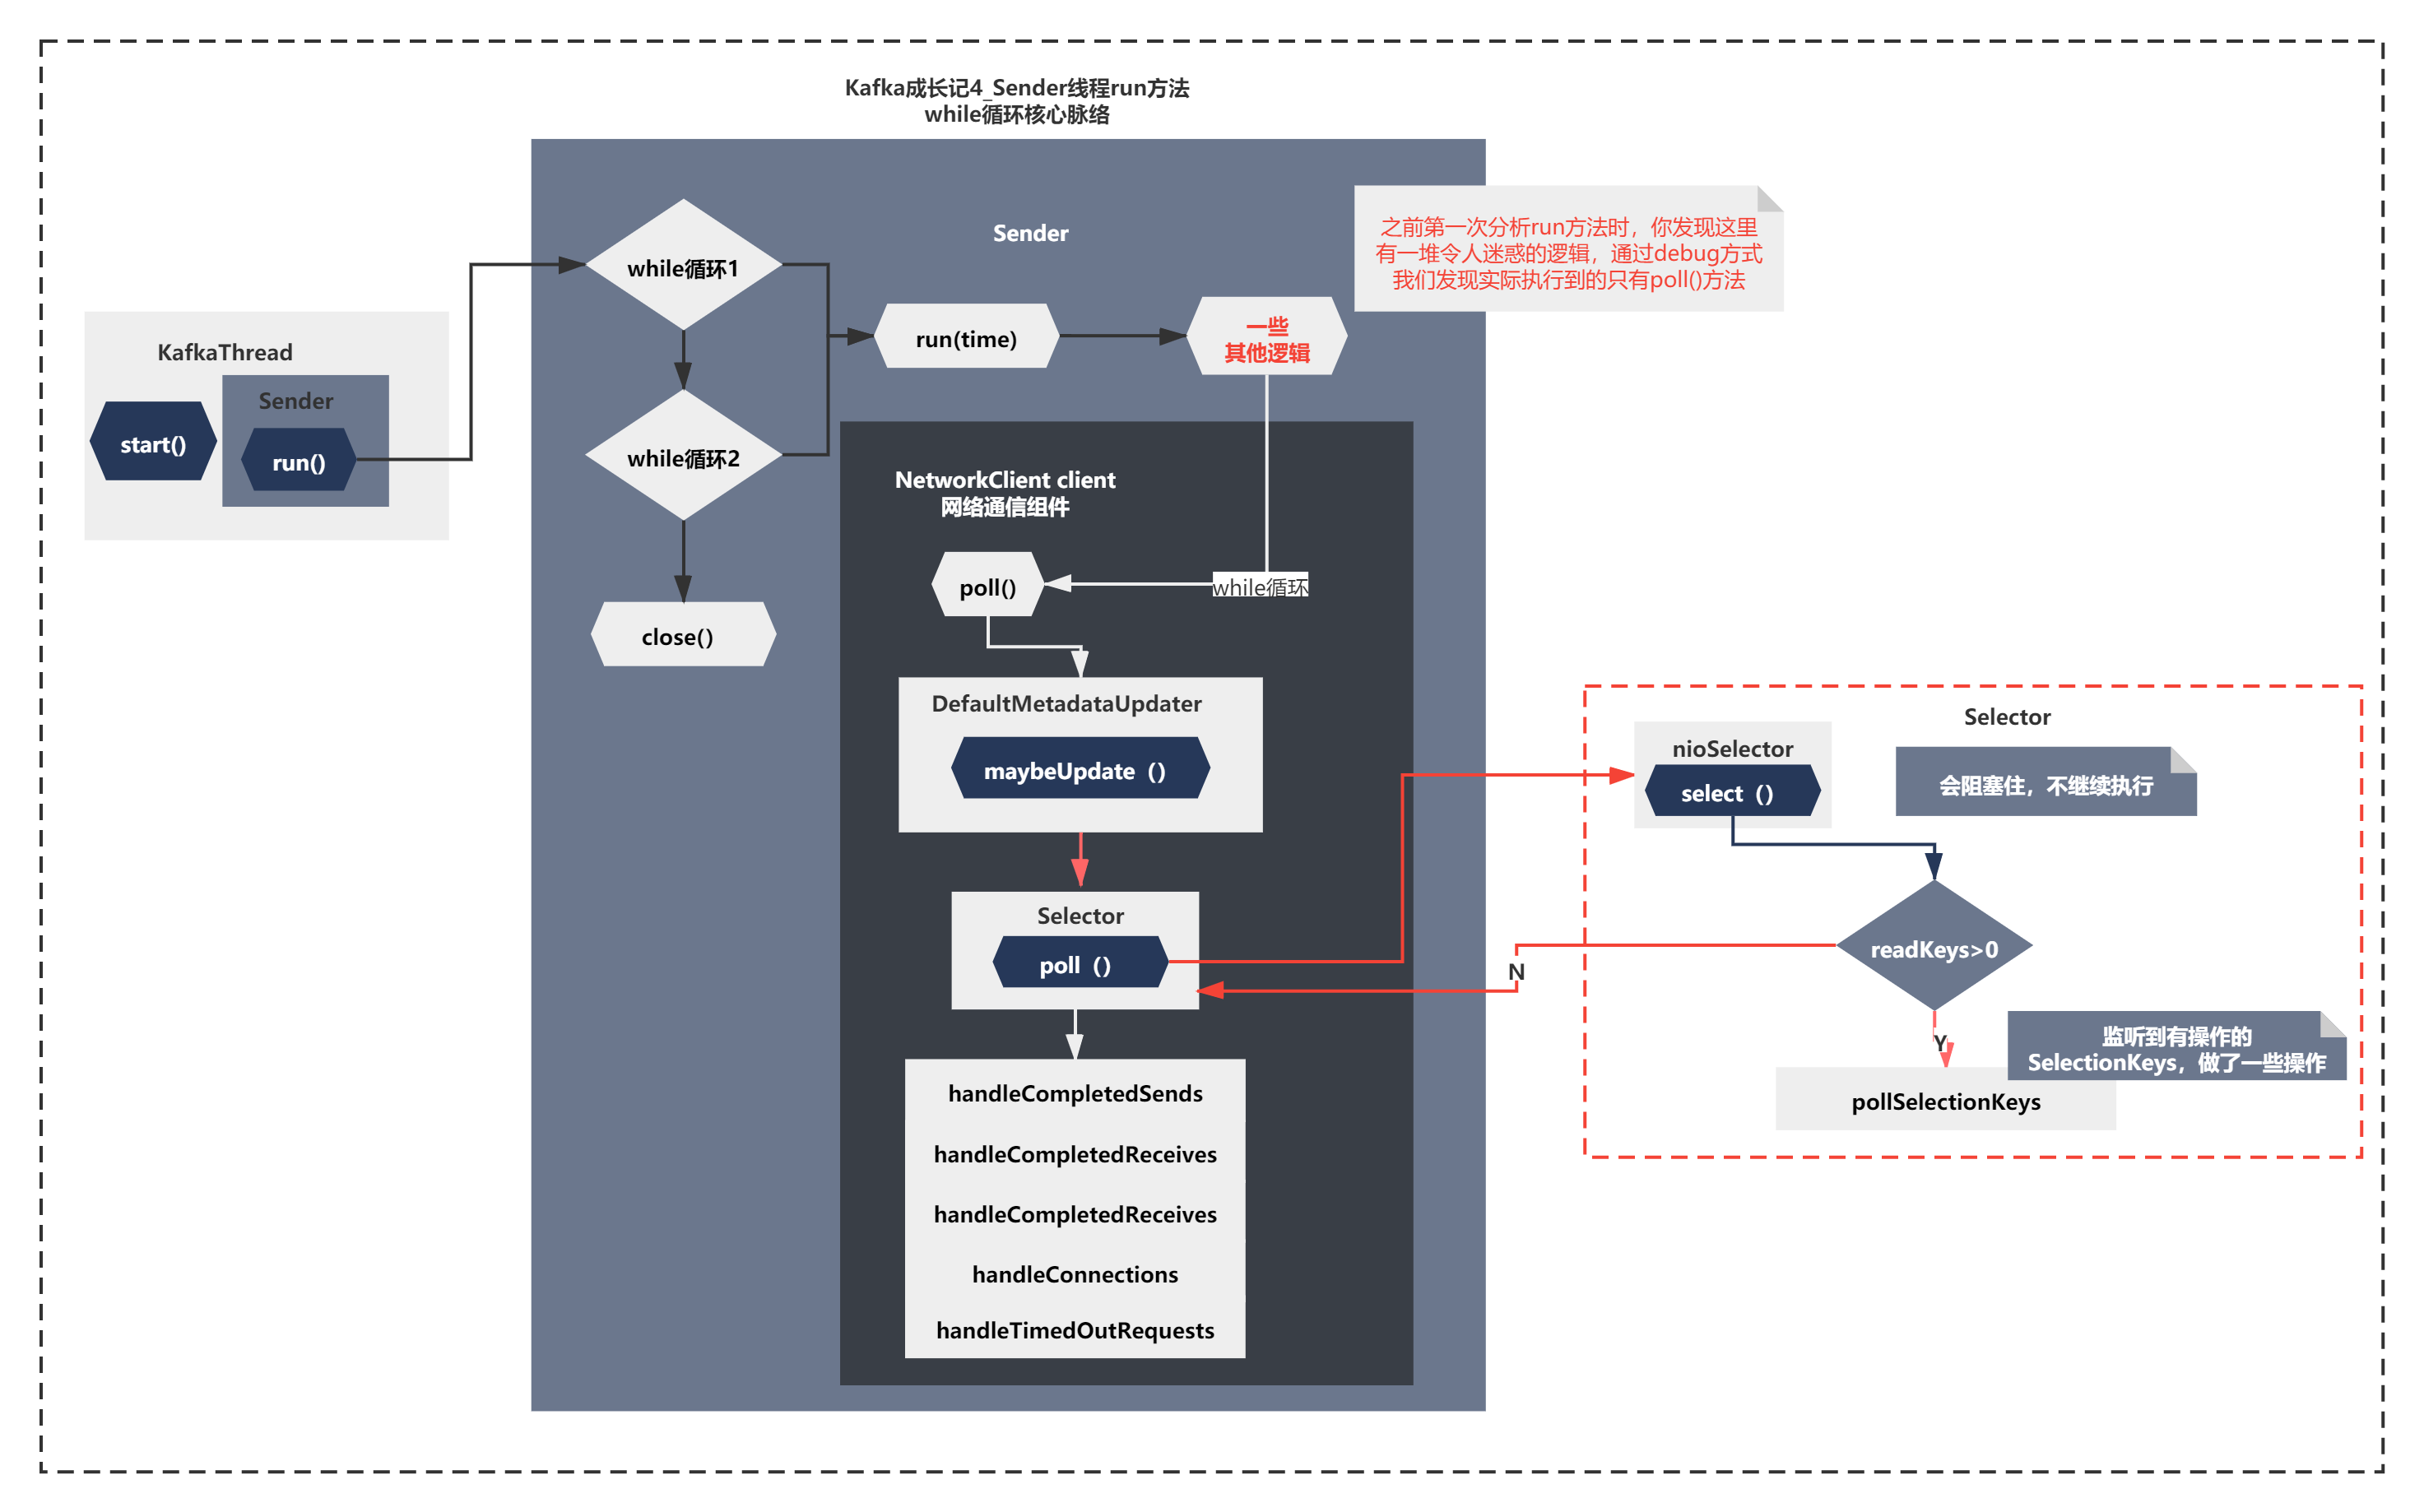
既然最终触发了sender.wakeUp(),你应该知道底层触发的就是NioSelector的wakeup。唤醒的是哪一个流程呢?我们先来回顾下,之前《Kafka成长记4 元数据拉取 下》Sender线程的run的主要脉络在如下图所示:
也就是之前分析拉取元数据的时候,核心就是NetworkClient.poll()的内部主要3步 maybeUpdate()–>Selector()–>hanlde()。
最终拉取元数据成功后,会再次阻塞在Selector.select()等待,而此时sender.waykeUp()就会唤醒阻塞继续执行run方法了。
但是NetworkClient.poll()外层还有一堆令人迷惑的代码,不知道大家记不记得?
   void run(long now) {
        Cluster cluster = metadata.fetch();
        // get the list of partitions with data ready to send
        RecordAccumulator.ReadyCheckResult result = this.accumulator.ready(cluster, now);

        // if there are any partitions whose leaders are not known yet, force metadata update
        if (result.unknownLeadersExist)
            this.metadata.requestUpdate();

        // remove any nodes we aren't ready to send to
        Iterator<Node> iter = result.readyNodes.iterator();
        long notReadyTimeout = Long.MAX_VALUE;
        while (iter.hasNext()) {
            Node node = iter.next();
            if (!this.client.ready(node, now)) {
                iter.remove();
                notReadyTimeout = Math.min(notReadyTimeout, this.client.connectionDelay(node, now));
            }
        }

        // create produce requests
        Map<Integer, List<RecordBatch>> batches = this.accumulator.drain(cluster,
                                                                         result.readyNodes,
                                                                         this.maxRequestSize,
                                                                         now);
        if (guaranteeMessageOrder) {
            // Mute all the partitions drained
            for (List<RecordBatch> batchList : batches.values()) {
                for (RecordBatch batch : batchList)
                    this.accumulator.mutePartition(batch.topicPartition);
            }
        }

        List<RecordBatch> expiredBatches = this.accumulator.abortExpiredBatches(this.requestTimeout, now);
        // update sensors
        for (RecordBatch expiredBatch : expiredBatches)
            this.sensors.recordErrors(expiredBatch.topicPartition.topic(), expiredBatch.recordCount);

        sensors.updateProduceRequestMetrics(batches);
        List<ClientRequest> requests = createProduceRequests(batches, now);
        // If we have any nodes that are ready to send + have sendable data, poll with 0 timeout so this can immediately
        // loop and try sending more data. Otherwise, the timeout is determined by nodes that have partitions with data
        // that isn't yet sendable (e.g. lingering, backing off). Note that this specifically does not include nodes
        // with sendable data that aren't ready to send since they would cause busy looping.
        long pollTimeout = Math.min(result.nextReadyCheckDelayMs, notReadyTimeout);
        if (result.readyNodes.size() > 0) {
            log.trace("Nodes with data ready to send: {}", result.readyNodes);
            log.trace("Created {} produce requests: {}", requests.size(), requests);
            pollTimeout = 0;
        }
        for (ClientRequest request : requests)
            client.send(request, now);

        // if some partitions are already ready to be sent, the select time would be 0;
        // otherwise if some partition already has some data accumulated but not ready yet,
        // the select time will be the time difference between now and its linger expiry time;
        // otherwise the select time will be the time difference between now and the metadata expiry time;
        this.client.poll(pollTimeout, now);
    }
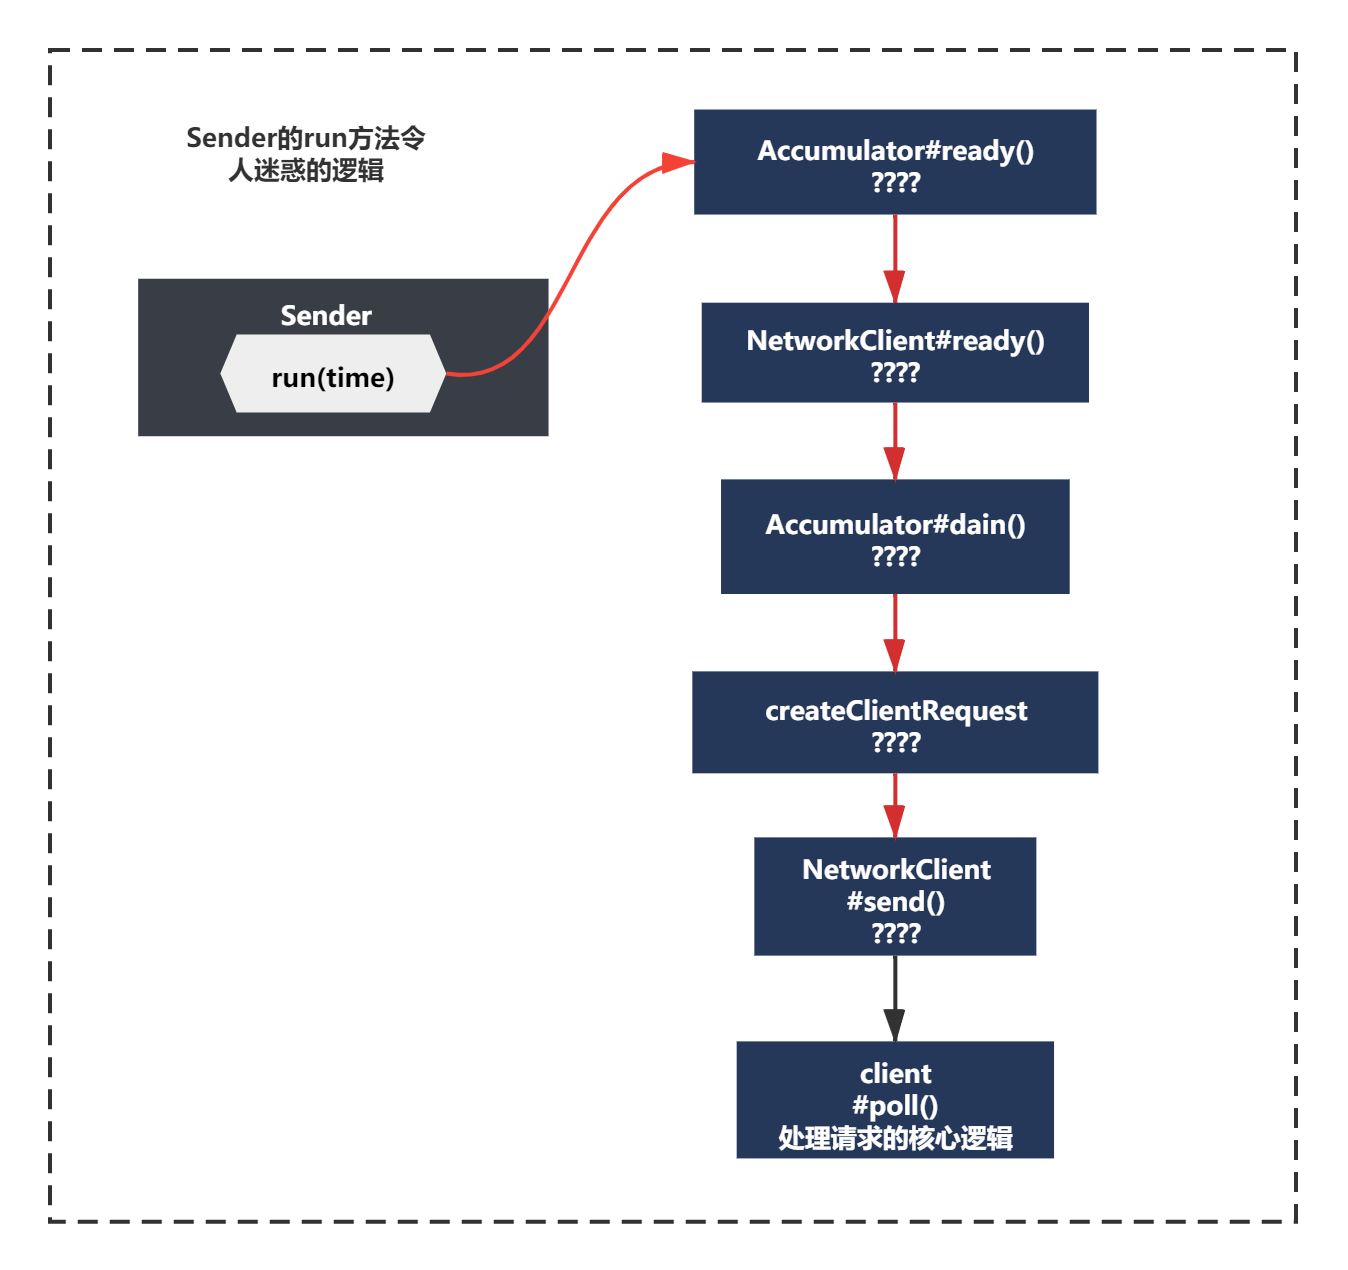
之前第一次分析run方法时,你发现这里有一堆令人迷惑的逻辑,通过debug方式我们发现实际执行到的最后一行只有client.poll()方法。
而还有一堆之前的一对令人迷惑的逻辑:
accumulator.ready()、client.ready(node, now)
accumulator.drain()
accumulator.abortExpiredBatches()
client.send(request, now)
如下所示:
唤醒Sender之后,现在我们已经有一个batch了,这些逻辑有哪一些触发到了呢?我们一起来看下吧。
RecordAccumulator.ready()在准备什么?
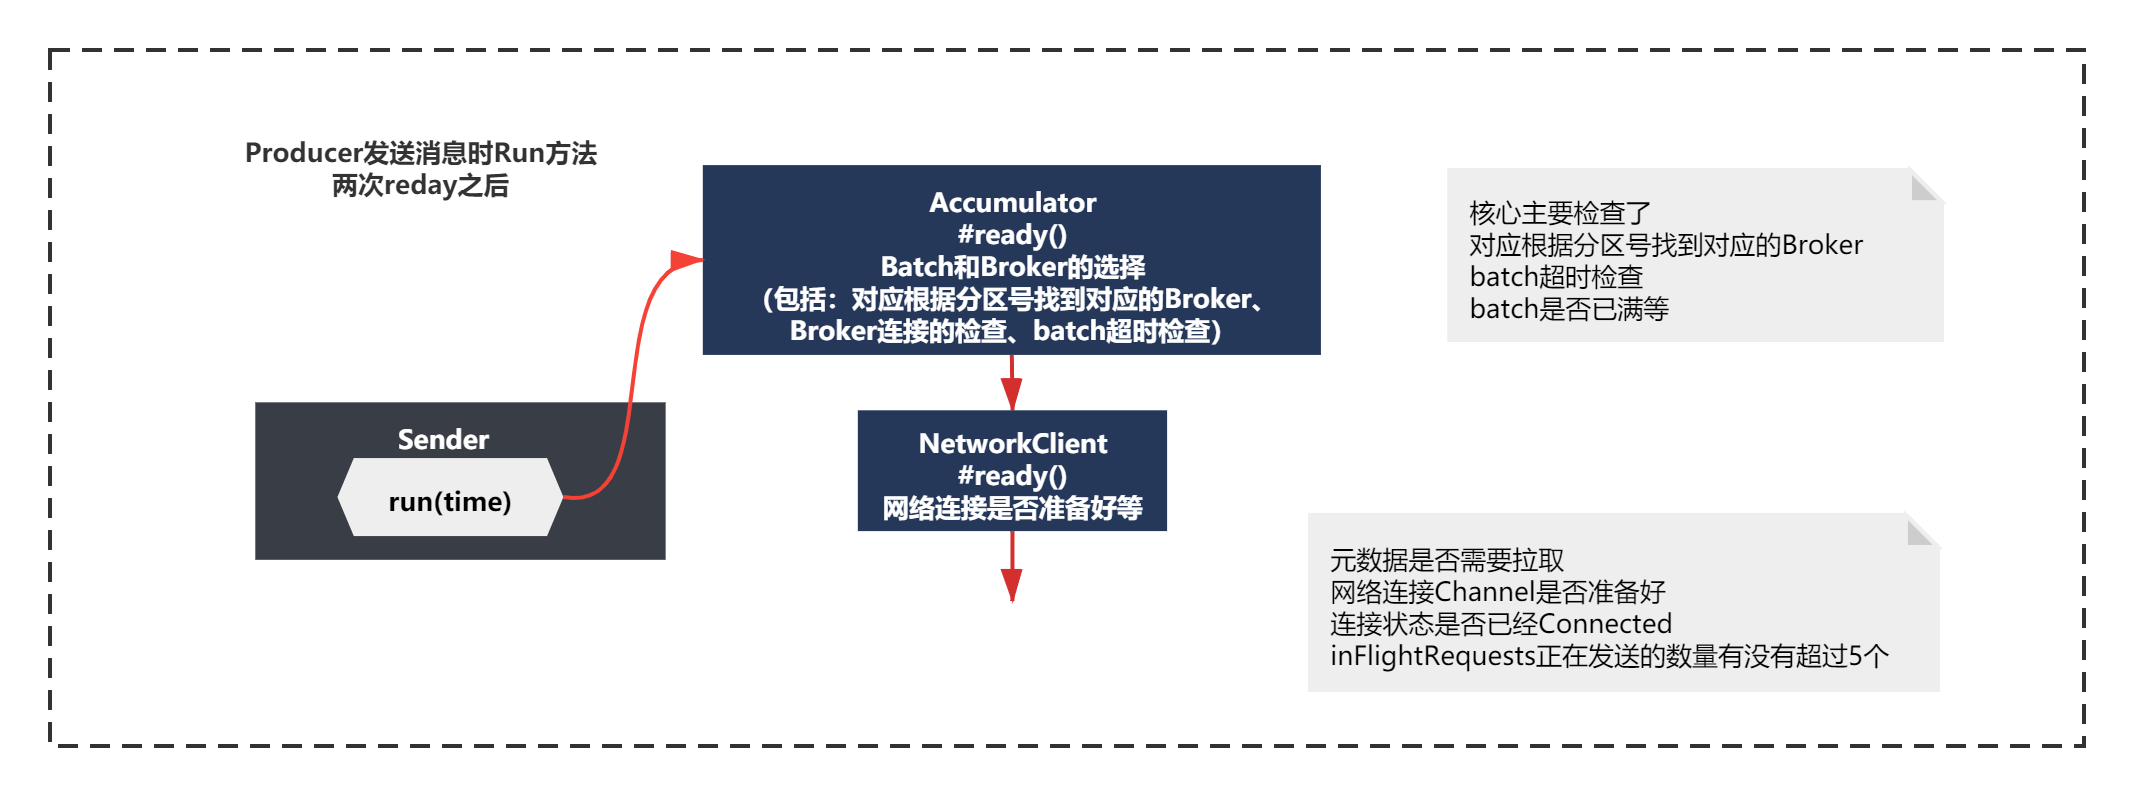
但是发送消息前要做一些检查,比如对应根据分区号找到对应的Broker、Broker连接的检查、batch超时检查等等。
 //Sender.java
  run(){
     // 第一次Ready
      RecordAccumulator.ReadyCheckResult result = this.accumulator.ready(cluster, now)
     //省略...
     client.poll();
  }

public ReadyCheckResult ready(Cluster cluster, long nowMs) {
        Set<Node> readyNodes = new HashSet<>();
        long nextReadyCheckDelayMs = Long.MAX_VALUE;
        boolean unknownLeadersExist = false;

        boolean exhausted = this.free.queued() > 0;
        for (Map.Entry<TopicPartition, Deque<RecordBatch>> entry : this.batches.entrySet()) {
            TopicPartition part = entry.getKey();
            Deque<RecordBatch> deque = entry.getValue();

            Node leader = cluster.leaderFor(part);
            if (leader == null) {
                unknownLeadersExist = true;
            } else if (!readyNodes.contains(leader) && !muted.contains(part)) {
                synchronized (deque) {
                    RecordBatch batch = deque.peekFirst();
                    if (batch != null) {
                        boolean backingOff = batch.attempts > 0 && batch.lastAttemptMs + retryBackoffMs > nowMs;
                        long waitedTimeMs = nowMs - batch.lastAttemptMs;
                        long timeToWaitMs = backingOff ? retryBackoffMs : lingerMs;
                        long timeLeftMs = Math.max(timeToWaitMs - waitedTimeMs, 0);
                        boolean full = deque.size() > 1 || batch.records.isFull();
                        boolean expired = waitedTimeMs >= timeToWaitMs;
                        boolean sendable = full || expired || exhausted || closed || flushInProgress();
                        if (sendable && !backingOff) {
                            readyNodes.add(leader);
                        } else {
                            // Note that this results in a conservative estimate since an un-sendable partition may have
                            // a leader that will later be found to have sendable data. However, this is good enough
                            // since we'll just wake up and then sleep again for the remaining time.
                            nextReadyCheckDelayMs = Math.min(timeLeftMs, nextReadyCheckDelayMs);
                        }
                    }
                }
            }
        }

        return new ReadyCheckResult(readyNodes, nextReadyCheckDelayMs, unknownLeadersExist);
    }
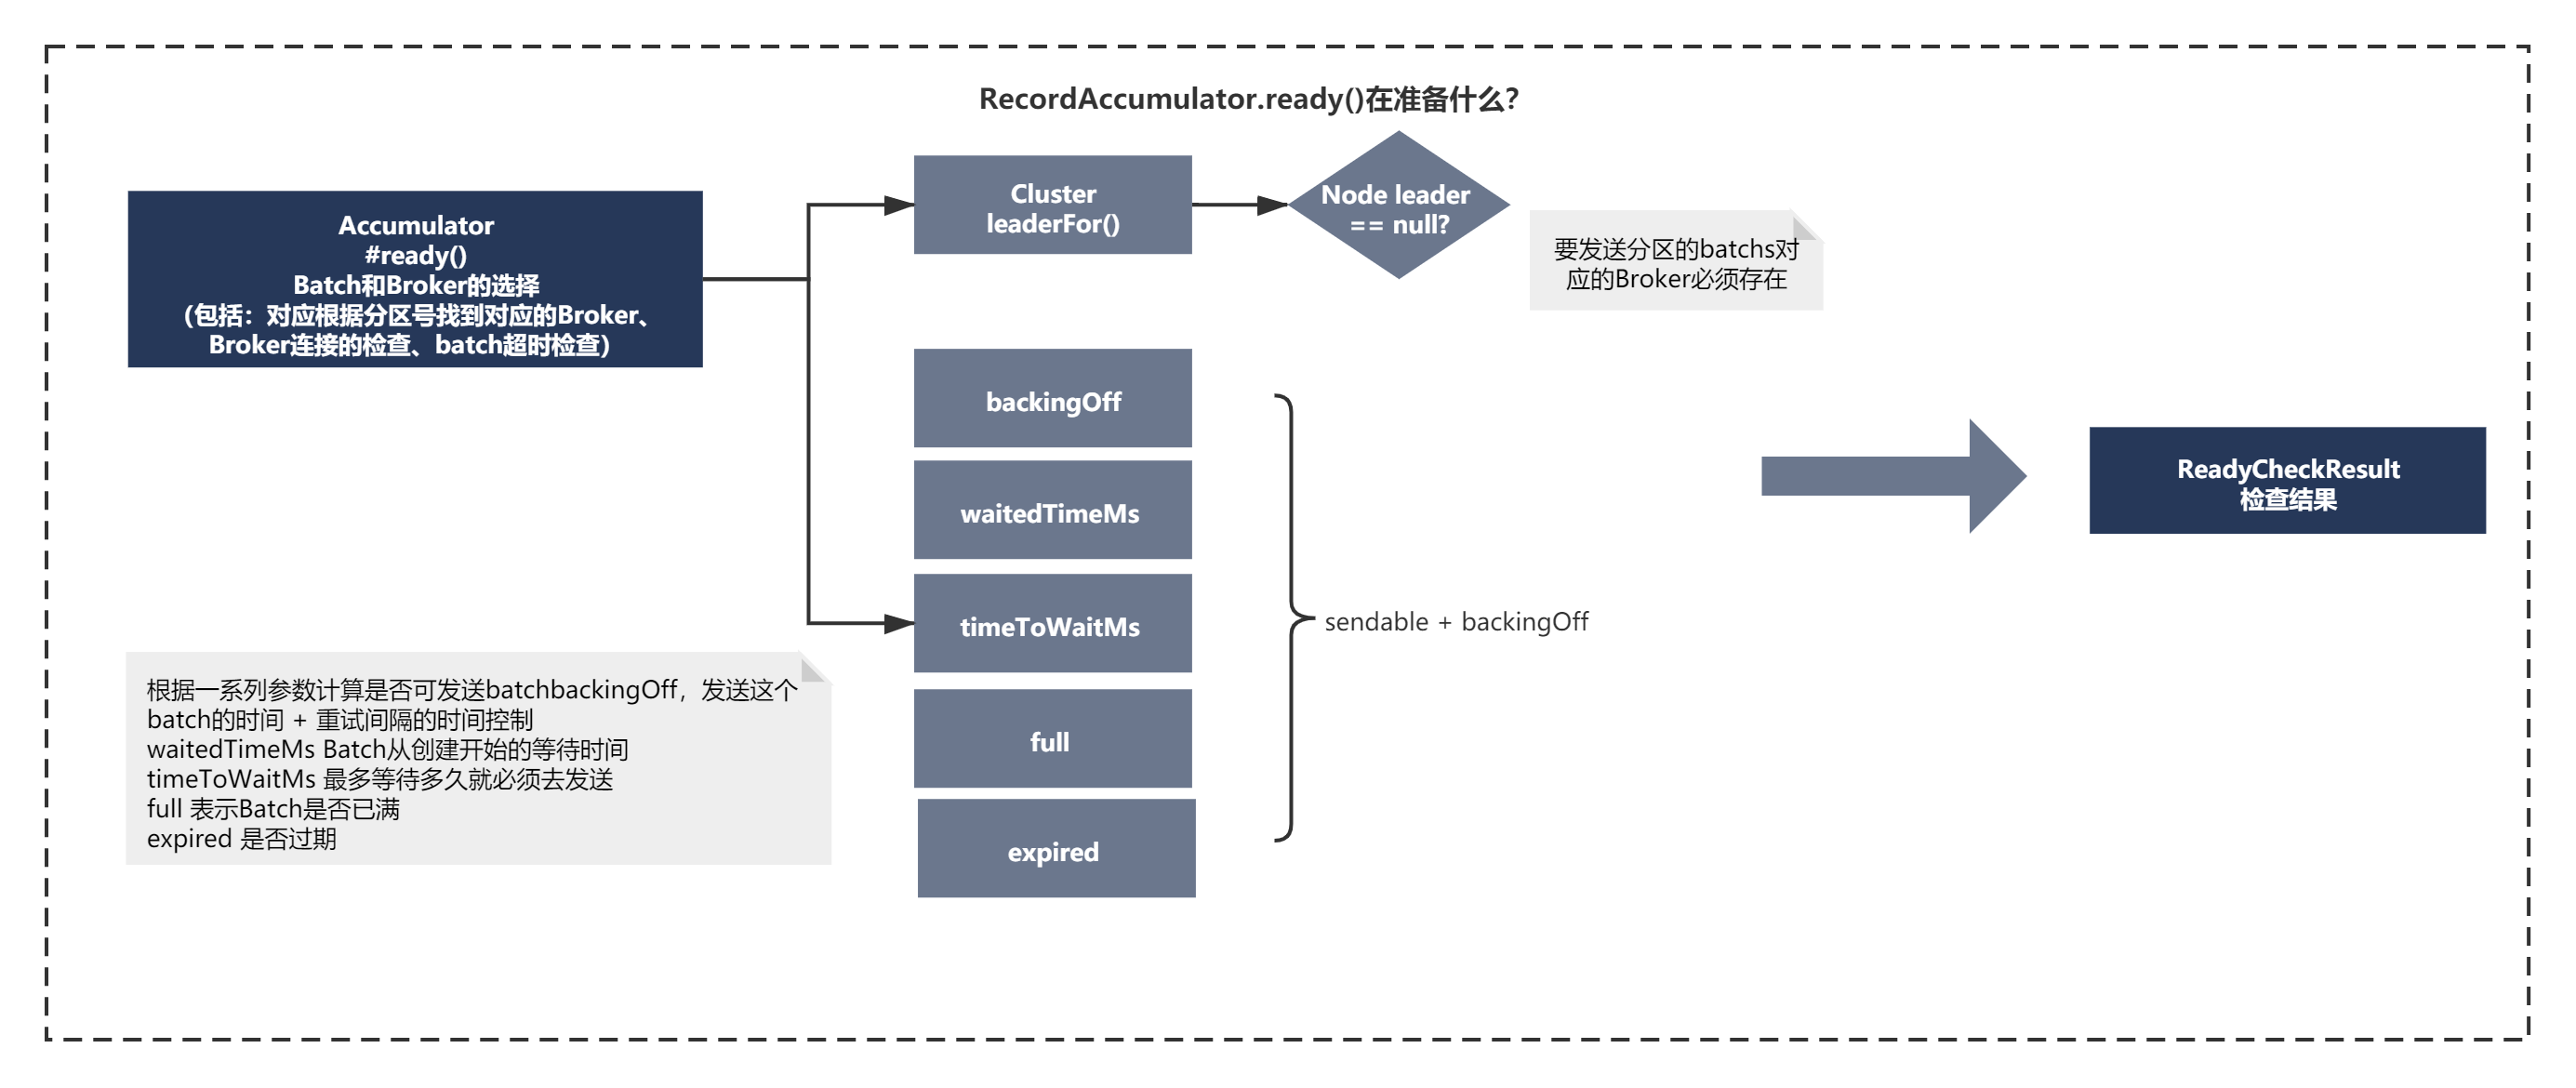
可以看到发送消息前的Accumulator.ready()主要的脉络就是:
通过遍历内存缓冲器中batches的这个内存集合,经过以一些判断,决定batch是否可以被发送。
1)第一个判断就是要发送分区的batchs对应的Broker必须存在。
2)如果leader存在,则计算一些条件,比如 :
backingOff,发送这个batch的时间 + 重试间隔的时间,是否大于了当前时间,默认是间隔是100ms,一般attempts是0,不重试。但是如果attempts>0,则重试时,过了间隔时间才可以发送batch。
waitedTimeMs 表示当前时间减去这个Batch被创建出来的那个时间,这个Batch从创建开始到现在已经等待了多久了
timeToWaitMs 这个Batch从创建开始算起,最多等待多久就必须去发送。如果重试阶段,这个时间就是重试间隔,但是在非重试的初始阶段,就是linger.ms的时间(100ms),就是到了100ms这个batch必须发送出去。
full 表示Batch是否已满,如果说Dequeue里超过一个Batch了,说明这个peekFirst返回的Batch就一定是已经满的,另外就是如果假设Dequeue里只有一个Batch,但是判断发现这个Batch达到了16kb的大小,也是已满的
expired 当前Batch已经等待的时间(120ms) >= Batch最多只能等待的时间(100ms),已经超出了linger.ms的时间范围了,否则呢,60ms < 100ms,此时就没有过期。如果linger.ms默认是0,就意味着说,只要Batch创建出来了,在这个地方一定是expired = true
最终上面的条件组合成一个条件:
boolean sendable = full || expired || exhausted || closed || flushInProgress()
条件成立,则将准备好的ReadyCheckResult数据返回,表明是否发送batch,并且发送到指明发送到哪一个Broker。
3)最后一点其实就是每次循环每个TopicPartition只是取出第一个batch,进行判断。如果一个都不满足条件,会取所有Partition中timeLeftMs最小的时间等待发送Batch。这算是尽可能快速的发送batch的优化的吧,这个细节其实大家可以不用在刻意记住,知道大体发送逻辑就够了,知道Kafka有一些优化和考量就够了。
上面过程 整体如下图所示:
核心主要检查了对应根据分区号找到对应的Broker、Broker连接的检查、batch超时检查等信息。
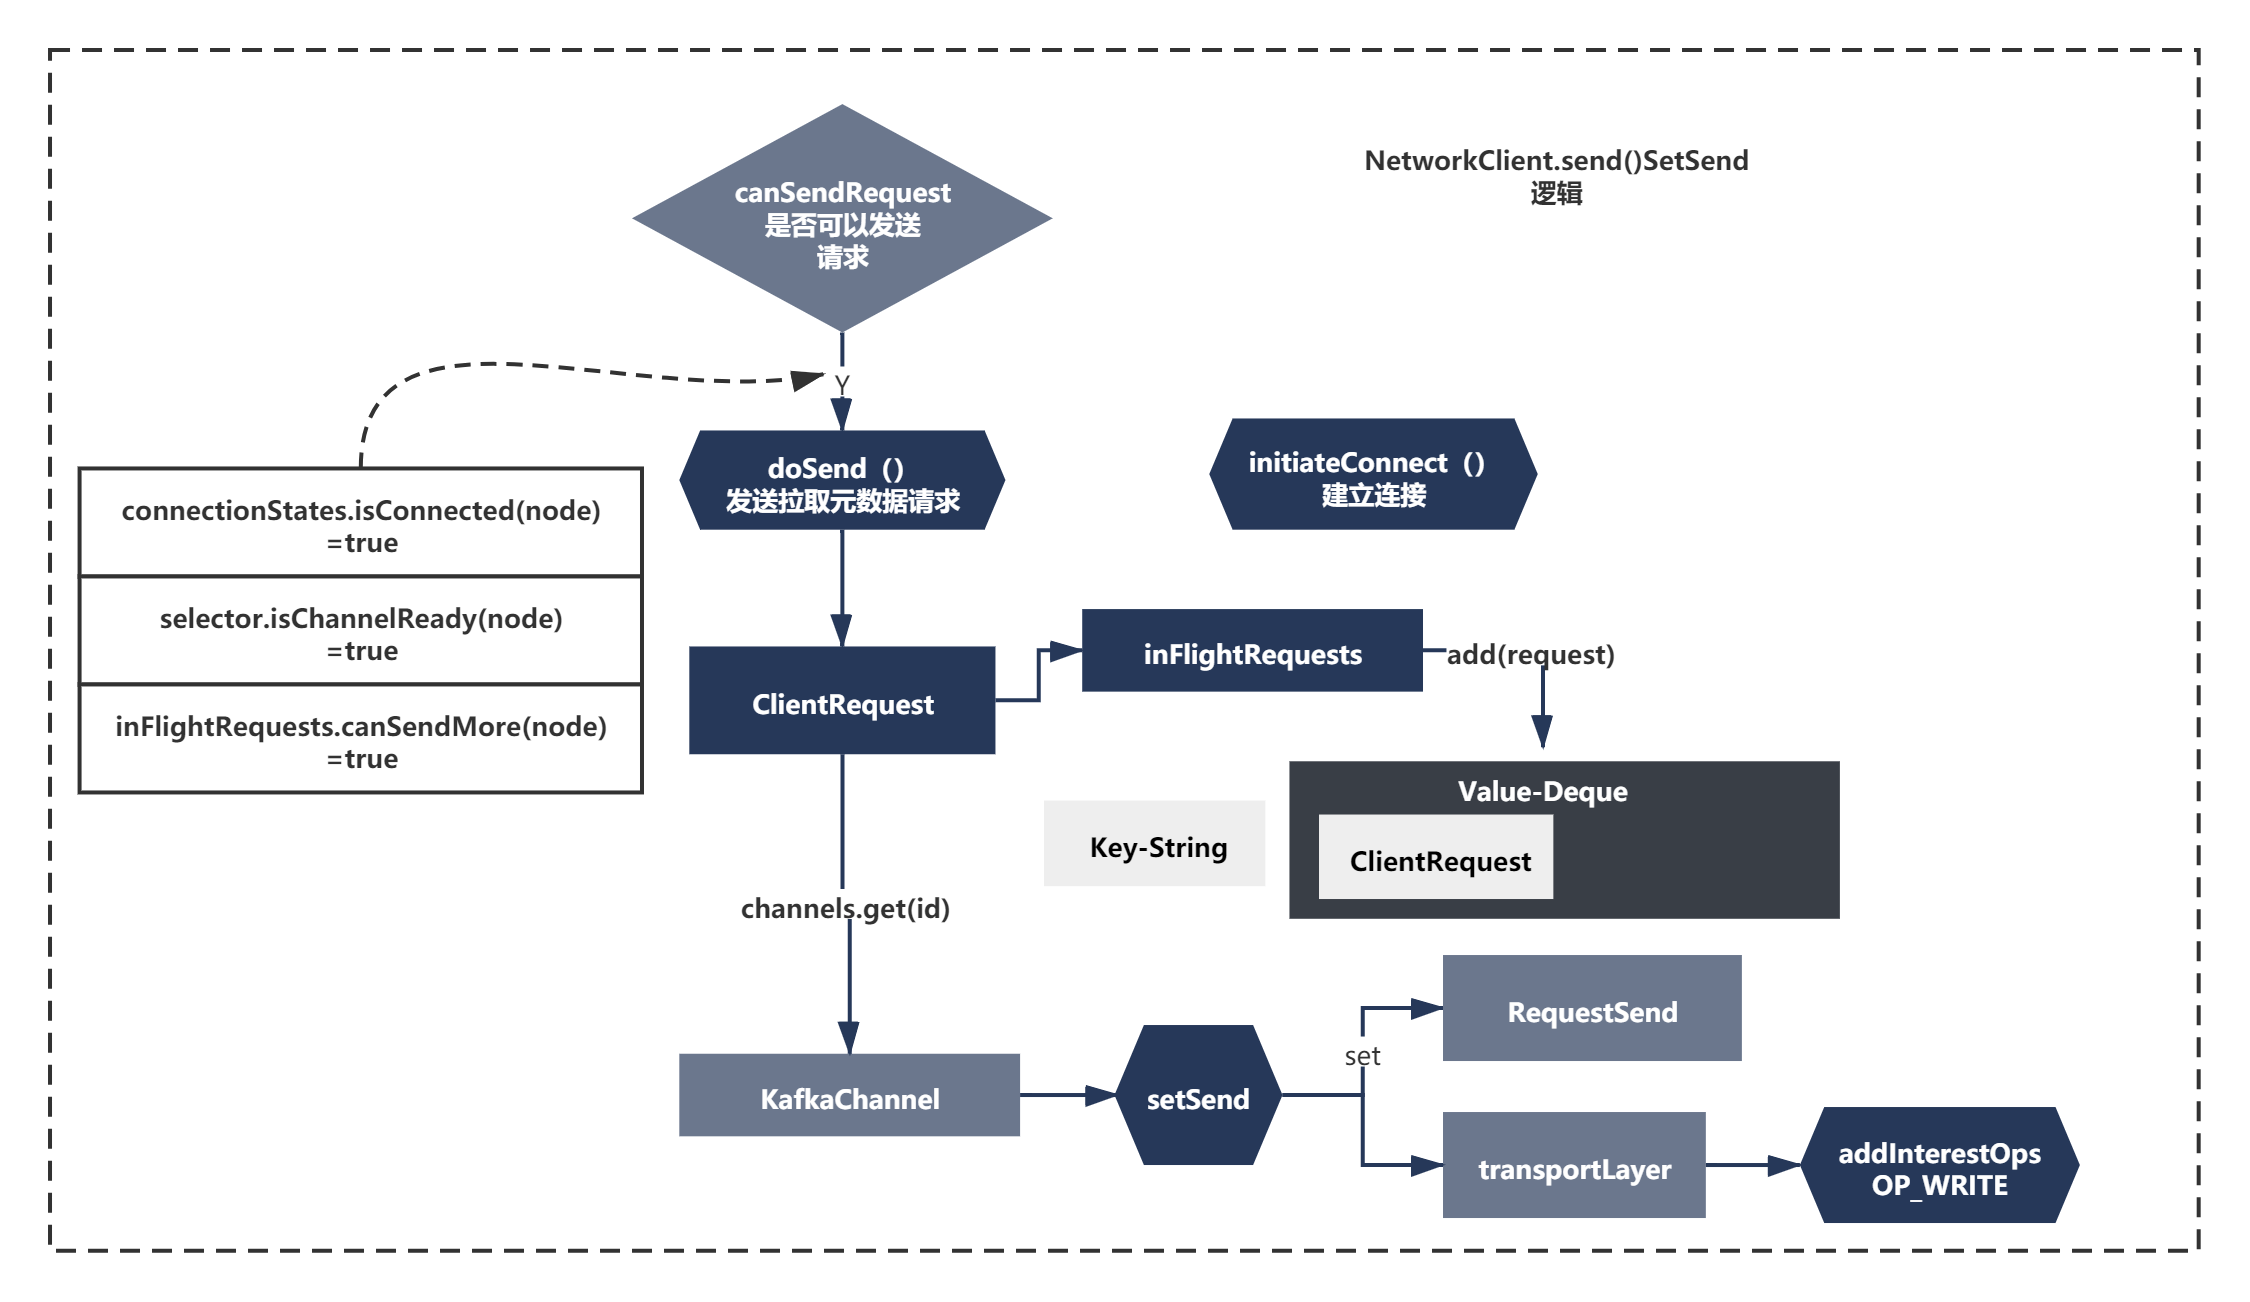
NetWorkClient.ready()在准备什么?
在run方法中,主要有两个ready,其中一个我们已经分析过了,另一个ready是在做什么呢?
其实从名字上看,当然是在准备网络连接了。代码如下:
 //Sender.java
  run(){
     // 第一次Ready
      RecordAccumulator.ReadyCheckResult result = this.accumulator.ready(cluster, now)
      //第二次ready
        Iterator<Node> iter = result.readyNodes.iterator();
        long notReadyTimeout = Long.MAX_VALUE;
        while (iter.hasNext()) {
            Node node = iter.next();
            if (!this.client.ready(node, now)) {
                iter.remove();
                notReadyTimeout = Math.min(notReadyTimeout, this.client.connectionDelay(node, now));
            }
        }
     //省略...
     client.poll();
  }

   @Override
    public boolean ready(Node node, long now) {
        if (node.isEmpty())
            throw new IllegalArgumentException("Cannot connect to empty node " + node);

        if (isReady(node, now))
            return true;

        if (connectionStates.canConnect(node.idString(), now))
            // if we are interested in sending to a node and we don't have a connection to it, initiate one
            initiateConnect(node, now);

        return false;
    }


    public boolean isReady(Node node, long now) {
        // if we need to update our metadata now declare all requests unready to make metadata requests first
        // priority
        return !metadataUpdater.isUpdateDue(now) && canSendRequest(node.idString());
    }


    private boolean canSendRequest(String node) {
        return connectionStates.isConnected(node) && selector.isChannelReady(node) && inFlightRequests.canSendMore(node);
    }
其实这里代码脉络很清晰,就是主要判断了:
元数据是否需要拉取+网络连接Channel是否准备好+连接状态是否已经Connected+inFlightRequests正在发送的数量有没有超过5个(这个inFlightRequests之前拉取元数据的原理中遇见过,每次通过NIO发送的请求,如果没有收到响应,inFlightRequests这里会记录正在发送的请求)
如果上述都准备好了,就可以发送batch了,如果没有准备好,该需要拉取元数据就拉取,该需要建立broker连接就建立,这个就没什么好说的了。
经过两次ready执行,Sender的run()方法执行如下图:
请求的准备Accumulator.drain()和ClientRequest创建
执行完两次ready,在之后就是Accumulator.drain()方法了。drain方法其实逻辑从注释上就能明显看出来。
 //Sender.java
  run(){
     // 第一次Ready accumulator.ready(cluster, now)
      //第二次Ready networkclient.ready
     // 请求的汇集 Accumulator.drain
      Map<Integer, List<RecordBatch>> batches =
       this.accumulator.drain(cluster,result.readyNodes,this.maxRequestSize,now);
     //省略...
     client.poll();
  }

/**
     * Drain all the data for the given nodes and collate them into a list of batches that will fit within the specified
     * size on a per-node basis. This method attempts to avoid choosing the same topic-node over and over.
     *
     * @param cluster The current cluster metadata
     * @param nodes The list of node to drain
     * @param maxSize The maximum number of bytes to drain
     * @param now The current unix time in milliseconds
     * @return A list of {@link RecordBatch} for each node specified with total size less than the requested maxSize.
     */
    public Map<Integer, List<RecordBatch>> drain(Cluster cluster,
                                                 Set<Node> nodes,
                                                 int maxSize,
                                                 long now) {
        if (nodes.isEmpty())
            return Collections.emptyMap();

        Map<Integer, List<RecordBatch>> batches = new HashMap<>();
        for (Node node : nodes) {
            int size = 0;
            List<PartitionInfo> parts = cluster.partitionsForNode(node.id());
            List<RecordBatch> ready = new ArrayList<>();
            /* to make starvation less likely this loop doesn't start at 0 */
            int start = drainIndex = drainIndex % parts.size();
            do {
                PartitionInfo part = parts.get(drainIndex);
                TopicPartition tp = new TopicPartition(part.topic(), part.partition());
                // Only proceed if the partition has no in-flight batches.
                if (!muted.contains(tp)) {
                    Deque<RecordBatch> deque = getDeque(new TopicPartition(part.topic(), part.partition()));
                    if (deque != null) {
                        synchronized (deque) {
                            RecordBatch first = deque.peekFirst();
                            if (first != null) {
                                boolean backoff = first.attempts > 0 && first.lastAttemptMs + retryBackoffMs > now;
                                // Only drain the batch if it is not during backoff period.
                                if (!backoff) {
                                    if (size + first.records.sizeInBytes() > maxSize && !ready.isEmpty()) {
                                        // there is a rare case that a single batch size is larger than the request size due
                                        // to compression; in this case we will still eventually send this batch in a single
                                        // request
                                        break;
                                    } else {
                                        RecordBatch batch = deque.pollFirst();
                                        batch.records.close();
                                        size += batch.records.sizeInBytes();
                                        ready.add(batch);
                                        batch.drainedMs = now;
                                    }
                                }
                            }
                        }
                    }
                }
                this.drainIndex = (this.drainIndex + 1) % parts.size();
            } while (start != drainIndex);
            batches.put(node.id(), ready);
        }
        return batches;
    }
结合注释和整体脉络,就是一个基于之前ready好的Node(broker)的列表的for循环。我们可以得出如下结论:
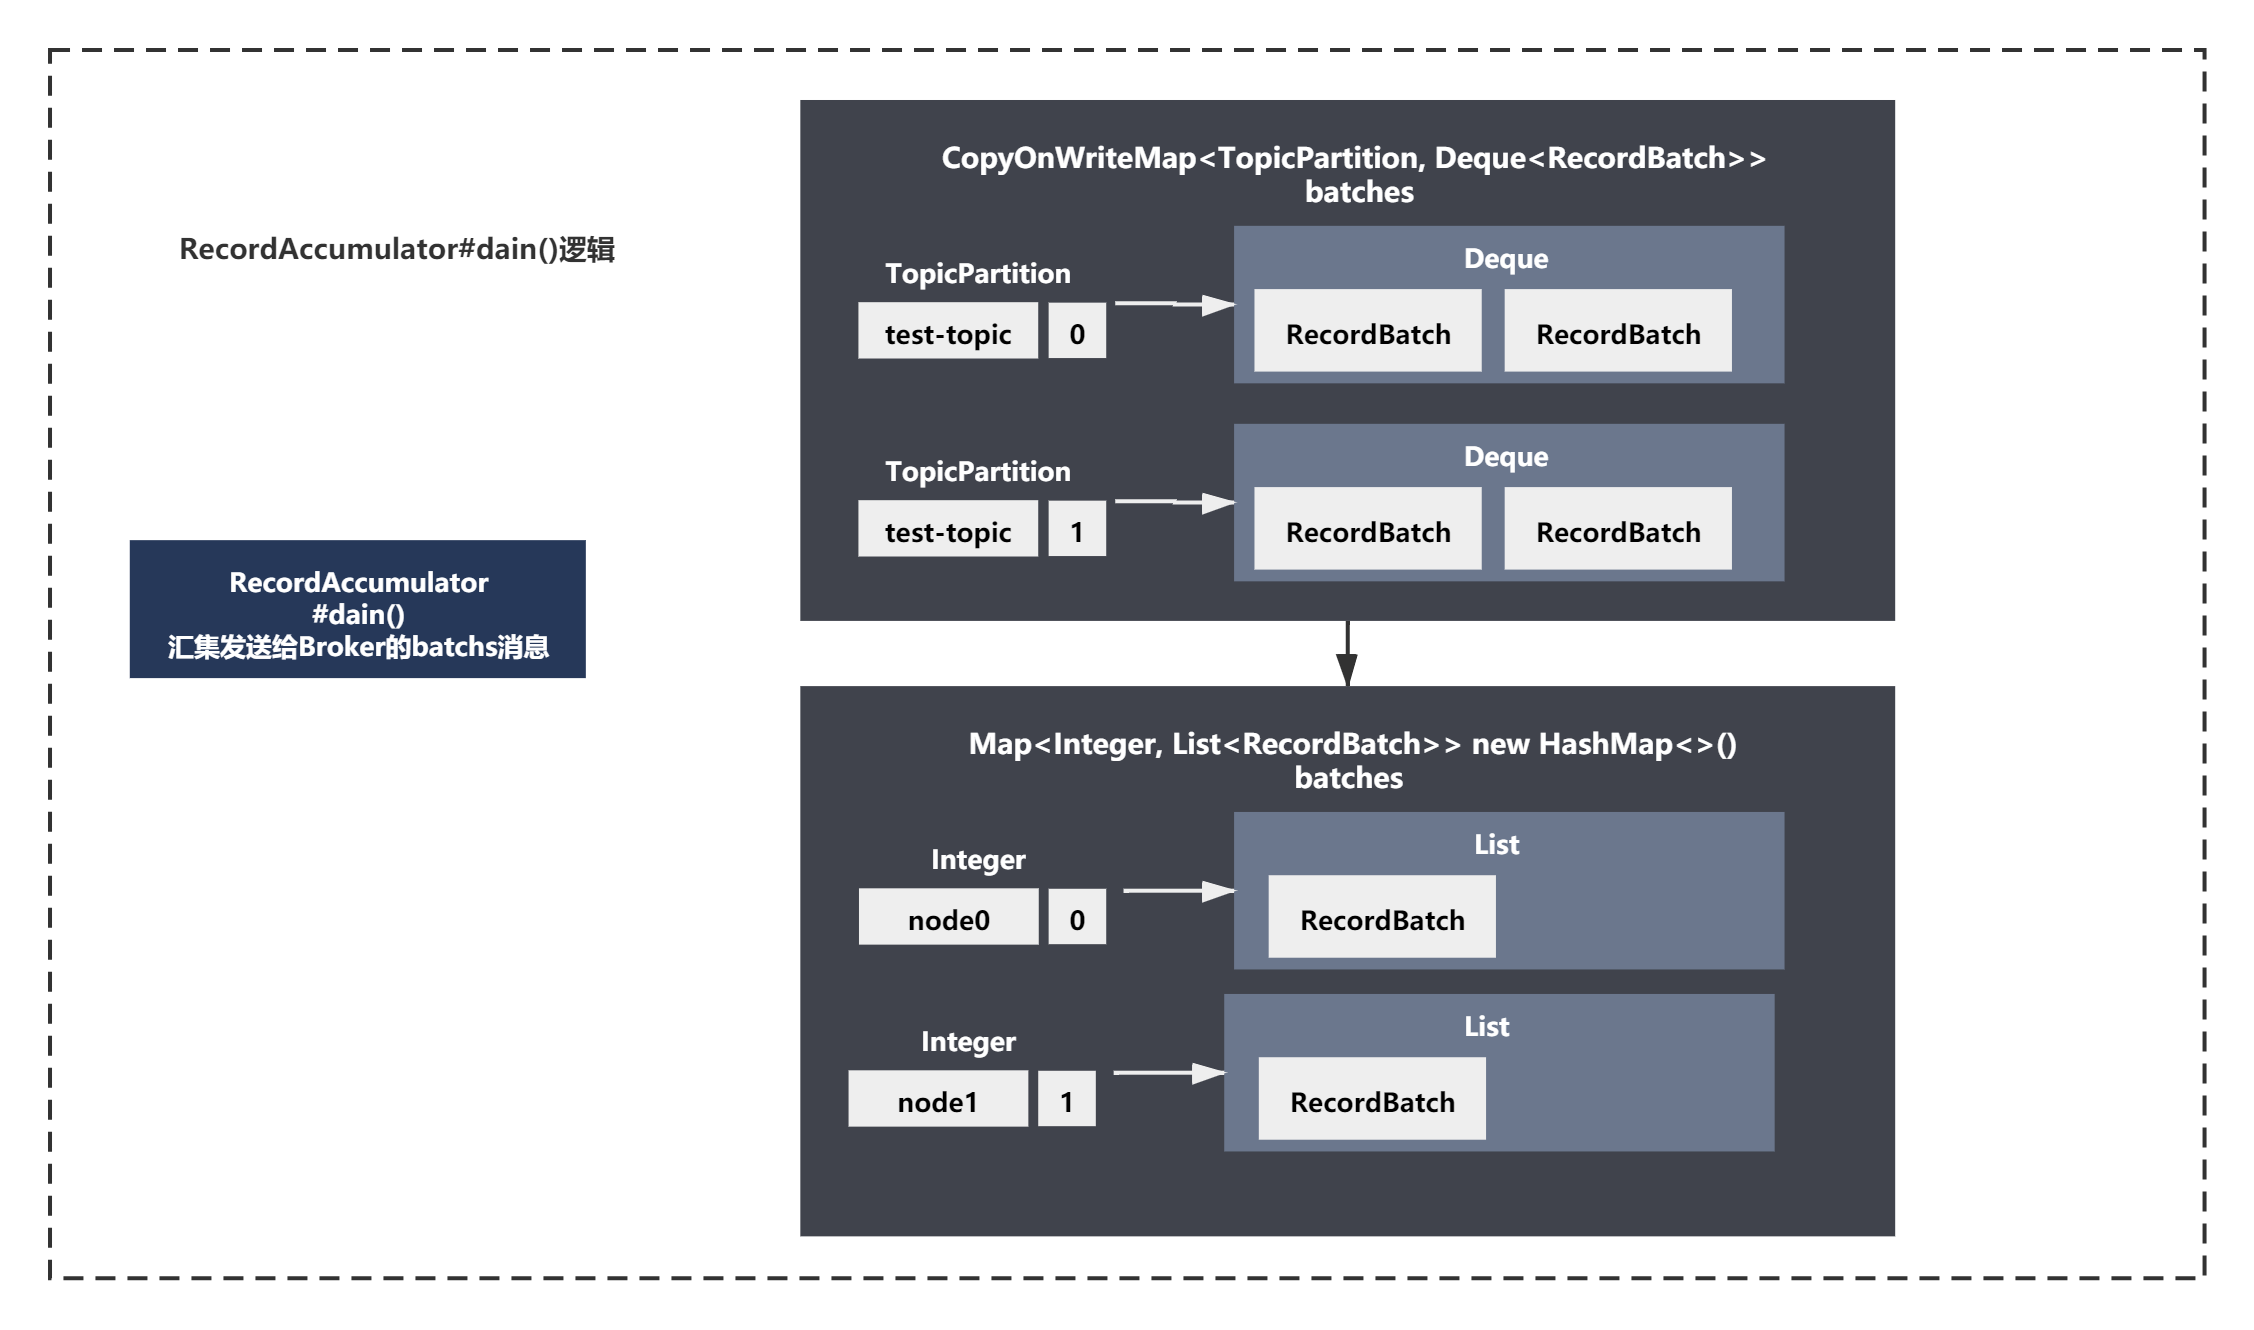
由于默认我们是按照topic-partition的结构记录batch消息的,为了确认每一个Broker需要发送那些partition中的batchs消息,需要基于Node组装好Batchs,而不是基于topic组装好baths。
Accumulator.drain()就是这件事的,获取broker上所有的partition,遍历broker上的所有的partitions,对每个partition获取到dequeue里的first batch,放入待发送到broker的列表里,每个broker都有一个batches列表,形成一个map记录下来。key是brokerId,value是batches列表。
整体如下图所示:
2次ready之后,drain汇集数据之后,主要进行是batchs请求的最终构建,createClientRequest。
 //Sender.java
  run(){
     // 2次Ready、drain之后
     // createProduceRequests操作
     List<ClientRequest> requests = createProduceRequests(batches, now);
     //省略...
     client.poll()
  }

   /**
     * Transfer the record batches into a list of produce requests on a per-node basis
     */
    private List<ClientRequest> createProduceRequests(Map<Integer, List<RecordBatch>> collated, long now) {
        List<ClientRequest> requests = new ArrayList<ClientRequest>(collated.size());
        for (Map.Entry<Integer, List<RecordBatch>> entry : collated.entrySet())
            requests.add(produceRequest(now, entry.getKey(), acks, requestTimeout, entry.getValue()));
        return requests;
    }

  /**
     * Create a produce request from the given record batches
     */
    private ClientRequest produceRequest(long now, int destination, short acks, int timeout, List<RecordBatch> batches) {
        Map<TopicPartition, ByteBuffer> produceRecordsByPartition = new HashMap<TopicPartition, ByteBuffer>(batches.size());
        final Map<TopicPartition, RecordBatch> recordsByPartition = new HashMap<TopicPartition, RecordBatch>(batches.size());
        for (RecordBatch batch : batches) {
            TopicPartition tp = batch.topicPartition;
            produceRecordsByPartition.put(tp, batch.records.buffer());
            recordsByPartition.put(tp, batch);
        }
        ProduceRequest request = new ProduceRequest(acks, timeout, produceRecordsByPartition);
        RequestSend send = new RequestSend(Integer.toString(destination),
                                           this.client.nextRequestHeader(ApiKeys.PRODUCE),
                                           request.toStruct());
        RequestCompletionHandler callback = new RequestCompletionHandler() {
            public void onComplete(ClientResponse response) {
                handleProduceResponse(response, recordsByPartition, time.milliseconds());
            }
        };

        return new ClientRequest(now, acks != 0, send, callback);
    }
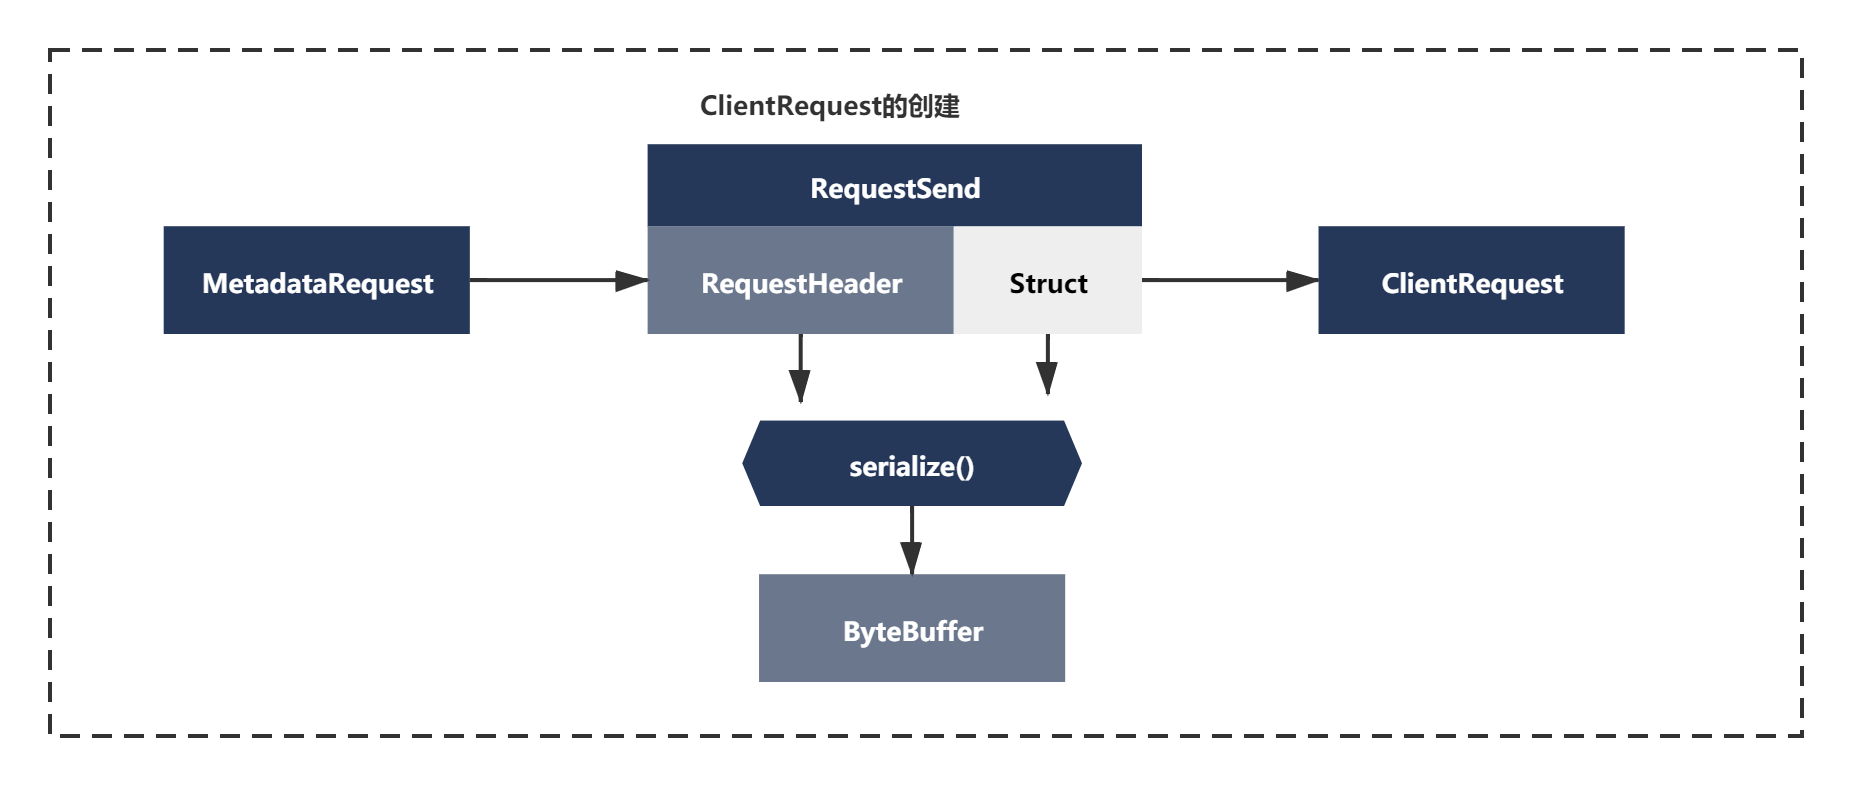
我们想要发送消息肯定不是直接吧batchs这个List发送出去,最终还是要进行一个简单封装的。你还记拉取元数据的请求是怎么封装的么?
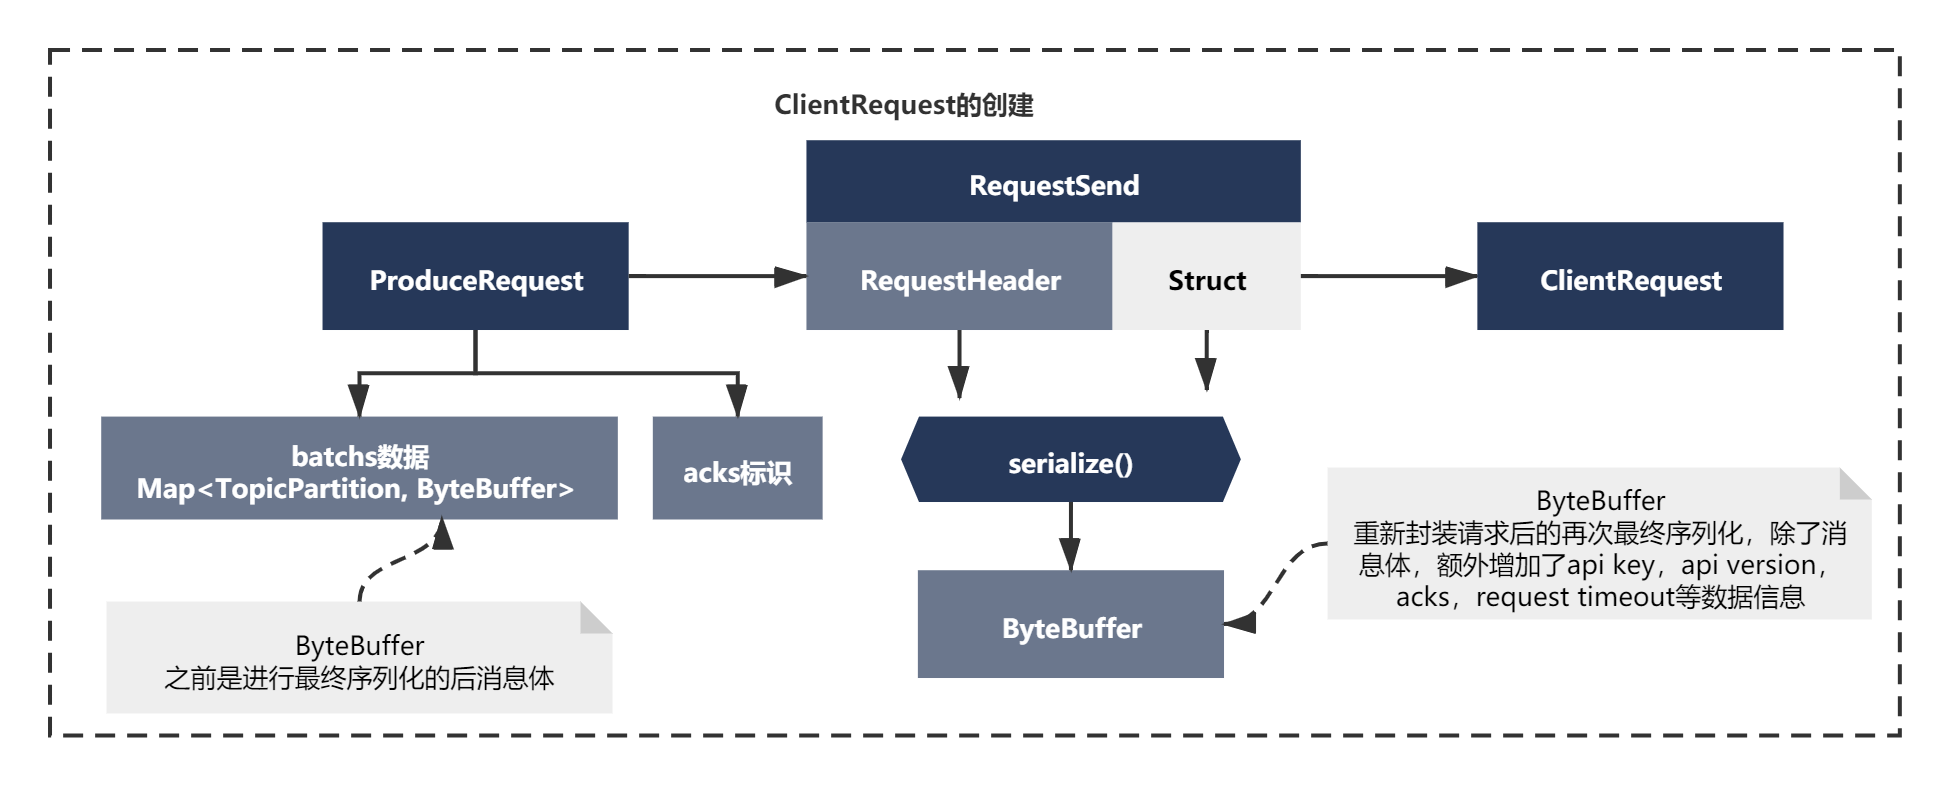
可以看到是有一套封装请求逻辑的。同理这里发送消息时也是类似的, 之前我们序列化好的RecordBatch消息,本质还是ByteBuffer,这里通过一系列对象再次补充了一些新主要是额外增加了api key,api version,acks,request timeout等数据信息。如下图所示:
最后的准备setSend()
最后准备是一次setSend的操作,上面一系列准备后,连接准备好了,请求也准备好了,都ok之后,由于现在唤醒了Selector,按照NIO的通信机制,接着我们需要将SelectKey的Ops操作更新为Wirte,表示需要写数据给Broker,接着进行write操作即可。所以这里会执行一次setSend操作,代码主要如下:
 //Sender.java
  run(){
     // 2次Ready、drain、createClientRequest之后
     // setSend操作
     for (ClientRequest request : requests)
       client.send(request, now);
     //省略...
     client.poll();
  }

    public void send(ClientRequest request, long now) {
        String nodeId = request.request().destination();
        if (!canSendRequest(nodeId))
            throw new IllegalStateException("Attempt to send a request to node " + nodeId + " which is not ready.");
        doSend(request, now);
    }

    private void doSend(ClientRequest request, long now) {
        request.setSendTimeMs(now);
        this.inFlightRequests.add(request);
        selector.send(request.request());
    }
//org.apache.kafka.common.network.Selecotor.java
    public void send(Send send) {
        KafkaChannel channel = channelOrFail(send.destination());
        try {
            channel.setSend(send);
        } catch (CancelledKeyException e) {
            this.failedSends.add(send.destination());
            close(channel);
        }
    }
// org.apache.kafka.common.network.KafkaChannel
    public void setSend(Send send) {
        if (this.send != null)
            throw new IllegalStateException("Attempt to begin a send operation with prior send operation still in progress.");
        this.send = send;
        this.transportLayer.addInterestOps(SelectionKey.OP_WRITE);
    }
这个过程和之前发送元数据拉取请求是类似的,你应该很有些熟悉,可以见《Kafka成长记4发送元数据拉取请求》。
整体如下图所示:
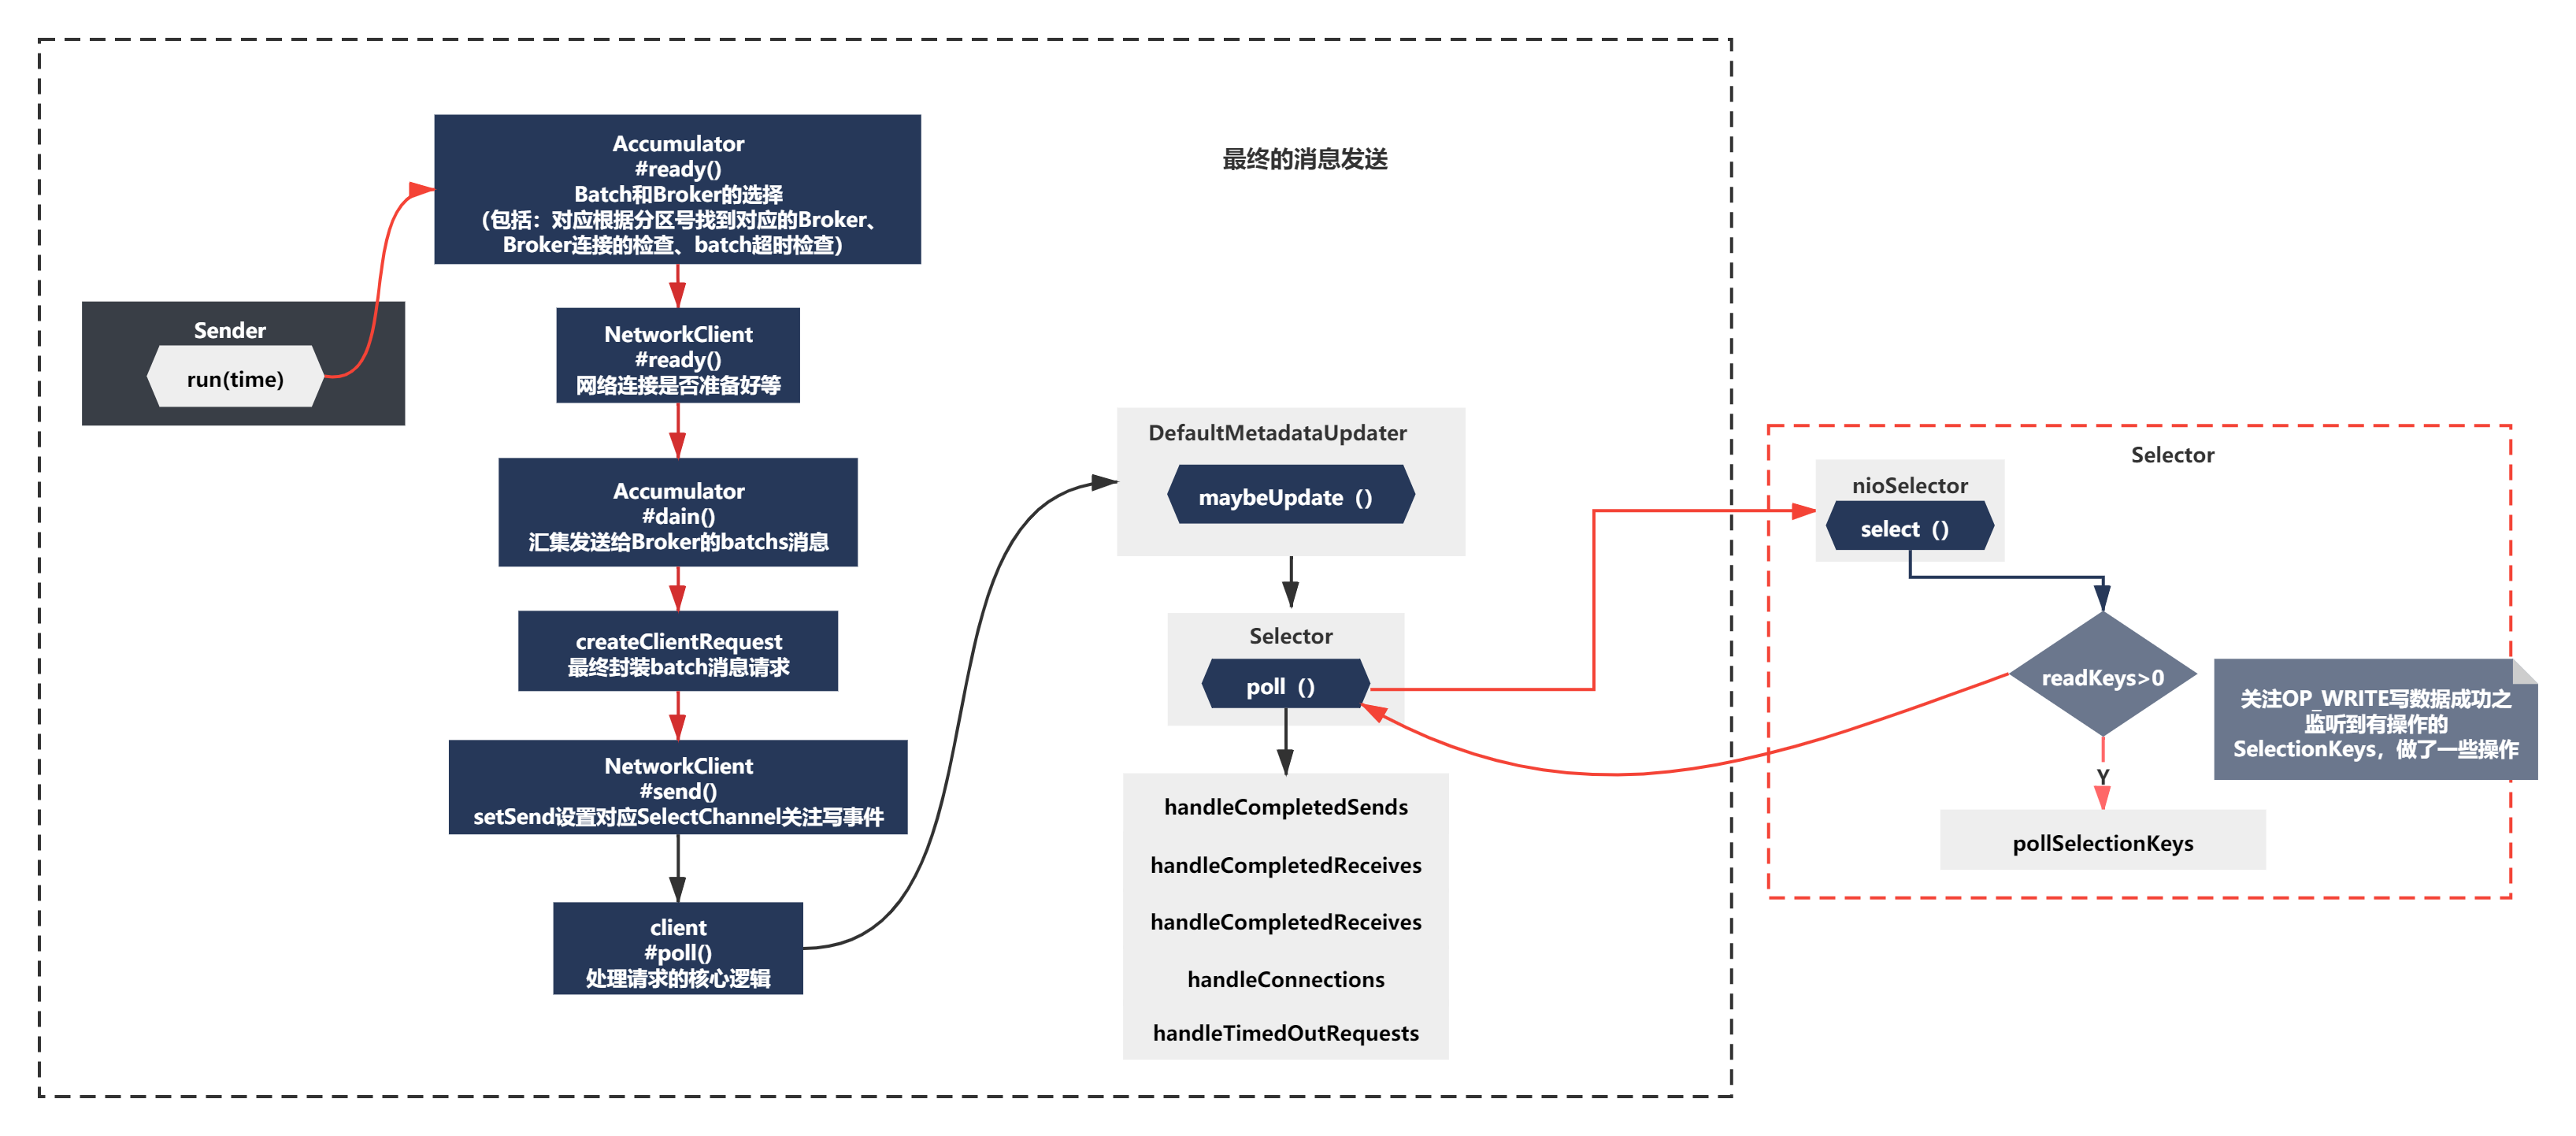
最终的消息发送
经过前面一系列准备,2次的reday、drain、clientRequest的创建,setSend设置对应SelectChannel关注写事件这些一系列准备都ok后,终于要执行到消息发送了。
其实有了之前发送元数据的经验,最终我们肯定是通过poolSelectKey->之后Handle类的方法处理的。
1)首先发送消息的写请求,其实就是依托inFlightRequests去暂存了正在发送的Request,通过channel.write写数据出去,之后执行handleCompletedSend方法
2)当消息发送成功后,取消对OP_WRITE事件的关注,会接受到返回信息进行handreceives方法,否则如果一个Request的数据都没发送完毕,此时还需要保持对OP_WRITE事件的关注,关注NIO里的OP_READ事件呢key.interestOps(key.interestOps() & ~SelectionKey.OP_CONNECT | SelectionKey.OP_READ);
(具体代码逻辑就是在对应的handle方法,比较简单,我就不展开带大家看了,之后下一节讲解粘包拆包的时候会再次研究这块逻辑的)
整个过程大体如下图所示:
小结
最后,到这里Kafka内存缓冲区中的消息最终如何发送出去的就带大家一起研究明白了。
其实之前9节内容都比较干货,讲解的比较细致,不能说算是精读源码,但是肯定是Kafka的核心源码都摸透了。
《Kafka Producer篇》预计还有几节就结束了
我是繁茂,我们下一节见~
这篇关于Kafka成长记9:Kafka内存缓冲区中的消息最终如何发送出去的?的文章就介绍到这儿,希望我们推荐的文章对大家有所帮助,也希望大家多多支持为之网!
- 2024-12-21MQ-2烟雾传感器详解
- 2024-12-09Kafka消息丢失资料:新手入门指南
- 2024-12-07Kafka消息队列入门:轻松掌握Kafka消息队列
- 2024-12-07Kafka消息队列入门:轻松掌握消息队列基础知识
- 2024-12-07Kafka重复消费入门:轻松掌握Kafka消费的注意事项与实践
- 2024-12-07Kafka重复消费入门教程
- 2024-12-07RabbitMQ入门详解:新手必看的简单教程
- 2024-12-07RabbitMQ入门:新手必读教程
- 2024-12-06Kafka解耦学习入门教程
- 2024-12-06Kafka入门教程:快速上手指南


