小白入门学习Nginx代理服务器?看这篇最新Nginx进阶学习最佳配置实践指南就OK了
2022/4/16 3:14:07
本文主要是介绍小白入门学习Nginx代理服务器?看这篇最新Nginx进阶学习最佳配置实践指南就OK了,对大家解决编程问题具有一定的参考价值,需要的程序猿们随着小编来一起学习吧!
0x00 编译实践
描述:在企业线上生产环境中推荐进行Nginx编译安装,可以按照业务侧重点进行相应 Nginx 编译参数配置,所以编译参数不是功能加的越多越好,应该尽可能少编译模块不用的最好不要加入,本小结将以最新的Nginx版本以及依赖版本进行编译演示。
Nginx-1.21.6+OpenSSL-1.1.1n
最新源码构建安装整理,当前最新版本nginx-1.21.6,实践时间【2022年3月24日】
版本说明: pcre-8.45 、zlib-1.2.11、openssl-1.1.1n、nginx-1.21.6。
官方安装参考地址: https://docs.nginx.com/nginx/admin-guide/installing-nginx/installing-nginx-open-source/#downloading-the-sources
步骤 01.在从源代码编译 NGINX Open Source 之前,您需要为其依赖项安装库:
- PCRE – 支持正则表达式,NGINX Core 和 Rewrite 模块需要。
# http://pcre.org/
# https://sourceforge.net/projects/pcre/files/
wget -c https://nchc.dl.sourceforge.net/project/pcre/pcre/8.45/pcre-8.45.tar.bz2
tar -jxf pcre-8.45.tar.bz2 && cd pcre-8.45
./configure
make  && sudo make install
- zlib – 支持标头压缩, NGINX Gzip 模块需要。
# http://www.zlib.net/
wget -c http://zlib.net/zlib-1.2.11.tar.gz
tar -zxf zlib-1.2.11.tar.gz && cd zlib-1.2.11
./configure
make && sudo make install
- OpenSSL – 支持 HTTPS 协议, NGINX SSL 模块和其他模块需要。
# https://www.openssl.org/source/
wget -c http://www.openssl.org/source/openssl-1.1.1n.tar.gz
tar -zxf openssl-1.1.1n.tar.gz && cd openssl-1.1.1n
./config --prefix=/usr/local/openssl
make && sudo make install
# lib 库加载到系统
echo "/usr/local/openssl/lib" >> /etc/ld.so.conf.d/libc.conf
ldconfig
# 可以看到当下系统的Openssl版本已经更新到最新
# root@weiyigeek-top:/usr/local/openssl/bin# openssl version
# OpenSSL 1.1.1n  15 Mar 2022
步骤 02.从 nginx.org 下载稳定版和主线版本的源代码文件,要下载并解压最新主线版本的源代码,请运行:
# https://nginx.org
sudo mkdir -vp /usr/local/nginx/module /usr/lib/nginx/modules /var/cache/nginx/{client_temp,proxy_temp,fastcgi_temp,uwsgi_temp,scgi_temp}
wget https://nginx.org/download/nginx-1.21.6.tar.gz
tar zxf nginx-1.21.6.tar.gz && cd nginx-1.21.6
$ ./configure \
--prefix=/usr/local/nginx \
--with-pcre=../pcre-8.45 \
--with-zlib=../zlib-1.2.11 \
--user=ubuntu --group=ubuntu \
--sbin-path=/usr/sbin/nginx \
--conf-path=/usr/local/nginx/nginx.conf \
--pid-path=/usr/local/nginx/nginx.pid \
--error-log-path=/var/log/nginx/error.log \
--http-log-path=/var/log/nginx/access.log \
--lock-path=/var/run/nginx.lock \
--modules-path=/usr/lib/nginx/modules \
--http-client-body-temp-path=/var/cache/nginx/client_temp \
--http-proxy-temp-path=/var/cache/nginx/proxy_temp \
--http-fastcgi-temp-path=/var/cache/nginx/fastcgi_temp \
--http-uwsgi-temp-path=/var/cache/nginx/uwsgi_temp \
--http-scgi-temp-path=/var/cache/nginx/scgi_temp \
--with-stream --with-stream_realip_module --with-stream_ssl_module --with-stream_ssl_preread_module --with-stream_geoip_module \
--with-threads --with-mail --with-mail_ssl_module \
--with-http_addition_module --with-http_auth_request_module --with-http_dav_module --with-http_flv_module --with-http_gunzip_module \
--with-http_gzip_static_module --with-http_mp4_module --with-http_random_index_module --with-http_realip_module --with-http_secure_link_module \
--with-http_slice_module --with-http_ssl_module --with-http_stub_status_module --with-http_sub_module --with-http_v2_module \
--with-compat --with-file-aio \
--with-cc-opt='-Os -fomit-frame-pointer -g' --with-ld-opt=-Wl,--as-needed,-O1,--sort-common
# <!-- --add-dynamic-module=/usr/local/nginx/module -->
Tips :请注意 geoip_module 模块, 如果需要使用则需要提前安装好 GeoIP library,例如在Ubuntu系统上执行apt-get install libgeoip-dev如下命令。
Tips : 请注意 通过yum或者apt安装的nginx,通常会将nginx的配置文件放在/etc/nginx,而手动编译构建的一般是在 /usr/local/nginx 目录中。
步骤 03.执行./configure命令后的结果如下
Configuration summary
  + using threads
  + using PCRE library: ../pcre-8.45
  + using system OpenSSL library
  + using zlib library: ../zlib-1.2.11

  nginx path prefix: "/usr/local/nginx"
  nginx binary file: "/usr/sbin/nginx"
  nginx modules path: "/usr/lib/nginx/modules"
  nginx configuration prefix: "/usr/local/nginx"
  nginx configuration file: "/usr/local/nginx/nginx.conf"
  nginx pid file: "/usr/local/nginx/nginx.pid"
  nginx error log file: "/var/log/nginx/error.log"
  nginx http access log file: "/var/log/nginx/access.log"
  nginx http client request body temporary files: "/var/cache/nginx/client_temp"
  nginx http proxy temporary files: "/var/cache/nginx/proxy_temp"
  nginx http fastcgi temporary files: "/var/cache/nginx/fastcgi_temp"
  nginx http uwsgi temporary files: "/var/cache/nginx/uwsgi_temp"
  nginx http scgi temporary files: "/var/cache/nginx/scgi_temp"
步骤 04.执行构建安装后查看nginx版本以及构建参数等信息
$ nginx -V
nginx version: nginx/1.21.6
built by gcc 9.4.0 (Ubuntu 9.4.0-1ubuntu1~20.04)
built with OpenSSL 1.1.1n  15 Mar 2022
TLS SNI support enabled
  configure arguments: --prefix=/usr/local/nginx --with-pcre=../pcre-8.45 --with-zlib=../zlib-1.2.11 --user=ubuntu --group=ubuntu --sbin-path=/usr/sbin/nginx --conf-path=/usr/local/nginx/nginx.conf --pid-path=/usr/local/nginx/nginx.pid --error-log-path=/var/log/nginx/error.log --http-log-path=/var/log/nginx/access.log --lock-path=/var/run/nginx.lock --modules-path=/usr/lib/nginx/modules --http-client-body-temp-path=/var/cache/nginx/client_temp --http-proxy-temp-path=/var/cache/nginx/proxy_temp --http-fastcgi-temp-path=/var/cache/nginx/fastcgi_temp --http-uwsgi-temp-path=/var/cache/nginx/uwsgi_temp --http-scgi-temp-path=/var/cache/nginx/scgi_temp --with-stream --with-stream_realip_module --with-stream_ssl_module --with-stream_ssl_preread_module --with-stream_geoip_module --with-threads --with-mail --with-mail_ssl_module --with-http_addition_module --with-http_auth_request_module --with-http_dav_module --with-http_flv_module --with-http_gunzip_module --with-http_gzip_static_module --with-http_mp4_module --with-http_random_index_module --with-http_realip_module --with-http_secure_link_module --with-http_slice_module --with-http_ssl_module --with-http_stub_status_module --with-http_sub_module --with-http_v2_module --with-compat --with-file-aio --with-cc-opt='-Os -fomit-frame-pointer -g' --with-ld-opt=-Wl,--as-needed,-O1,--sort-common
步骤 05.执行/usr/sbin/nginx命令, 启用nginx服务并查看提供的服务。
# 查看Nginx并发进程数
$ ps -ef | grep nginx | grep -v "grep" | wc -l
3
Nginx编译(configure) 参数一览
描述: 我们可以执行./configure --help便可以查看编译相关参数。
# 常用选项 #
--prefix= #指向安装目录
--user= #指定程序运行时的非特权用户
--group= #指定程序运行时的非特权用户组
--with-perl= #设定perl库文件路径启用pcre库
--with-perl_modules_path= #设定perl模块路径
--with-pcre-opt= 在编译时为pcre库设置附加参数

--with-zlib= #指向zlib库目录
--with-zlib-opt= #在编译时为zlib设置附加参数
--with-zlib-asm= #为指定的CPU使用zlib汇编源进行优化,CPU类型为pentium, pentiumpro

--with-openssl= #指向openssl安装目录
--with-openssl-opt #在编译时为openssl设置附加参数
--with-http_ssl_module #启用ngx_http_ssl_module支持(使支持https请求,需已安装openssl)

--with-cc-opt= #设置C编译器参数将被添加到CFLAGS变量(PCRE库,需要指定–with-cc-opt=”-I /usr/local/include”,如果使用select()函数则需要同时增加文件描述符数量,可以通过–with-cc- opt=”-D FD_SETSIZE=2048”指定。)
--with-ld-opt= #设置连接文件参数链接系统库。(PCRE库,需要指定–with-ld-opt=”-L /usr/local/lib”。)
--with-cpu-opt= #指定编译的CPU,可用的值为: pentium, pentiumpro, pentium3, pentium4, athlon, opteron, amd64, sparc32, sparc64, ppc64


#下面按需配置
--conf-path= #指向配置文件(nginx.conf)
--error-log-path= #指向错误日志目录
--pid-path= #指向pid文件(nginx.pid)
--sbin-path= #指向(执行)程序文件(nginx)
--lock-path= #指向lock文件(nginx.lock)(安装文件锁定,防止安装文件被别人利用,或自己误操作。)
--builddir= #指向编译目录

#模块添加
--with-rtsig_module #启用rtsig模块支持(实时信号)
--with-select_module #启用select模块支持(一种轮询模式,不推荐在高载环境下使用)禁用:–without-select_module
--with-poll_module #启用poll模块支持(功能与select相同,与select特性相同,为一种轮询模式,不推荐在高载环境下使用)
--with-file-aio #启用file aio支持(一种APL文件传输格式)
--with-ipv6 #启用ipv6支持
--with-http_realip_module #启用ngx_http_realip_module支持(这个模块允许从请求标头更改客户端的IP地址值,默认为关)
--with-http_addition_module #启用ngx_http_addition_module支持(作为一个输出过滤器,支持不完全缓冲,分部分响应请求)
--with-http_xslt_module #启用ngx_http_xslt_module支持(过滤转换XML请求)
--with-http_image_filter_module #启用ngx_http_image_filter_module支持(传输JPEG/GIF/PNG 图片的一个过滤器)(默认为不启用、gd库要用到)
--with-http_geoip_module #启用ngx_http_geoip_module支持(该模块创建基于与MaxMind GeoIP二进制文件相配的客户端IP地址的ngx_http_geoip_module变量)
--with-http_sub_module #启用ngx_http_sub_module支持(允许用一些其他文本替换nginx响应中的一些文本)
--with-http_dav_module #启用ngx_http_dav_module支持(增加PUT,DELETE,MKCOL:创建集合,COPY和MOVE方法)默认情况下为关闭,需编译开启
--with-http_flv_module #启用ngx_http_flv_module支持(提供寻求内存使用基于时间的偏移量文件)
--with-http_gzip_static_module #启用ngx_http_gzip_static_module支持(在线实时压缩输出数据流)
--with-http_random_index_module #启用ngx_http_random_index_module支持(从目录中随机挑选一个目录索引)
--with-http_secure_link_module #启用ngx_http_secure_link_module支持(计算和检查要求所需的安全链接网址)
--with-http_degradation_module  #启用ngx_http_degradation_module支持(允许在内存不足的情况下返回204或444码)
--with-http_stub_status_module   #启用ngx_http_stub_status_module支持(获取nginx自上次启动以来的工作状态)

--without-http_charset_module #禁用ngx_http_charset_module支持(重新编码web页面,但只能是一个方向–服务器端到客户端,并且只有一个字节的编码可以被重新编码)
--without-http_gzip_module #禁用ngx_http_gzip_module支持(该模块同-with-http_gzip_static_module功能一样)

--without-http_ssi_module #禁用ngx_http_ssi_module支持(该模块提供了一个在输入端处理处理服务器包含文件(SSI)的过滤器,目前支持SSI命令的列表是不完整的)

--without-http_userid_module #禁用ngx_http_userid_module支持(该模块用来处理用来确定客户端后续请求的cookies)

--without-http_access_module #禁用ngx_http_access_module支持(该模块提供了一个简单的基于主机的访问控制。允许/拒绝基于ip地址)

--without-http_auth_basic_module #禁用ngx_http_auth_basic_module(该模块是可以使用用户名和密码基于http基本认证方法来保护你的站点或其部分内容)

--without-http_autoindex_module #禁用disable ngx_http_autoindex_module支持(该模块用于自动生成目录列表,只在ngx_http_index_module模块未找到索引文件时发出请求。)

--without-http_geo_module #禁用ngx_http_geo_module支持(创建一些变量,其值依赖于客户端的IP地址)

--without-http_map_module #禁用ngx_http_map_module支持(使用任意的键/值对设置配置变量)

--without-http_split_clients_module #禁用ngx_http_split_clients_module支持(该模块用来基于某些条件划分用户。条件如:ip地址、报头、cookies等等)

--without-http_referer_module #禁用disable ngx_http_referer_module支持(该模块用来过滤请求,拒绝报头中Referer值不正确的请求)

--without-http_rewrite_module #禁用ngx_http_rewrite_module支持(该模块允许使用正则表达式改变URI,并且根据变量来转向以及选择配置。如果在server级 别设置该选项,那么他们将在 location之前生效。如果在location还有更进一步的重写规则,location部分的规则依然会被执行。如果这个URI重写是因为 location部分的规则造成的,那么 location部分会再次被执行作为新的URI。 这个循环会执行10次,然后Nginx会返回一个500错误。)

--without-http_proxy_module #禁用ngx_http_proxy_module支持(有关代理服务器)

--without-http_fastcgi_module #禁用ngx_http_fastcgi_module支持(该模块允许Nginx 与FastCGI 进程交互,并通过传递参数来控制FastCGI 进程工作。 )FastCGI一个常驻型的公共网关接口。

--without-http_uwsgi_module #禁用ngx_http_uwsgi_module支持(该模块用来医用uwsgi协议,uWSGI服务器相关)

--without-http_scgi_module #禁用ngx_http_scgi_module支持(该模块用来启用SCGI协议支持,SCGI协议是CGI协议的替代。它是一种应用程序与HTTP服务接口标准。它有些像FastCGI但他的设计 更容易实现。)

--without-http_memcached_module #禁用ngx_http_memcached_module支持(该模块用来提供简单的缓存,以提高系统效率)
-without-http_limit_zone_module #禁用ngx_http_limit_zone_module支持(该模块可以针对条件,进行会话的并发连接数控制)
--without-http_limit_req_module #禁用ngx_http_limit_req_module支持(该模块允许你对于一个地址进行请求数量的限制用一个给定的session或一个特定的事件)
--without-http_empty_gif_module #禁用ngx_http_empty_gif_module支持(该模块在内存中常驻了一个1*1的透明GIF图像,可以被非常快速的调用)
--without-http_browser_module #禁用ngx_http_browser_module支持(该模块用来创建依赖于请求报头的值。如果浏览器为modern ,则$modern_browser等于modern_browser_value指令分配的值;如 果浏览器为old,则$ancient_browser等于 ancient_browser_value指令分配的值;如果浏览器为 MSIE中的任意版本,则 $msie等于1)
--without-http_upstream_ip_hash_module #禁用ngx_http_upstream_ip_hash_module支持(该模块用于简单的负载均衡)
--with-http_perl_module #启用ngx_http_perl_module支持(该模块使nginx可以直接使用perl或通过ssi调用perl)


--http-log-path=           # 设定access log路径
--http-client-body-temp-path= # 设定http客户端请求临时文件路径
--http-proxy-temp-path=    # 设定http代理临时文件路径
--http-fastcgi-temp-path=  # 设定http fastcgi临时文件路径
--http-uwsgi-temp-path=    # 设定http uwsgi临时文件路径
--http-scgi-temp-path=    # 设定http scgi临时文件路径

-without-http # 禁用http server功能
--without-http-cache # 禁用http cache功能

--with-mail #启用POP3/IMAP4/SMTP代理模块支持
--with-mail_ssl_module 启用ngx_mail_ssl_module支持
--without-mail_pop3_module #禁用pop3协议(POP3即邮局协议的第3个版本,它是规定个人计算机如何连接到互联网上的邮件服务器进行收发邮件的协议。是因特网电子邮件的第一个离 线协议标 准,POP3协议允许用户从服务器上把邮件存储到本地主机上,同时根据客户端的操作删除或保存在邮件服务器上的邮件。POP3协议是TCP/IP协议族中 的一员,主要用于 支持使用客户端远程管理在服务器上的电子邮件)
--without-mail_imap_module #禁用imap协议(一种邮件获取协议。它的主要作用是邮件客户端可以通过这种协议从邮件服务器上获取邮件的信息,下载邮件等。IMAP协议运行在 TCP/IP协议之上, 使用的端口是143。它与POP3协议的主要区别是用户可以不用把所有的邮件全部下载,可以通过客户端直接对服务器上的邮件进行操作。)
--without-mail_smtp_module #禁用smtp协议(SMTP即简单邮件传输协议,它是一组用于由源地址到目的地址传送邮件的规则,由它来控制信件的中转方式。SMTP协议属于 TCP/IP协议族,它帮助每台计算机在发送或中转信件时找到下一个目的地。)
--with-google_perftools_module #启用ngx_google_perftools_module支持(调试用,剖析程序性能瓶颈)
--with-cpp_test_module #启用ngx_cpp_test_module支持

--add-module= #启用外部模块支持

--with-cc=  # 指向C编译器路径
--with-cpp= # 指向C预处理路径

--without-pcre #禁用pcre库

--with-md5=     # 指向md5库文件目录(消息摘要算法第五版,用以提供消息的完整性保护)
--with-md5-opt= # 在编译时为md5库设置附加参数
--with-md5-asm  # 使用md5汇编源

--with-sha1=     # 指向sha1库目录(数字签名算法,主要用于数字签名)
--with-sha1-opt= # 在编译时为sha1库设置附加参数
--with-sha1-asm  # 使用sha1汇编源

--with-libatomic  # 为原子内存的更新操作的实现提供一个架构
--with-libatomic= # 指向libatomic_ops安装目录

--with-debug # 启用debug日志
Shell脚本一键部署虚拟主机(附上关键性脚本):
完整代码:https://github.com/weiyigeek/SecOpsDev/Application/Web/Nginx/nginxVirtualHost-v1.sh
#!/bin/bash
#@Desc:Nginx多实例部署虚拟主机
#@Author:WeiyiGeek
#@CreatTime:2020年3月8日 12点06分
#@Site:WeiyiGeek.top
#@Test_Linux: Linux weiyigeek 3.10.0-693.el7.x86_64 #1 SMP Tue Aug 22 21:09:27 UTC 2017 x86_64 x86_64 x86_64 GNU/Linux
#@release:CentOS Linux release 7.4.1708 (Core)

## Define nginx variable
NGX_VER=1.16.1
NGX_URI="http://nginx.org/download/nginx-${NGX_VER}.tar.gz"
NGX_SRC="nginx-${NGX_VER}.tar.gz"
NGX_NAME=${NGX_SRC%.tar.gz}
NGX_DIR="/usr/local/nginx/${NGX_VER}"
NGX_ARGS="--prefix=${NGX_DIR} --user=nginx --group=nginx --with-http_stub_status_module"
NGX_SRCCODE="${NGX_NAME}/src/core/nginx.h"
NGX_VHDIR="${NGX_DIR}/conf/domains"

## Define 防火墙开放端口
FIREWALL_PORT=(80 8080)


## [Nginx INSTALL]
function nginx_install(){
    echo -e "\e[32m1.核查安装依赖....... \e[0m"
    CHECK_SOFT=$(rpm -qa | grep -cE "^gcc|^pcre|^zlib")
    if [ $CHECK_SOFT -lt 2 ];then yum install -y gcc gcc-c++ pcre pcre-devel zlib-devel;fi

    echo -e "\e[32m2.检查nginx源码包是否存在....... \e[0m"
    if [ ! -f $NGX_SRC ];then wget -c $NGX_URI;fi
    if [ ! -d $NGX_NAME ];then tar -zxf $NGX_SRC;fi

    echo -e "\e[32m3.nginx安装陆军是否存在....... \e[0m"
    if [ ! -f $NGX_DIR/sbin/nginx ];then mkdir -vp $NGX_DIR;fi

    echo -e "\e[32m3.验证nginx用户是否存在不存在则建立低权限用户....... \e[0m"
    CHECK_USER=$(getent passwd | grep -wc nginx)
    if [ $CHECK_USER -eq 0 ];then useradd -s /sbin/nologin nginx -M; fi

    echo -e "安全设置:Nginx版本隐藏......"
    sed -i "s/$NGX_VER//g" $NGX_SRCCODE
    sed -i 's/nginx\//JWS/g' $NGX_SRCCODE
    sed -i 's/"NGINX"/"JWS"/g' $NGX_SRCCODE

    echo -e "\e[32m4.进行nginx预编译及其编译安装....... \e[0m"
    cd $NGX_NAME && ./configure $NGX_ARGS
    if [ $? -eq 0 ];then
        #进行2个线程并行编译(可以根据你处理器个数选择)
        make -j2 && make -j2 install
    else
        echo -e "\e[31m#Error: 预编译失败!终止安装,请检查软件依赖! \e[0m"
        exit
    fi
    if [ $? -ne 0 ];then echo -e "\e[31m#Error: 编译安装失败!终止安装 \e[0m";exit;fi
    echo -e "\e[32m Nginx 成功安装....... \n安装目录:${NGX_DIR} \n 正在启动Nginx....\e[0m"
    $NGX_DIR/sbin/nginx
}

## [Nginx CONFIG]
function nginx_vhost(){
    NGX_VHOSTS=$1
    firewall_config
    cd ${NGX_DIR}
    NGX_CNF="${NGX_DIR}/conf/nginx.conf"
    if [ ! -f $NGX_CONF ];then echo -e "Nginx-配置文件不存在请仔细检查!";exit;fi
    #判断是否已经存在domains配置文件是则不同重新建立;
    grep "domains" ${NGX_CNF} >>/dev/null 2>&1
    if [ $? -ne 0 ];then
        #备份NGX配置文件
        cp ${NGX_CNF}{,_$(date +%F_%H%M%S).bak}
    	mkdir -vp ${NGX_VHDIR}
        sed -i "s/#user  nobody/user  nginx/g" ${NGX_CNF}
        sed -i "s/#gzip/gzip/g" ${NGX_CNF}
        #去除空行以及注释
	    grep -vE "#|^$" ${NGX_CNF} > ${NGX_CNF}.swp
        #重点删除server字符到文件末尾
	    sed -i '/server/,$d' ${NGX_CNF}.swp
        cp ${NGX_CNF}.swp ${NGX_CNF}
	    echo -e "    include domains/*;\n}" >> ${NGX_CNF}
    fi

cat>${NGX_VHDIR}/$NGX_VHOSTS.conf<<EOF
server {
    listen       80;
    server_name  $NGX_VHOSTS;

    location / {
        root   html/$NGX_VHOSTS;
        index  index.html index.htm;
    }
    #Nginx 监控模块启用
    location /nginxStatus {
        stub_status;
    }
    error_page   500 502 503 504  /50x.html;
    location = /50x.html {
        root   html;
    }
}
EOF


echo -e "\e[32m$NGX_VHOSTS 网站目录建立之中.....\e[0m"
if [ ! -d $NGX_DIR/html/$NGX_VHOSTS/ ];then
    mkdir -vp $NGX_DIR/html/$NGX_VHOSTS/
cat>$NGX_DIR/html/$NGX_VHOSTS/index.html<<EOF
<h1>$NGX_VHOSTS Test Pages. </h1>
<p>By WeiyiGeek.top </p>
<hr color=red>
EOF
fi
    echo -e "\e[32mNginx配置文件验证中.....\e[0m"
    $NGX_DIR/sbin/nginx -t
    if [ $? -ne 0 ];then
        echo -e "\e[31mNginx配置文件有误,请处理错误后重启Nginx服务器:\n ${NGX_DIR}/sbin/nginx -s reload"
    fi
    cat ${NGX_VHDIR}/$NGX_VHOSTS.conf

    echo -e "\e[32mNginx重启之中.....\e[0m"
    $NGX_DIR/sbin/nginx -s reload
    CHECK_STATUS=$(netstat -tlnp | grep -wc "nginx")
    if [ $CHECK_STATUS -ne 0 ];then
        echo -e "\e[32m#Nginx 启动成功.... \e[0m"
    else
        echo -e "\e[31m#Nginx 启动失败.... \e[0m"
    fi
}
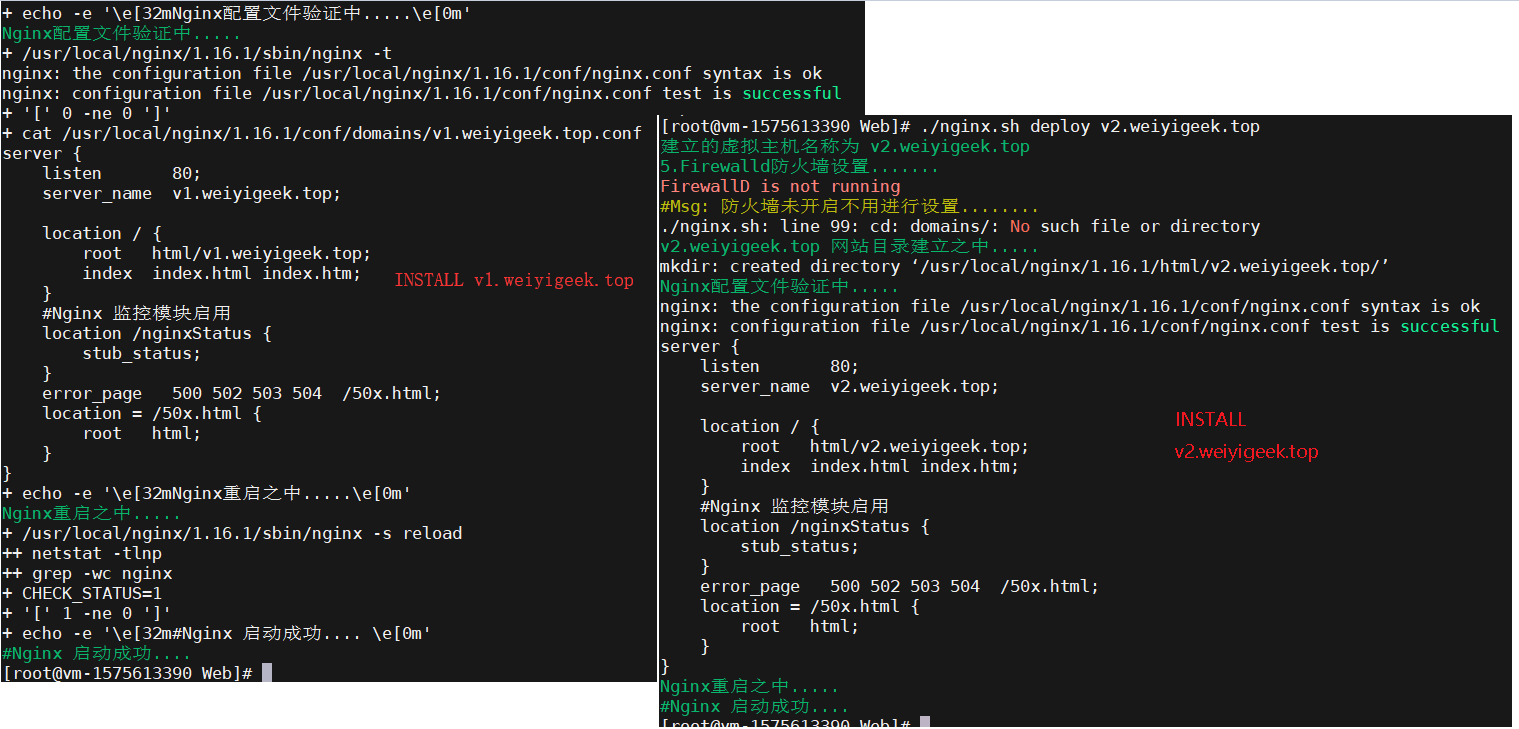
运行效果:
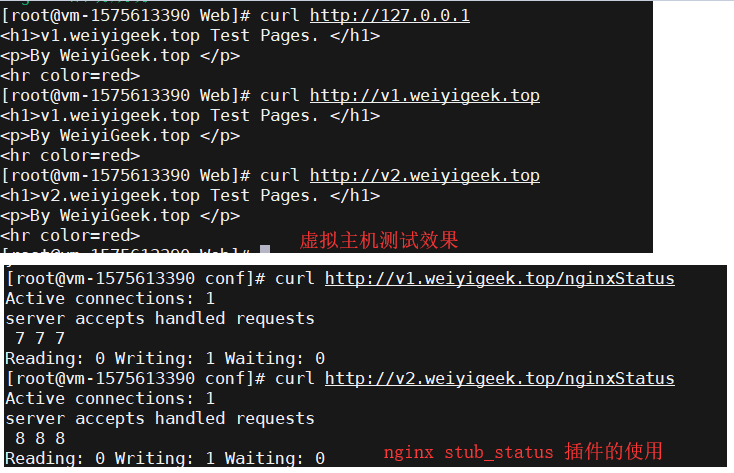
测试效果:
0x01 Nginx 配置最佳实践
Nginx 之 多配置文件配置
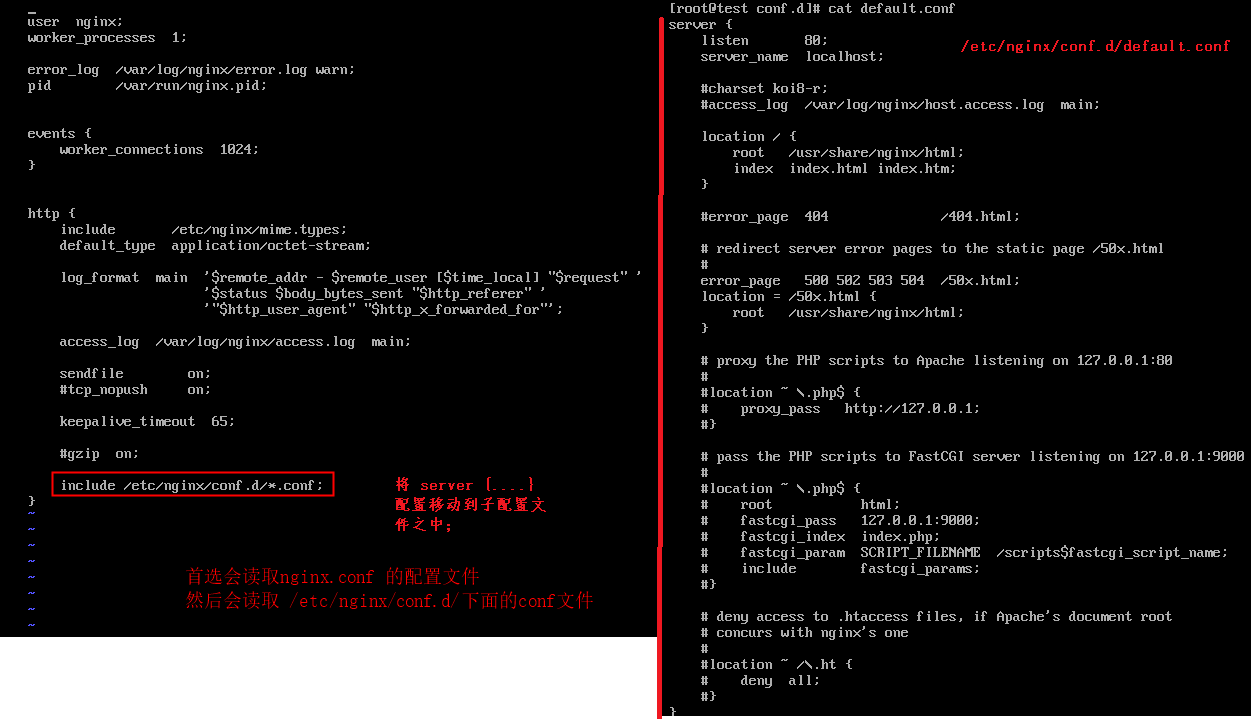
描述: Nginx配置文件中支持包含多个配置文件,比如下面的虚拟主机的配置将使用,在程序加载运行时候首先会读取nginx.conf 的配置文件,然后再读取 /etc/nginx/conf.d/下面的配置文件;
例如,我们需要在/etc/nginx/nginx.conf文件中,进行如下设置include /etc/nginx/conf.d/*.conf;
http {
  ....
  include conf.d/*.conf;
  ....
}
Nginx 之 Server 侦听端口主机头配置浅析
描述:常规网站编译安装后运行只是单个网站访问,我们如何可以做到多网站同时运行到该Nginx服务器上,那我们便可使用Nginx提供的虚拟机主机方式, 使得一个服务端口可以访问不同的服务应用;
常规有三种方式:
-
- 多端口
-
- 多IP
-
- 多域名:虚拟主机(VirtualHost)
环境准备:
cat >> /etc/hosts<<END
127.0.0.1 v1.weiyigeek.top v2.weiyigeek.top
END
流程步骤:
- 1.修改移除Nginx.conf配置文件中的
Server {...}包含的参数添加include domains/*;;
user  nginx;
worker_processes  1;
events {
    worker_connections  1024;
}
http {
  include       mime.types;
  default_type  application/octet-stream;
  sendfile        on;
  keepalive_timeout  65;
  gzip  on;
  include domains/*;
}
- 2.在Nginx的Conf目录中建立一个domains目录(注意这里不要建立到上级目录之中,否则会出现nginx master进程已经启动但是无监听端口),进入该目录中建立虚拟主机v1.weiyigeek.top.conf文件
server {
  listen       80;
  server_name  v1.weiyigeek.top;  #关键点
  location / {
    #关键点
    root   html/v1.weiyigeek.top;
    index  index.html index.htm;
  }
  #Nginx 监控模块启用
  location /nginxStatus {
      stub_status;
  }
  error_page   500 502 503 504  /50x.html;
  location = /50x.html {
      root   html;
  }
}
- 3.在nginx安装目录中的html中建立一个与虚拟主机同名的文件夹(当然名字您可以任意取,但是必须和v1.weiyigeek.top.conf中指定路与的root一致)
[root@WeiyiGeek html]# pwd
/usr/local/nginx/1.16.1/html
[root@WeiyiGeek html]# ls
50x.html  index.html  v1.weiyigeek.top  v2.weiyigeek.top
配置示例
server {
  # 使用标准 HTTP 协议
  listen 80;
  # 使用标准 HTTPS 协议
  listen 443 ssl;
  # 使用 http2 协议
  listen 443 ssl http2;
  # 使用IPV6地址监听80端口
  listen [::]:80;
  # 只使用IPV6地址监听80端口
  listen [::]:80 ipv6only=on;

  # 匹配指定域名访问
  server_name weiyigeek.top;
  # 匹配多域名访问
  server_name weiyigeek.top www.weiyigeek.top;
  # 匹配weiyigeek.top下所有子域名
  server_name *.weiyigeek.top;
  # 匹配所有的包含weiyigeek.top的顶级域名
  server_name weiyigeek.top.*;
  # 仅匹配IP地址访问
  server_name "";
  server_name _;
}
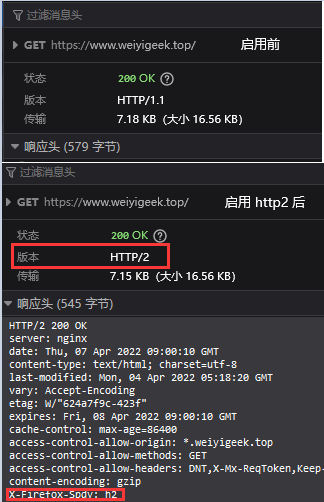
温馨提示: 当网站设置支持http2以后可以从请求响应头中看到如下字段 X-Firefox-Spdy:h2
Nginx 之 Location 规则配置浅析
描述: Location 语法规则:location [=|~|~*|^~] /uri/ { … }
=: 表示精确匹配./: 表示通用匹配, 即任何请求都会匹配到。~: 表示区分大小写的正则匹配.~*: 表示不区分大小写的正则匹配.!~,!~*: 分别标识为区分大小写不匹配及不区分大小写不匹配的正则^~: 表示URL以某个常规字符串开头,可以理解为匹配url路径即可,值得注意的是Nginx不对URL做编码,例如会将请求为/static/20%/aa被^~ /static/ /aa规则匹配到。
默认情况下 location 的匹配顺序为精确匹配 -> 开头匹配(^~) -> 文件顺序中的正则匹配 -> 通用匹配(/), 当有匹配成功的URL则停止匹配。
例如,有如下匹配规则:
location = / {
  #规则A.精确匹配 / URL 下的操作。
}
location = /login {
  #规则B.精确匹配 /login URL 下的操作。
}
location ^~ /static/ {
  #规则C.正则匹配 /static/ URL 下的操作。
}
location ~ \.(gif|jpg|png|svg|js|css)$ {
  #规则D,注意:是根据括号内的大小写进行匹配,括号内全是小写只匹配小写。
}
location ~* \.(gif|jpg|png|svg|js|css)$ {
  #规则D,注意:忽略大写来匹配静态资源后缀。
}
location ~* \.png$ {
  #规则E.匹配以.png或者.PNG结尾的静态资源。
}
location !~ \.xhtml$ {
  #规则F.不匹配.xhtml为后缀的资源。
}
location !~* \.xhtml$ {
  #规则G.不匹配.xhtml或者.XHTML为后缀的资源。
}
location / {
  #规则H.通用匹配,当上述匹配都不能匹配时,使用该规则。
}
在实践过程中常见, 有如下几种匹配规则:
# 第一个必选规则是直接匹配网站根,通过域名访问网站首页比较频繁,使用这个会加速处理,
# 这里可以是直接转发给后端应用服务器了,也可以是一个静态首页。
location = / {
  root /usr/local/nginx/html
  proxy_pass http://tomcat:8080/index
}

# 第二个必选规则是处理静态文件请求,这是nginx作为http服务器的强项
# 有两种配置模式,目录匹配或后缀匹配,任选其一或搭配使用
location ^~ /static/ {                             # // 以xx开头
  root /webroot/static/;   # 注意,需要指定跟目录.
}
location ~* \.(gif|jpg|jpeg|png|css|js|ico)$ {     # // 以xx结尾
  root /webroot/res/;
}

#第三个规则就是通用规则,用来转发动态请求到后端应用服务器
#非静态文件请求就默认是动态请求,自己根据实际把握
location / {
  proxy_pass http://tomcat:8080/
}
Nginx 之 规则判断表达式浅析
Nginx 常用判断表达式如下:
-f和!-f: 用来判断是否存在文件-d和!-d:用来判断是否存在目录-e和!-e:用来判断是否存在文件或目录-x和!-x:用来判断文件是否可执行- 除此之外我们还可以使用上一小节的正则匹配符进行判断。
nginx 全局变量一览:
arg_PARAMETER      # 这个变量包含GET请求中,如果有变量PARAMETER时的值。
args               # 这个变量等于请求行中(GET请求)的参数,如:foo=123&bar=blahblah;
binary_remote_addr # 二进制的客户地址。
body_bytes_sent    # 响应时送出的body字节数数量。即使连接中断,这个数据也是精确的。
content_length    # 请求头中的Content-length字段。
content_type      # 请求头中的Content-Type字段。
cookie_COOKIE     # cookie COOKIE变量的值
document_root     # 当前请求在root指令中指定的值。
document_uri      # 与uri相同。
host              # 请求主机头字段,否则为服务器名称。
hostname          # 设置为gethostname返回的机器主机名
http_HEADER       # 请求header头字段
is_args           # 如果有args参数,这个变量等于”?”,否则等于”",空值。
http_user_agent   # 客户端agent信息
http_cookie       # 客户端cookie信息
limit_rate        # 这个变量可以限制连接速率。
query_string      # 与args相同。
request_body_file  #客户端请求主体信息的临时文件名。
request_method    #客户端请求的动作,通常为GET或POST。
remote_addr          #客户端的IP地址。
remote_port          #客户端的端口。
remote_user          #已经经过Auth Basic Module验证的用户名。
request_completion #如果请求结束,设置为OK. 当请求未结束或如果该请求不是请求链串的最后一个时,为空(Empty)。
request_method    #GET或POST
request_filename  #当前请求的文件路径,由root或alias指令与URI请求生成。
request_uri          #包含请求参数的原始URI,不包含主机名,如:”/foo/bar.php?arg=baz”。不能修改。
scheme                #HTTP方法(如http,https)。
server_protocol      #请求使用的协议,通常是HTTP/1.0或HTTP/1.1。
server_addr          #服务器地址,在完成一次系统调用后可以确定这个值。
server_name        #服务器名称。
server_port          #请求到达服务器的端口号。
Nginx 解析URL用作判断的全局变量,例如,访问的URL为http://weiyigeek.top:8080/test1/test2/test.php.
$host:weiyigeek.top
$server_port:8080
$request_uri:http://weiyigeek.top:8080/test1/test2/test.php
$document_uri:/test1/test2/test.php
$document_root:/data/nginx/html
$request_filename:/data/html/test1/test2/test.php
简单示例:
- 1.判断请求的静态资源文件是否是存在的,如不存在则返回403.
location ~* \.(js|css|jpg|jpeg|gif|png|swf)$ {
  if (-f $request_filename) {
    return 403;
    break;
  }
}
- 2.判断Nginx全局变量并进行跳转到指定页面。
if ( $host !~* weiyigeek\.top ) {
  return 301 https://space.bilibili.com/385802642;
}
- 3.文件反盗链并设置过期时间
location ~*^.+\.(jpg|jpeg|gif|png|swf|rar|zip|css|js)$ {
  valid_referers none blocked *.weiyigeek.top localhost 127.0.0.1;
  if ($invalid_referer) {
      rewrite ^/ https://weiyigeek.top/wechat.html;
      return 412;
      break;
  }
  root /usr/local/nginx/html
  access_log  off;
  expires 3d;
  break;
}
- 4.自定义变量判断跳转到指定页面.
# 仅允许222.222.222.222或者内网的两个IP访问,其他IP都rewrite到停服页面
if ( $remote_addr = 222.222.222.222){set $my_ip 1;}
if ( $remote_addr = 192.168.1.170 ){ set $my_ip 1;}
if ( $remote_addr = 192.168.1.169 ){ set $my_ip 1;}
if ( $my_ip != 1) {rewrite ^/design/(.*)\.php$ /weiyigeek.html?$1&;}  #将*.php转到tingfu.html
温馨提示: 此处以Nginx暴露给互联网, 所以利用 $remote_addr 变量获取访问者地址, 如果用了负载均衡的话此处应该是$http_x_forwarded_for 变量。
Nginx 之 Redirect重定向与ReWrite重写 配置浅析
Redirect(重定向)语法示例
# http 向 https 跳转 (永久)
server {
  listen 80;
  server_name weiyigeek.top www.weiyigeek.top;
  return 301 https://$host$request_uri;
}

# http 向 https 跳转(临时)
server {
  listen 80;
  server_name weiyigeek.top www.weiyigeek.top;
  return 302 https://www.weiyigeek.top$request_uri;
}
ReWrite 重写语法示例
rewrite 正则表达式以及其可用参数:
last: 基本上都用这个Flag。break: 中止 Rewirte 不在继续匹配redirect: 返回临时重定向的HTTP状态302permanent: 返回永久重定向的HTTP状态301
# http 向 https 跳转
server {
  listen 80;
  server_name weiyigeek.top www.weiyigeek.top;
  # 判断请求host是否是 www.weiyigeek.top ,如果是 weiyigeek.top 则重写为 www.weiyigeek.top
  if ($http_host !~ "^www\.weiyigeek\.top$" {
    rewrite ^(.*) https://www.weiyigeek.top$1 permanent;
  }
}

# 利用重写规则防止盗链
location ~* \.(gif|jpg|png|svg|css|js)$ {
  valid_referers none blocked *.weiyigeek.top localhost 127.0.0.1 server_names ~\.google\. ~\.baidu\.;
  if ($invalid_referer) {
    rewrite ^/ https://www.weiyigeek.top/403.jpg;
  }
}

# 利用重写功能可将网页中旧的访问目录重写到新的访问路径
# 例如, 如果访问https://blogwww.weiyigeek.top/2020/10/515.html 则将显示首页。
if ( $document_uri ~* /([0-9]+)/([0-9]+)/([0-9]+)\.html$) {
  rewrite ^/ /index.html last;
}
温馨提示:301 与 302 状态码的不同区别。
- 301 redirect: 301 代表永久性转移(
Permanently Moved) - 网站SEO推荐。 - 302 redirect: 302 代表暂时性转移(
Temporarily Moved)
Nginx 之 SSL 证书安全配置浅析
描述: 通常为了保证网站数据在传输过程中不被窃取和篡改,我们需要为其配置SSL证书,而在Nginx中配置方法是非常的简单的,不过最重要的还是你要生成私钥以及证书申请文件csr向证书颁发机构生成网站证书。
# Permanent Redirect for HTTP to HTTPS
server {
  listen 80;
  listen [::]:80;
  server_name weiyigeek.top;
  return 301 https://$host$request_uri;
}

server {
  listen 443 ssl http2;
  listen [::]:443 ssl http2;
  server_name weiyigeek.top;

  # HSTS (ngx_http_headers_module is required) 应该只使用 HTTPS 而不是使用 HTTP 通信
  add_header Strict-Transport-Security "max-age=31536000;includeSubDomains;preload" always;

  # XXS-Protection
  add_header X-XSS-Protection "1; mode=block";

  # MIME 模拟探测
  add_header X-Content-Type-Options nosniff;

  # Frame 安全控制
  add_header X-Frame-Options ALLOW-FROM music.163.com;

  # Spider Robots 爬取策略限制
  add_header X-Robots-Tag none;

  # 开启 SSL ,如果想http 与 https 公用一个配置则可以将其注释( the "ssl" directive is deprecated )
  # ssl on;

  # 配置证书链与证书密钥
  ssl_certificate      /etc/nginx/ssl/fullchain.cer;
  ssl_certificate_key  /etc/nginx/ssl/weiyigeek.top.key;

  # ssl会话复用超时时间以及会话复用缓存大小
  ssl_session_timeout 1d;
  ssl_session_cache shared:MozSSL:10m;  # about 40000 sessions

  # 配置双证书时开启否则应该关闭
  ssl_session_tickets off;

  ## OCSP stapling
  ssl_stapling on;
  ssl_stapling_verify on;
  # 使用根 CA 和中间证书验证 OCSP 响应的信任链
  ssl_trusted_certificate /etc/nginx/ssl/ca.cer;

  # 仅使用ECDH是不用配置ssl_dhparam的否则你应该为它配置上
  # curl https://ssl-config.mozilla.org/ffdhe2048.txt > /path/to/dhparam
  ssl_dhparam /path/to/dhparam;

  # 兼容性较为通用的SSL协议与加密算法套件
  ssl_protocols TLSv1 TLSv1.1 TLSv1.2 TLSv1.3;
  ssl_ciphers ECDHE-ECDSA-AES128-GCM-SHA256:ECDHE-RSA-AES128-GCM-SHA256:ECDHE-ECDSA-AES256-GCM-SHA384:ECDHE-RSA-AES256-GCM-SHA384:ECDHE-ECDSA-CHACHA20-POLY1305:ECDHE-RSA-CHACHA20-POLY1305:ECDHE:ECDH:AES:HIGH:EECDH+CHACHA20:EECDH+CHACHA20-draft:EECDH+AES128:RSA+AES128:EECDH+AES256:RSA+AES256:EECDH+3DES:RSA+3DES:DHE-RSA-AES128-GCM-SHA256:DHE-RSA-AES256-GCM-SHA384:!NULL:!aNULL:!eNULL:!EXPORT:!PSK:!ADH:!DH:!DES:!MD5:!RC4;
  # 安全配置: ssl_ciphers ECDHE-RSA-AES128-GCM-SHA256:ECDHE:ECDH:AES:HIGH:!NULL:!aNULL:!MD5:!ADH:!RC4:!DH:!DHE;
  # 证书常规握手加密算法方式共十八个,ECDHE、DHE、AES开头分别6个
  ; ssl_ciphers ECDHE-RSA-AES128-GCM-SHA256:ECDHE-RSA-AES256-GCM-SHA384:DHE-RSA-AES256-GCM-SHA384:DHE-RSA-AES128-GCM-SHA256:ECDHE-RSA-AES256-SHA384:ECDHE-RSA-AES128-SHA256:ECDHE-RSA-AES256-SHA:ECDHE-RSA-AES128-SHA:DHE-RSA-AES256-SHA256:DHE-RSA-AES128-SHA256:DHE-RSA-AES256-SHA:DHE-RSA-AES128-SHA:AES256-GCM-SHA384:AES128-GCM-SHA256:AES256-SHA256:AES128-SHA256:AES256-SHA:AES128-SHA:HIGH:!NULL:!aNULL:!eNULL:!EXPORT:!PSK:!ADH:!DES:!MD5:!RC4;

  # 为了兼容性推荐服务器自动选择要使用的算法套件
  ssl_prefer_server_ciphers  on;

  # replace with the IP address of your resolver
  resolver 223.6.6.6 8.8.8.8 192.168.12.254;
}
补充说明: 为Nginx服务器配置RSA与ECDSA双证书的两种方式。
# 1.首先是将两个证书链都加入 Nginx 的配置文件
ssl_certificate     example.com.rsa.crt;
ssl_certificate_key example.com.rsa.key;
ssl_certificate     example.com.ecdsa.crt;
ssl_certificate_key example.com.ecdsa.key;

# 2.或者使用 CT 的话有两种方法,一个是将两个证书的 CT 信息放到同一目录,并做如下设置,Nginx CT 模块会自动在这个目录下查找相应证书的 CT 信息并发送验证:
ssl_ct on;
ssl_ct_static_scts /path/to/sct/dir;

# 我们也可以单独配置每个证书的 CT 文件
ssl_ct on;
ssl_certificate example.com.rsa.crt;
ssl_certificate_key example.com.rsa.key;
ssl_ct_static_scts xample.com.rsa.scts;

ssl_certificate example.com.ecdsa.crt;
ssl_certificate_key example.com.ecdsa.key;
ssl_ct_static_scts example.com.ecdsa.scts;
Nginx 之 资源压缩配置浅析
描述: 为了降低服务器带宽压力以及优化响应速度, 通常我们需要在Nginx服务器配置中为其开启gzip压缩,
配置示例:
# 开启gzip
gzip on;
# 启用gzip压缩的最小文件,小于设置值的文件将不会压缩
gzip_min_length 2k;
# gzip 压缩级别,1-10,数字越大压缩的越好,也越占用CPU时间,后面会有详细说明
gzip_comp_level 2;
# 进行压缩的文件类型,javascript有多种形,其中的值可以在 mime.types 文件中找到。
gzip_types text/plain application/javascript application/x-javascript text/css application/xml text/javascript application/x-httpd-php image/jpeg image/gif image/png font/ttf font/opentype image/svg+xml;
# 建议在http header中添加Vary: Accept-Encoding支持
gzip_vary on;
Nginx 之 静态资源expires缓存过期时间配置
描述: 在 Nginx 配置 expires 指令可以起到控制页面缓存的作用, 配置静态资源的 expires 可以有效的减少客户端对服务器的请求,该配置项适用于: http、server 以及 location 块中。
expires(过期时间语法)语法示例
; 语法: `expires [time|epoch|max|off]`
* epoch:指定Expires的值为 1 January,1970,00:00:01 GMT
* max: 指定Expires的值为31 December2037 23:59:59GMT,"Cache-Control"的值为10年。
* -1:指定Expires的值为当前服务器时间-1s,即永远过期。
* off:不修改Expires和"Cache-Control"的值

# location 块 ~ 使用正则匹配
location ~ \.(gif|jpg|jpeg|png|bmp|ico)$ {
  # 静态资源源路径必须配置否则,静态资源可能无法找到
  root /var/www/img/;
  # 禁用404错误日志
  log_not_found off;
  # 关闭access访问日志
  access_log off;
  # 静态资源过期时间
  expires 7d;
}
该指令控制HTTP应答中的"Expires"和"Cache-Control"Header头部信息, 例如在配置后expires指令请求 https://blog.weiyigeek.top/img/avatar.jpg URL:
HTTP/1.1 304 Not Modified
Server: nginx
Date: Fri, 01 Apr 2022 09:19:09 GMT
Last-Modified: Wed, 30 Mar 2022 15:42:30 GMT
Connection: keep-alive
ETag: "62447a66-35db"
Expires: Fri, 08 Apr 2022 09:19:09 GMT # 表示资源过期时间,由当前访问时间加上max-age指令值所得
Cache-Control: max-age=604800          # 使用max-age指令指定组件被缓存多久,负数表示no-cache,正数或零表示max-age=time
Access-Control-Allow-Origin: *.weiyigeek.top
Access-Control-Allow-Methods: GET,POST
Access-Control-Allow-Headers: DNT,X-Mx-ReqToken,Keep-Alive,User-Agent,X-Requested-With,If-Modified-Since,Cache-Control,Content-Type,Authorization
实践示例:
# 网页资源缓存
location ~* \.(xml|html|htm)$ {
  # 资源决绝对目录设置
  root /var/www/html;
  # 日志文件的相对路径或完整路径
  access_log /path/to/file.log;
  # 开启日志记录
  access_log on;
  # 设置过期时间
  expires 24h;
}

# 样式、JS、图片资源缓存
location ~* \.(css|js|ico|gif|jpg|jpeg|png)$ {
  root /var/www/html/res;
  # 禁用404错误日志
  log_not_found off;
  # 关闭日志
  access_log off;
  # 缓存时间7天
  expires 7d;
}

# 字体资源缓存
location ~* \.(eot|ttf|otf|woff|woff2|svg)$ {
  root /var/www/html/static;
  log_not_found off;
  access_log off;
  expires max;
}
Nginx 之 反向代理资源基本缓存配置
描述: 在 Nginx 中往往我们会对指定站点进行反代(反向代理), 而在反代站点中存在动态资源与静态资源,我们可以使用下述指令开启简单的缓存配置。
首先我们需要了解一下三种缓存类型:
- 客户端缓存
- 代理缓存(Proxy Cache)
- 服务端缓存
这里主要讲解Nginx作为代理服务器进行代理缓存的配置采用的参数以及示例:
- 1.
proxy_cache:定义用于缓存的共享内存区域。同一个区域可以用于多个地方
Syntax: 	proxy_cache zone | off;
Default: 	proxy_cache off;
Context: 	http, server, location
- 2.
proxy_cache_path:设置缓存的路径和其他参数缓存数据存储在文件中,缓存中的文件名是将MD5函数应用于缓存键的结果
Context: http
Syntax: proxy_cache_path path [levels=levels] [use_temp_path=on|off] keys_zone=name:size [inactive=time] [max_size=size] [manager_files=number] [manager_sleep=time] [manager_threshold=time] [loader_files=number] [loader_sleep=time] [loader_threshold=time] [purger=on|off] [purger_files=number] [purger_sleep=time] [purger_threshold=time];

#例如,在下面的配置中level参数定义缓存的层次结构级别:从1到3,每个级别接受值1或2。
proxy_cache_path /data/nginx/cache levels=1:2 keys_zone=one:10m; #10M = 10 * 8000 个密钥
#/data/nginx/cache/c/29/b7f54b2df7773722d382f4809d65029c
- 3.
proxy_cache_valid:设置缓存过期时间
Syntax: 	proxy_cache_valid [code ...] time;
Context: 	http, server, location

#例如,为不同的响应代码设置缓存时间。
proxy_cache_valid 200 302 10m;
proxy_cache_valid 404      1m;

#If only caching time is specified (指定),也可以可以指定any参数来缓存任何响应:
proxy_cache_valid 5m;
proxy_cache_valid any      1m;
- 4.
proxy_cache_key:设置缓存维度
Syntax: 	proxy_cache_key string;
Default: 	proxy_cache_key $scheme$proxy_host$request_uri;
Context: 	http, server, location

#例如,定义用于缓存的键,
proxy_cache_key "$host$request_uri $cookie_user";
proxy_cache_key $scheme$proxy_host$uri$is_args$args; #默认情况下指令也是字符串不用加上""
- 5.
proxy_cache_purge:定义将在何种条件下将请求视为缓存清除请求。如果字符串参数中至少有一个值不为空且不等于“0”,则删除具有相应缓存键的缓存项。通过返回204 (No Content)响应来指示操作成功的结果。
Syntax: 	proxy_cache_purge string ...;
Context: 	http, server, location

# Example configuration:
map $request_method $purge_method {
    PURGE   1;
    default 0;
}
- 6.
proxy_no_cache:指定不缓存的部分页面,可以与proxy_cache_bypass指令一起使用。
Syntax: 	proxy_no_cache string ...;
Context: 	http, server, location

#如果字符串参数中至少有一个值不为空且不等于“0”,则不会保存响应:
proxy_no_cache $cookie_nocache $arg_nocache$arg_comment;
proxy_no_cache $http_pragma    $http_authorization;
proxy_cache 相关指令集简述
描述: 其中proxy_cache_path指令配置了缓存名称以及其存放地址、缓存大小等相关其它参数配置, 而proxy_cache指令配置是为了启用创建的mycache名称的缓存。
- proxy_no_cache : 该指令用于定义满足条件的响应不会被保存到缓存中,在条件字符串中至少有一个条件不为空或者0,符合这样条件的响应才不会被缓存, 其一般会配合
proxy_cache_bypass共同使用; - proxy_cache_bypass : 该指令用于定义哪些情况不从cache读取直接从backend获取资源配置同上。
- proxy_cache_key : 该指令给缓存数据定义一个键。
- proxy_cache_methods :该指令用于设置缓存哪些HTTP方法,默认缓存HTTP GET/HEAD方法不缓存POST方法。
- proxy_cache_valid :该指令用于设置不同响应码的缓存时间。
- proxy_cache_min_uses : 该指令用于设置缓存的最小使用次数,默认值为1
- proxy_cache_use_stale : 该指令开启(增强)容错能力,即使用缓存内容来响应客户端的请求
示例演示:
# 1.其中,cookie_nocache、arg_nocache...皆为变量,可以根据你访问的匹配策略来设置,其值只有2类,0和非0;
# 访问匹配策略, 如果在此链式配置中,只要有一个值不为 0 则不会cache。
if ($request_uri ~ ^/(login|register|password\/reset)/) { set $cookie_nocache 1; }
proxy_no_cache $cookie_nocache(0) $arg_nocache(1) $arg_comment(0)
proxy_no_cache $http_pragma $http_authorization;

# 2.默认情况下,该指令的值的字符串,给缓存数据定义一个键。
proxy_cache_key $scheme$proxy_host$uri$is_args$args; # 缺省
proxy_cache_key $scheme$proxy_host$request_uri;

# 4.缺省缓存GET HEAD请求。
proxy_cache_methods GET HEAD;

# 5.只对响应码为200,301,302的访问请求资源设置缓存时间,此外可以个性化定制。
proxy_cache_valid 200 302 10m;
proxy_cache_valid 301 1h;
proxy_cache_valid 404 1m;
proxy_cache_valid any 1m;

# 6.设置缓存的最小使用次数。
proxy_cache_min_uses 1;

# 7.当作为cache的NGINX收到源站返回error、timeout或者其他指定的5XX错误,并且在其缓存中有请求文件的陈旧版本,则会将这些陈旧版本的文件而不是错误信息发送给客户端。
proxy_cache_use_stale error timeout http_500 http_502 http_503 http_504;
实践配置: 多磁盘分割缓存,如果有多个硬盘则可以用来在多个硬盘之间分割缓存。
# 假设每块硬盘挂载在相应的目录中:/mnt/disk1、/mnt/disk2、/mnt/disk3, 使用了3个独立的缓存,每个缓存专用一块硬盘,另外,3个独立的线程池也各自专用一块硬盘。
proxy_cache_path /mnt/disk1 levels=1:2 keys_zone=cache_1:256m max_size=1024G use_temp_path=off;
proxy_cache_path /mnt/disk2 levels=1:2 keys_zone=cache_2:256m max_size=1024G use_temp_path=off;
proxy_cache_path /mnt/disk3 levels=1:2 keys_zone=cache_3:256m max_size=1024G use_temp_path=off;

# 缓存之间(其结果就是磁盘之间)的负载均衡使用 split_clients 模块
split_clients $request_uri $disk {
  33.3%     1;
  33.3%     2;
  *         3;
}
location / {
  proxy_pass http://127.0.0.1:9090;
  proxy_cache_key $request_uri;
  proxy_cache cache_$disk;
}
实践示例:
- 示例1.
proxy_cache_path /path/to/cache levels=1:2 keys_zone=mycache:10m max_size=10g inactive=60m use_temp_path=off;
upstream my_upstream {
  server 192.168.1.20:8080 weight=5 max_fails=5 fail_timeout=30s;
  server 192.168.1.10:8080 weight=5 max_fails=5 fail_timeout=30s;
}
server {
  location / {
    proxy_cache mycache;
    proxy_pass http://my_upstream;
  }
}
- 示例2:
http {
    ...
    proxy_cache_path /opt/app levels:1:2 keys_zone=weiyigeek_cache:10m max_size=10g inactive=60m use_temp_path=off;
    map $request_method $purge_method {
      PURGE   1;
      default 0;
    }
    ...
    server {
      ...
      location / {
          proxy_cache weiyigeek_cache;
          proxy_pass http://weiyigeek;
          proxy_cache_valid 200 304 12h;
          proxy_cache_valid any 10m;
          proxy_cache_key $host$uri$is_args$args;
          proxy_cache_purge $purge_method;
          add_header Nginx-Cache "$upstream_cache_status";
          proxy_net_upstream error timeout invalid_header http_500 http_502;
          include proxy_params;
      }
      ...
    }
}
温馨提示: 在proxy_cache_path指令中的use_temp_path=off参数,表示会将临时文件保存在缓存数据的同一目录中,此举避免在更新缓存时,磁盘之间互相复制响应数据,减少磁盘IO压力。
补充说明:
问: 如何清理指定缓存?
> 1.rm -rf 删除缓存目录内容
> 2.第三方扩展模块ngx_cache_purge
Nginx 之 黑白名单限制与请求限流
描述: 通常为了防止黑客攻击以及恶意爬虫爬取, 我们需要针对Nginx服务器配置黑白名单和限流措施。
黑白名单之deny 与 allow
描述: 利用 include 指令添加黑白名单配置文件,该指令可以在http, server, location, limit_except语句块,例如:
# 白名单
include whiteip.conf;
# allow 192.168.12.0/24; # 允许IP段
# allow 127.0.0.1;       # 允许单个IP
# allow all;             # 允许所有IP

# 黑名单
include blockip.conf;
# deny 127.0.0.1; # 屏蔽单个IP
# deny all; # 屏蔽所有IP
温馨提示: 当被屏蔽的 IP 再次访问我们的nginx服务器网页是,将会显示 403 页面。
访问限制之并发连接与请求速率
描述: 我们可以分别利用Nginx提供的 limit_conn_zone 与 limit_req_zone 模块来限制每个IP的连接数以及请求数。$binary_remote_addr 是限制同一客户端ip地址(节约空间), 注意不是使用$remote_addr变量;
http {
  # - limit_conn_zone:限制每个IP的并发连接数
  # 例如 blogweiyigeektop 是定义的一个会话区其用于记录会话状态信息。
  limit_conn_zone $binary_remote_addr zone=blogweiyigeektop:10m;
  limit_conn_zone $server_name zone=serverweiyigeektop:10m;
  limit_conn_log_level info;

  # - limit_req_zone:限制每个IP的请求数
  limit_req_zone $binary_remote_addr zone=weiyigeek_top:10m rate=1r/s;
	limit_req_zone $binary_remote_addr $uri zone=blog_weiyigeek_top:3m rate=1r/s; # $uri 表示同个ip 访问同个uri 才会进入限制

  server {
    # 限连接数
    location  ^~ /download1/ {
      limit_conn serverweiyigeektop 1000; # 表示该服务提供的总连接数最大不超过1000,超过的请求会被拒绝
      limit_conn blogweiyigeektop 4;   # 表示对blogweiyigeektop空间中的每个IP的最大并发连接数为4
      limit_rate 200k;                 # 注意此处是对连接的限速不是对IP的限速
      alias /data/www.weiyigeek.top/download1/;
    }

    # 限请求速率
    location  ^~ /download2/ {
      # 允许超过频率限制的请求数不多于5个,无延迟表示请求超过频次时,可提供处理(burst + rate)个请求的能力,注意 nodelay 是要和 burst 配合使用的。
			limit_req zone=weiyigeek_top burst=5 nodelay;
			alias /data/blog.weiyigeek.top/download2/;
    }
  }
}
动态屏蔽恶意IP
Step 1.从logs目录下日志文件中安装指定规则查找要屏蔽的IP执行如下命令awk '{print $1}' access.log |sort |uniq -c|sort -n即可,就可以统计出IP的访问次数。
68 218.76.35.4
73 42.192.96.35
94 139.155.14.45
221 223.202.212.140
- Step 2.自动化脚本简单实现访问请求次数多的IP将进行封禁,
#! /bin/bash
log_nginx="/var/log/nginx"            	# nginx日志文件
blockfile="/usr/local/nginx/conf.d"     # ip黑名单存放目录
ip_tempfile="/tmp/nginx/ip.txt"

# 取出日志中符合条件的ip写入ip.txt,并过滤掉重复的
grep "/atom.xml" $log_nginx/access.log | awk '{print $1}' | sort -rn |uniq -c |awk '{print $2}' > /tmp/nginx/ip.txt

for ip in `cat /home/shell/ip.txt`;do
  result=$(grep $ip $blockfile/blockip.conf)

  #判断ip是否已经被屏蔽
  if [ -z "$result" ]; then

  #分析ip请求的次数
  count=$(grep $ip $log_nginx/access.log|grep "app/user/getCode"|wc -l)

  # 请求次数大于等于20次就进行屏蔽
  if [ $count -ge 20 ]; then
    echo "deny $ip;" >> $blockfile/blockip.conf
  fi
fi
done

#重启nginx
/usr/local/nginx/sbin/nginx -s reload
温馨提示: 上述并不是一个非常好的方式,此种方式误杀明显,建议与请求限制联合使用,于此同时我们可以利用Lua + redis实现一个动态封禁与解封(这个后续在实现)。
白名单与限制联合使用:
描述: 如果 Nginx 前面有 lvs 或者 haproxy 之类的负载均衡或者反向代理,nginx 获取的都是来自负载均衡的连接或请求,此时是不应该限制负载均衡的连接和请求,这就需要 geo 和 map 模块设置白名单了;
geo $whiteiplist  {
  default 1;
  10.11.15.161 0;
}
map $whiteiplist $limit {
  1 $binary_remote_addr;
  0 "";
}
limit_req_zone $limit zone=one:10m rate=10r/s;
limit_conn_zone $limit zone=addr:10m;
欢迎各位志同道合的朋友一起学习交流,如文章有误请留下您宝贵的知识建议,通过邮箱【master#weiyigeek.top】联系我哟!
文章书写不易,如果您觉得这篇文章还不错的,请给这篇专栏 【点个赞、投个币、收个藏、关个注,转个发】(人间五大情),这将对我的肯定,谢谢!。
这篇关于小白入门学习Nginx代理服务器?看这篇最新Nginx进阶学习最佳配置实践指南就OK了的文章就介绍到这儿,希望我们推荐的文章对大家有所帮助,也希望大家多多支持为之网!
- 2024-10-29Nginx发布学习:从入门到实践的简单教程
- 2024-10-28Nginx发布:新手入门教程
- 2024-10-21nginx 怎么设置文件上传最大20M限制-icode9专业技术文章分享
- 2024-10-17关闭 nginx的命令是什么?-icode9专业技术文章分享
- 2024-09-17Nginx实用篇:实现负载均衡、限流与动静分离
- 2024-08-21宝塔nginx新增8022端口方法步骤-icode9专业技术文章分享
- 2024-08-21nginx配置,让ws升级为wss访问的方法步骤-icode9专业技术文章分享
- 2024-08-15nginx ws代理配置方法步骤-icode9专业技术文章分享
- 2024-08-14nginx 让访问带有/relid的地址返回404 ,例子 /relid-x-0.36-y-131.html-icode9专业技术文章分享
- 2024-08-14nginx 判断地址有/statics/的路径,指向到/home/html/statics/目录-icode9专业技术文章分享


