低资源部署 KubeSphere 4.1.2:2 核 4G 极简云原生实战
2024/12/3 21:02:53
本文主要是介绍低资源部署 KubeSphere 4.1.2:2 核 4G 极简云原生实战,对大家解决编程问题具有一定的参考价值,需要的程序猿们随着小编来一起学习吧!
本文首发:编码如写诗
KubeSphere V4已经开源一段时间了,推出了全新的 KubeSphere 架构:KubeSphere LuBan,它构建在 K8s 之上,支持高度可配置和可扩展。该版本只安装KubeSphere Core核心组件,即可实现KubeSphre Web控制台的使用。前几天在2核4G的VM虚拟机体验了一下。安装过程极快,服务非常精简。
本文演示在线联网部署,在线安装相对简单,以下部署过程较多简写,必要位置进行了注意事项和详细说明。如要查看具体安装过程和含义可浏览官方文档 在 Linux 上安装 K8s 和 KubeSphere
服务器配置:all in one形式部署
| 主机名 | IP | CPU | 内存 | 架构 | OS | 用途 |
|---|---|---|---|---|---|---|
| node1 | 192.168.150.128 | 2 | 4 | x86_64 | Ubuntu24.04.1 | 主集群 |
| node1 | 192.168.150.129 | 2 | 4 | x86_64 | Ubuntu24.04.1 | 成员集群 |
1. 前提条件
- 官网原话:
集群节点的操作系统和版本须为 Ubuntu 16.04、Ubuntu 18.04、Ubuntu 20.04、Ubuntu 22.04、Debian 9、Debian 10、CentOS 7、CentOS Stream、RHEL 7、RHEL 8、SLES 15 或 openSUSE Leap 15。多台服务器的操作系统可以不同。关于其它操作系统和版本支持,请联系 KubeSphere 技术支持。
Tips:也可以联系笔者
- 安装依赖项和初始化操作系统请看
2.4 初始化操作系统章节,在线安装非常简单。
2. 创建 Kubernetes 集群
2.1 创建安装目录
在/home目录下创建 ks目录用于安装部署 K8s 和 KubeSphere。
在/home 目录下创建ks 目录的原因如下:
某些操作系统默认的根目录(/)仅提供 50GB 的存储空间,而 /home 目录通常有更大的可用空间。
笔者所在公司在为用户提供服务器和操作系统以安装集群时,可能会遇到根目录存储不足的问题。因此,建议直接在/home 目录下新建安装目录,确保空间充足。
mkdir -p /home/ks
cd /home/ks
2.2 下载Kubekey
export KKZONE=cn
curl -sfL https://get-kk.kubesphere.io |  sh -
该命令会下载最新版 Kubekey,不同版本 Kubekey,所依赖的服务(如:docker,etcd等)和镜像版本(如:pause)不同。若需要指定版本的Kubekey,可使用命令
curl -sfL https://get-kk.kubesphere.io | VERSION={version} sh -
version为需要的版本。如:curl -sfL ``https://get-kk.kubesphere.io`` | VERSION=v3.1.5 sh -
2.3 创建集群配置文件
查看Kubekey支持的K8s版本
./kk version --show-supported-k8s
v1.19.0
v1.19.8
v1.19.9
v1.19.15
...
v1.29.10
v1.30.0
v1.30.1
v1.30.2
v1.30.3
v1.30.4
v1.30.5
v1.30.6
v1.31.0
v1.31.1
v1.31.2
由于本次重在体验和测试,这里使用较新的1.30.6版本
./kk create config --with-kubernetes v1.30.6
2.4 初始化操作系统
./kk init os
该命令kk会自动判断操作系统以安装依赖项和进行必要的初始化配置。关于这点官方文档是使用的apt install去下载依赖项,可能考虑节点多的话,需要每次下载/拷贝kk麻烦。实际上在线部署使用kk init os还是很方便的,笔者在线部署场景经常使用,命令少,好记。注意:离线部署,该命令不可用。
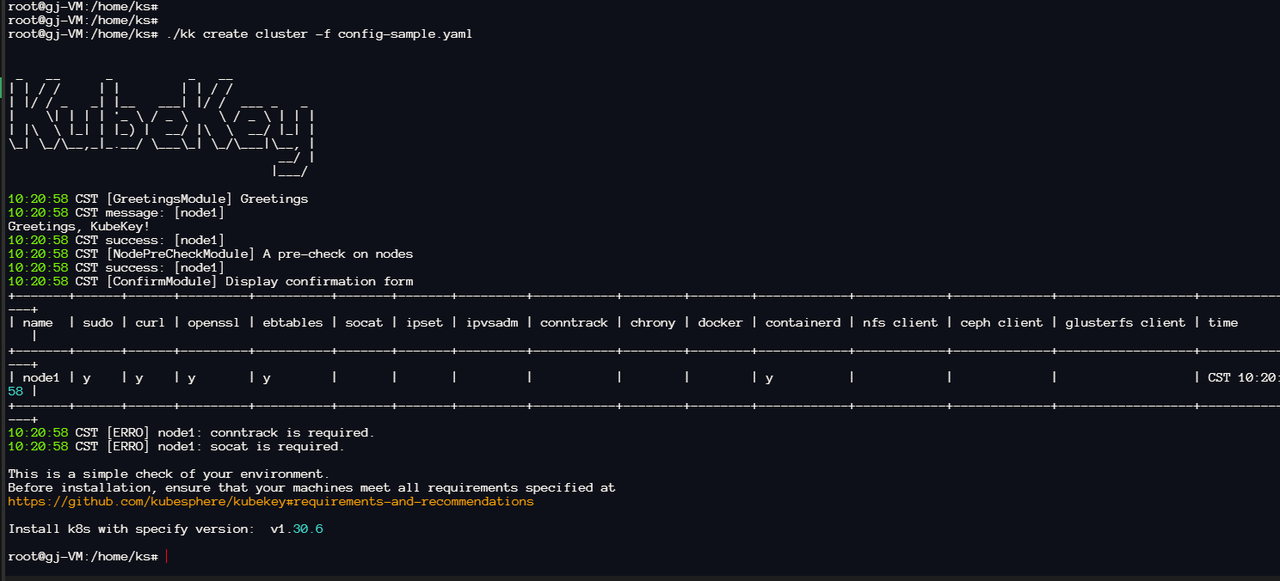
初始化前:
未初始化时,直接创建集群会报错提示并中断执行。
初始化后:
2.5 修改配置文件
由于笔者用惯了docker,此处修改容器运行时为docker。生产环境K8s 1.24以上版本建议还是使用containerd
apiVersion: kubekey.kubesphere.io/v1alpha2
kind: Cluster
metadata:
  name: sample
spec:
  hosts:
  - {name: node1, address: 192.168.150.128, internalAddress: 192.168.150.128, user: root, password: "123@213"}
  roleGroups:
    etcd:
    - node1
    control-plane:
    - node1
    worker:
    - node1
  controlPlaneEndpoint:
    ## Internal loadbalancer for apiservers
    # internalLoadbalancer: haproxy

    domain: lb.kubesphere.local
    address: ""
    port: 6443
  system:
    ntpServers:
      - node1 # 配置时间同步,所有节点服务器同步node1的时间
    timezone: "Asia/Shanghai"
  kubernetes:
    version: v1.30.6
    clusterName: cluster.local
    autoRenewCerts: true
    # 此处修改运行时为:docker
    containerManager: docker # 部署 kubernetes v1.24+ 版本,建议将 containerManager 设置为 containerd
  etcd:
    type: kubekey
  network:
    plugin: calico
    kubePodsCIDR: 10.233.64.0/18
    kubeServiceCIDR: 10.233.0.0/18
    ## multus support. https://github.com/k8snetworkplumbingwg/multus-cni
    multusCNI:
      enabled: false
  registry:
    privateRegistry: ""
    namespaceOverride: ""
    registryMirrors: []
    insecureRegistries: []
  addons: []
说明: 具体参数含义可查看官方文档:在 Linux 上安装 K8s 和 KubeSphere,这里写一下注意事项
config-sample.yaml配置文件的spec:hosts 参数
官方介绍
- address 服务器的 SSH 登录 IP 地址。
- internalAddress 服务器在子网内部的 IP 地址。
注:若部署的服务器在同一区域,内网IP可以互通,address 和internalAddress 都使用内网IP。之前遇到过有的小伙伴买的云服务器做测试,address使用公网IP,由于部署过程通信拷贝文件走了address,公网带宽又低。导致创建集群时异常的慢。
2.6 创建K8s集群
./kk create cluster -f config-sample.yaml
由于运行时使用了docker,执行后会有如下Notice提示
root@gj-VM:/home/ks# ./kk create cluster -f config-sample.yaml


 _   __      _          _   __
| | / /     | |        | | / /
| |/ / _   _| |__   ___| |/ /  ___ _   _
|    \| | | | '_ \ / _ \    \ / _ \ | | |
| |\  \ |_| | |_) |  __/ |\  \  __/ |_| |
\_| \_/\__,_|_.__/ \___\_| \_/\___|\__, |
                                    __/ |
                                   |___/

11:39:29 CST [GreetingsModule] Greetings
11:39:29 CST message: [node1]
Greetings, KubeKey!
11:39:29 CST success: [node1]
11:39:29 CST [NodePreCheckModule] A pre-check on nodes
11:39:29 CST success: [node1]
11:39:29 CST [ConfirmModule] Display confirmation form
+-------+------+------+---------+----------+-------+-------+---------+-----------+--------+--------+------------+------------+-------------+------------------+--------------+
| name  | sudo | curl | openssl | ebtables | socat | ipset | ipvsadm | conntrack | chrony | docker | containerd | nfs client | ceph client | glusterfs client | time         |
+-------+------+------+---------+----------+-------+-------+---------+-----------+--------+--------+------------+------------+-------------+------------------+--------------+
| node1 | y    | y    | y       | y        | y     | y     | y       | y         | y      |        | y          |            |             |                  | CST 11:39:29 |
+-------+------+------+---------+----------+-------+-------+---------+-----------+--------+--------+------------+------------+-------------+------------------+--------------+

This is a simple check of your environment.
Before installation, ensure that your machines meet all requirements specified at
https://github.com/kubesphere/kubekey#requirements-and-recommendations

Install k8s with specify version:  v1.30.6

[Notice]
For Kubernetes v1.24 and later, dockershim has been deprecated.
Current runtime is set to Docker and `cri-dockerd` will be installed to support Kubernetes v1.24 and later.
Yoc can also specify a container runtime other than Docker to install Kubernetes v1.24 or later.
You can set "spec.kubernetes.containerManager" in the configuration file to "containerd" or add "--container-manager containerd" to the "./kk create cluster" command.
For more information, see:
https://github.com/kubesphere/kubekey/blob/master/docs/commands/kk-create-cluster.md
https://kubernetes.io/docs/setup/production-environment/container-runtimes/#container-runtimes
https://kubernetes.io/blog/2022/02/17/dockershim-faq/
https://github.com/Mirantis/cri-dockerd

Continue this installation? [yes/no]:
输入y或者yes开始安装部署
大概等待10分钟,部署完成
11:50:23 CST success: [LocalHost]
11:50:23 CST Pipeline[CreateClusterPipeline] execute successfully
Installation is complete.

Please check the result using the command:

        kubectl get pod -A
ps:若发现下载服务过程很慢,可以尝试ctrl + c后重新输入export KKZONE=cn。有个小伙伴电脑,出现同一个窗口,输入了export KKZONE=cn后下载了两个服务后不生效了。需要重新输入后再次执行create cluster才可以,不确定是否为当前版本Bug,暂未排查原因。
2.7 验证
root@gj-VM:/home/ks# kubectl get pod -A
NAMESPACE     NAME                                       READY   STATUS    RESTARTS   AGE
kube-system   calico-kube-controllers-848b87ffbc-6hh97   1/1     Running   0          29m
kube-system   calico-node-ks586                          1/1     Running   0          29m
kube-system   coredns-848f88b9dc-hsmh9                   1/1     Running   0          29m
kube-system   coredns-848f88b9dc-k9djl                   1/1     Running   0          29m
kube-system   kube-apiserver-node1                       1/1     Running   0          29m
kube-system   kube-controller-manager-node1              1/1     Running   0          29m
kube-system   kube-proxy-2l2rx                           1/1     Running   0          29m
kube-system   kube-scheduler-node1                       1/1     Running   0          29m
kube-system   nodelocaldns-l59qn                         1/1     Running   0          29m
可以看到K8s所有pod运行中,K8s已经部署完成。
3.安装 KubeSphere
本章节只部署 KubeSphere 4.1.2的ks-core核心组件,扩展组件暂不安装。安装完成后,即可访问 KubeSphere Web 控制台,K8s和KubeSphere的核心功能已可使用。
3.1 安装Helm
curl https://raw.githubusercontent.com/helm/helm/main/scripts/get-helm-3 | bash
root@gj-VM:/home/ks# curl https://raw.githubusercontent.com/helm/helm/main/scripts/get-helm-3 | bash
  % Total    % Received % Xferd  Average Speed   Time    Time     Time  Current
                                 Dload  Upload   Total   Spent    Left  Speed
100 11903  100 11903    0     0  13760      0 --:--:-- --:--:-- --:--:-- 13760
[WARNING] Could not find git. It is required for plugin installation.
Helm v3.16.3 is available. Changing from version v3.14.3.
Downloading https://get.helm.sh/helm-v3.16.3-linux-amd64.tar.gz
Verifying checksum... Done.
Preparing to install helm into /usr/local/bin
helm installed into /usr/local/bin/helm
3.2 安装 KubeSphere Core
helm upgrade --install -n kubesphere-system --create-namespace ks-core https://charts.kubesphere.io/main/ks-core-1.1.3.tgz --debug --wait --set global.imageRegistry=swr.cn-southwest-2.myhuaweicloud.com/ks
部署过程非常快,快到让人怀疑,2H4G的硬件,不到2分钟安装完了,比之前版本离线部署还快。
Thank you for choosing KubeSphere Helm Chart.

Please be patient and wait for several seconds for the KubeSphere deployment to complete.

1. Wait for Deployment Completion

    Confirm that all KubeSphere components are running by executing the following command:

    kubectl get pods -n kubesphere-system
2. Access the KubeSphere Console

    Once the deployment is complete, you can access the KubeSphere console using the following URL:

    http://192.168.150.128:30880

3. Login to KubeSphere Console

    Use the following credentials to log in:

    Account: admin
    Password: P@88w0rd
再次查看pod情况
root@node1:~# kubectl get pod -A
NAMESPACE           NAME                                       READY   STATUS    RESTARTS        AGE
kube-system         calico-kube-controllers-848b87ffbc-2mqwb   1/1     Running   1 (2m25s ago)   130m
kube-system         calico-node-kmspv                          1/1     Running   1 (2m25s ago)   130m
kube-system         coredns-9dc95d955-4th25                    1/1     Running   1 (2m25s ago)   130m
kube-system         coredns-9dc95d955-zr77b                    1/1     Running   1 (2m25s ago)   130m
kube-system         kube-apiserver-node1                       1/1     Running   1 (2m25s ago)   131m
kube-system         kube-controller-manager-node1              1/1     Running   1 (2m25s ago)   131m
kube-system         kube-proxy-rlnsq                           1/1     Running   1 (2m25s ago)   130m
kube-system         kube-scheduler-node1                       1/1     Running   1 (2m25s ago)   131m
kube-system         nodelocaldns-rx4w2                         1/1     Running   1 (2m25s ago)   130m
kubesphere-system   extensions-museum-d77fddd77-5tqpp          1/1     Running   1 (2m25s ago)   70m
kubesphere-system   ks-apiserver-59b7c94c77-fpkmv              1/1     Running   1 (2m25s ago)   70m
kubesphere-system   ks-console-b9ff8948c-687zd                 1/1     Running   1 (2m25s ago)   70m
kubesphere-system   ks-controller-manager-777888fdb8-nlkmr     1/1     Running   1 (2m25s ago)   70m
可以看到kubespehre-system的pod只有4个,kube-sysem的 pod 有9个,对比 K8s 1.23和1.22也少了3~4个。也没有其他的ns,整体非常精简。
4.体验KubeSphere控制平台
4.1 登录
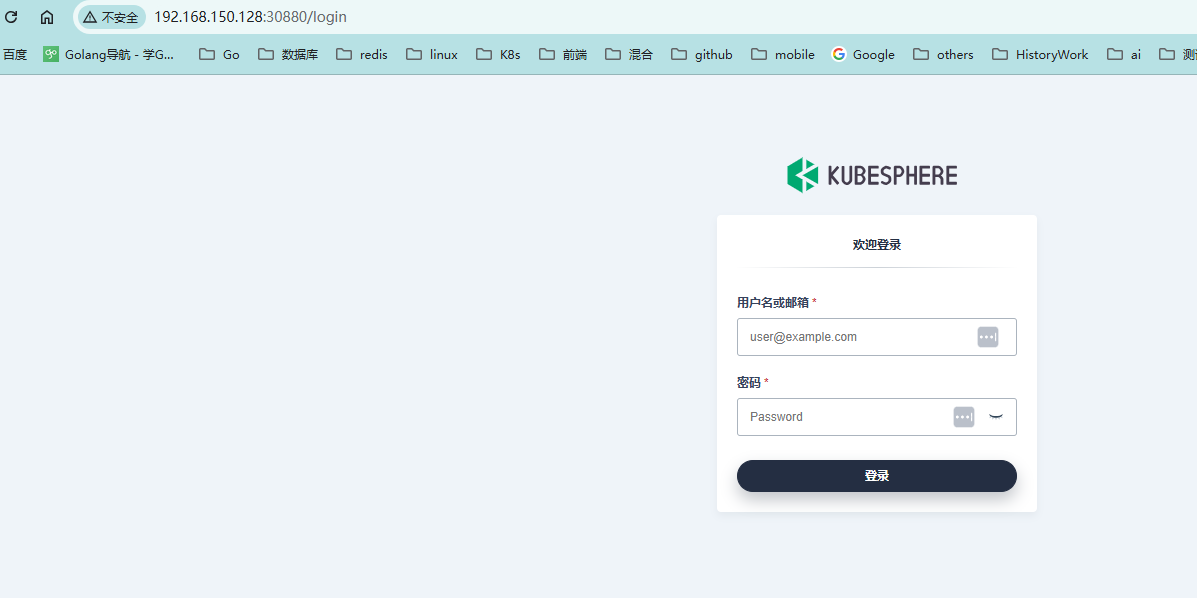
访问http://IP:30080登录 KubeSphere 管理平台
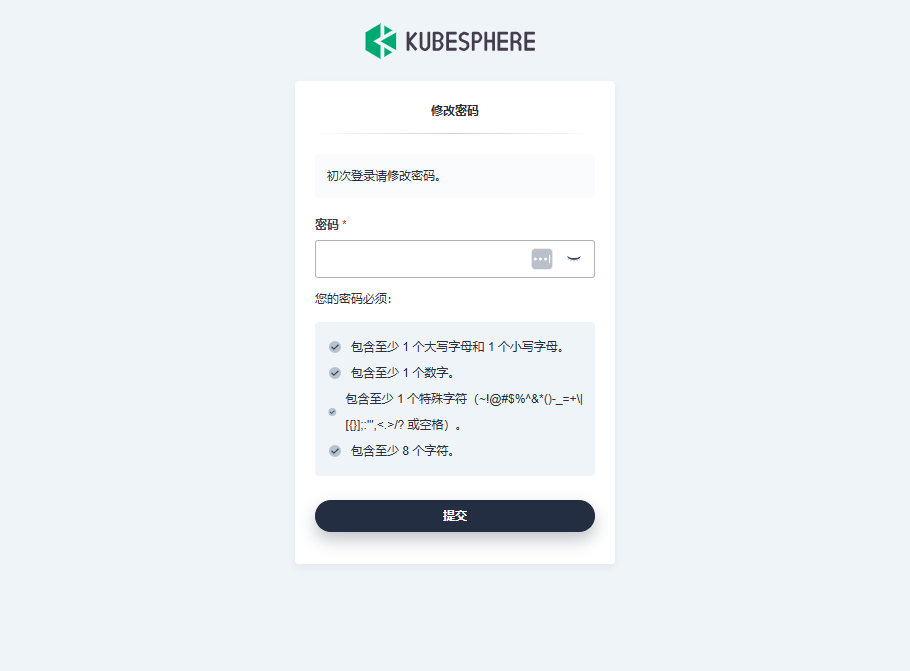
输入默认用户名密码:admin/P@88w0rd登录,之前版本不会强制要求更改默认密码。KubeSphere 4.1.2版本使用默认用户登录后,要求更改默认密码才可后续访问。
注意:根据海勒姆定律,非必要不修改。此变更,虽提高了安全性,若业务系统有使用的默认用户名密码调用 KubeSphere 的,影响比较大。需要业务系统同步修改(PS:之前我司有个研发小伙伴写的代码没有使用后创建的账号而用了默认admin/P@88w0rd)。
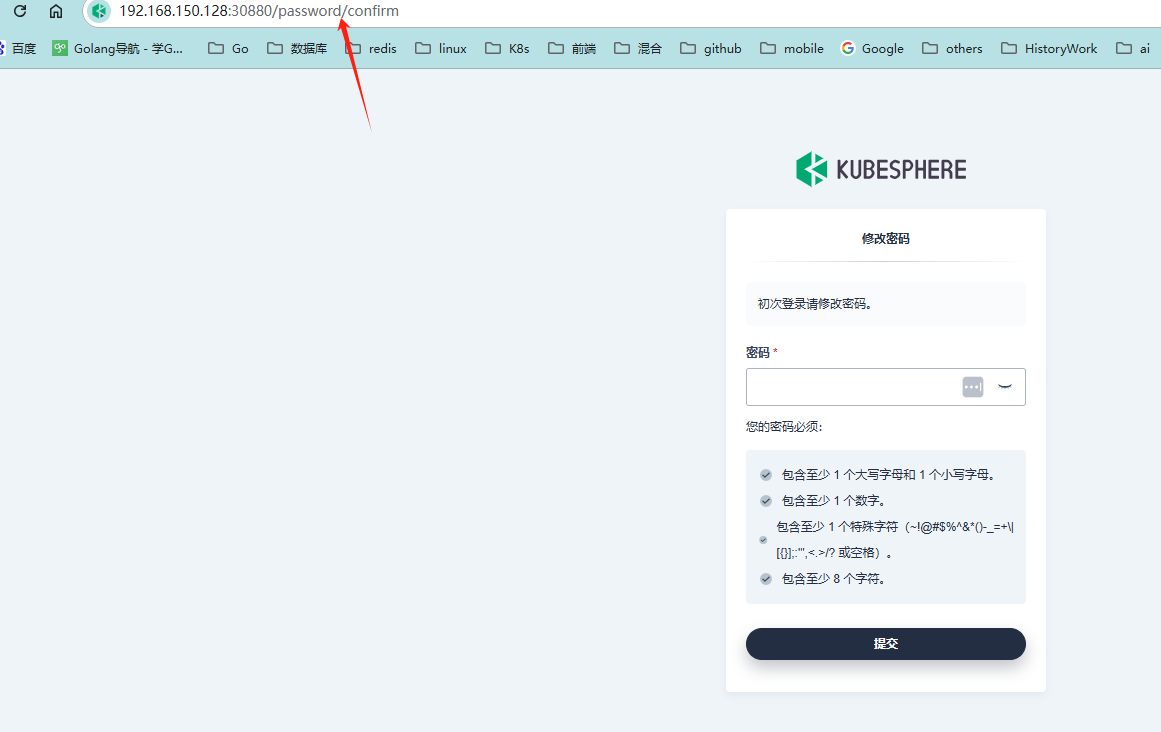
若想不修改密码继续使用后续功能。可通过以下二种方式规避。
- 修改浏览器url去掉
password/confirm
如,修改192.168.150.128:30880/password/confirm去掉后直接访问192.168.150.128:30880
- 先修改成一个复杂密码,然后用复杂密码登录后再修改为
P@88w0rd。由于修改过密码之后再登录不会出现强制修改密码。
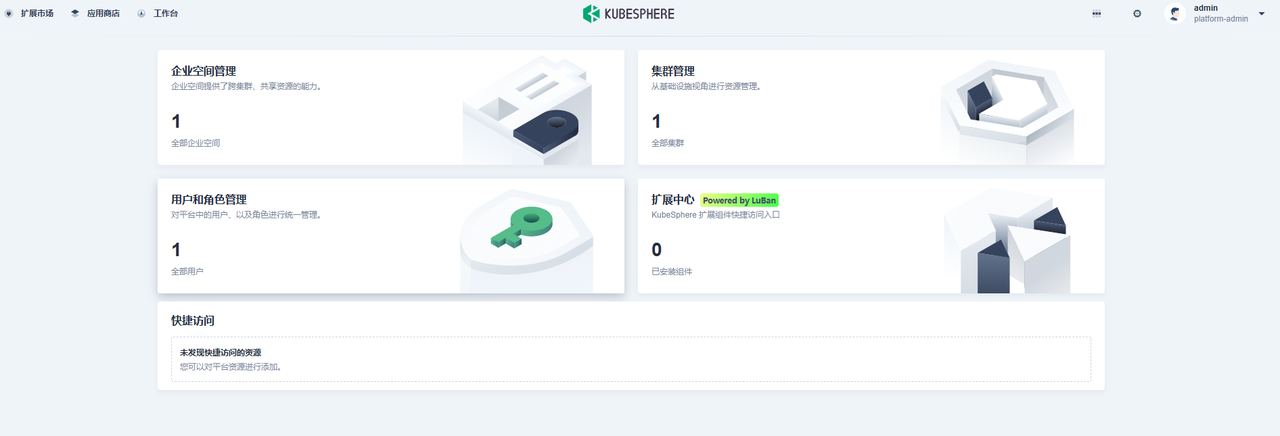
登录后,此时将会看到全新的 KubeSphere 页面
4.2 集群管理
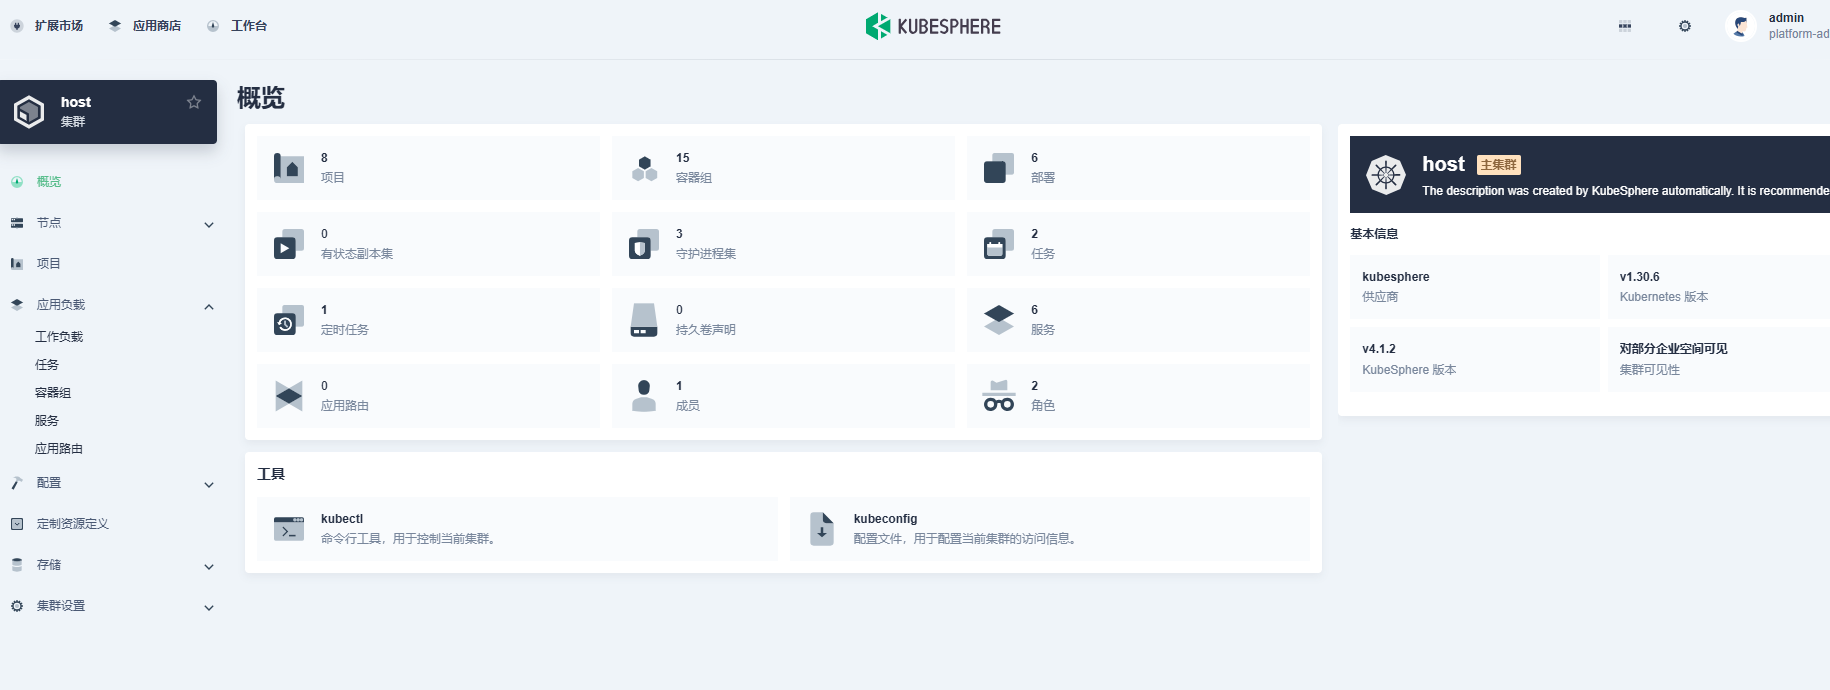
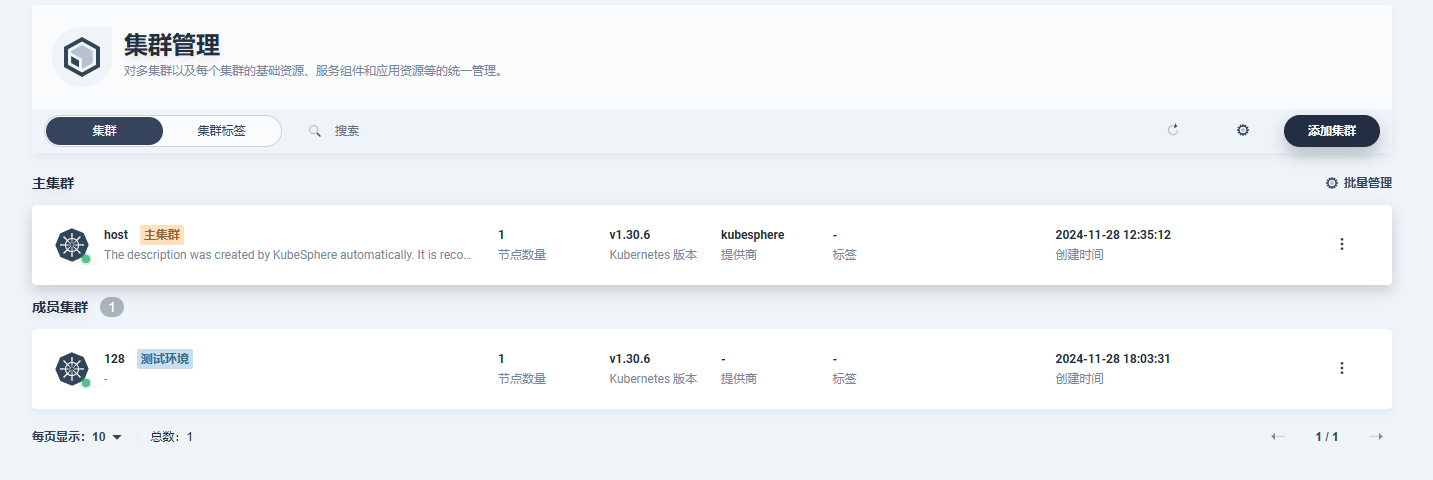
点击集群管理,可以看到之前联邦集群的页面,
进入主集群会看到左侧熟悉的菜单,跟之前的功能基本一致。
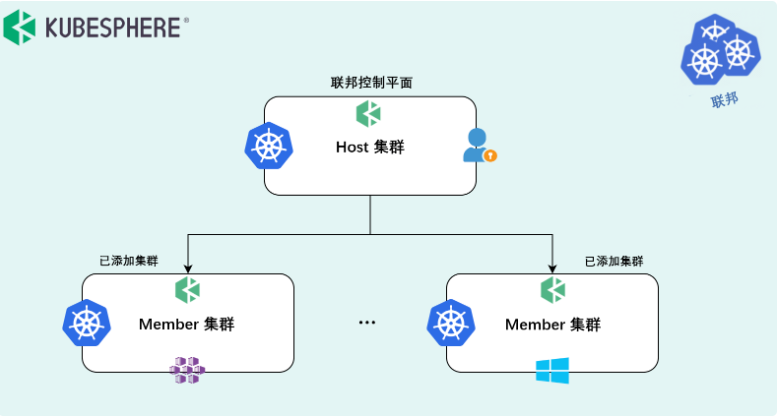
5.添加其他集群,组建集群联邦
5.1 概述
如今,各种组织跨不同的云厂商或者在不同的基础设施上运行和管理多个 K8s 集群的做法非常普遍。由于每个 K8s 集群都是一个相对独立的单元,上游社区正在艰难地研究和开发多集群管理解决方案。即便如此,K8s 集群联邦(Kubernetes Cluster Federation,简称 KubeFed)可能是其中一种可行的方法。
5.2 部署成员集群
重复以上步骤,在129,130创建all in one K8s集群
这里使用129作为主集群,添加128为成员集群
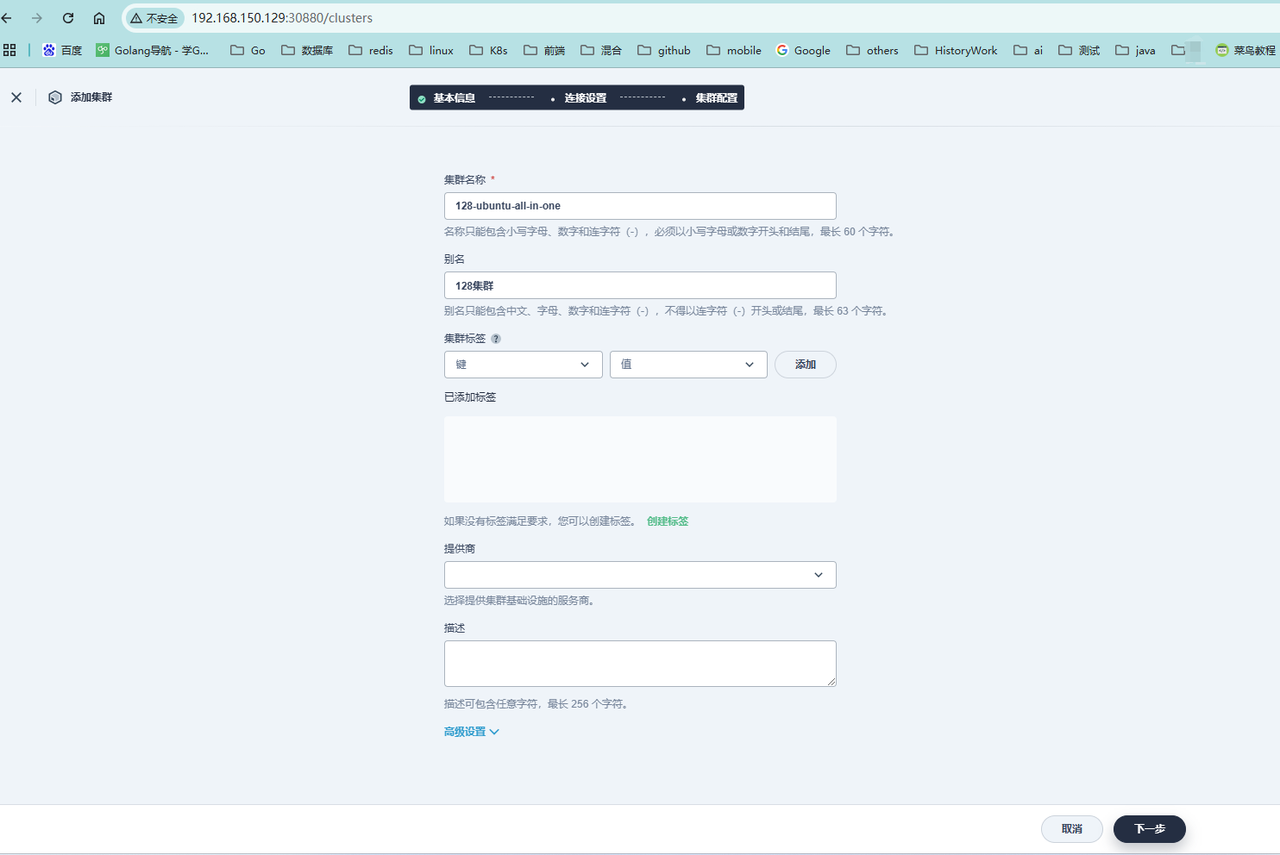
5.3 添加成员集群
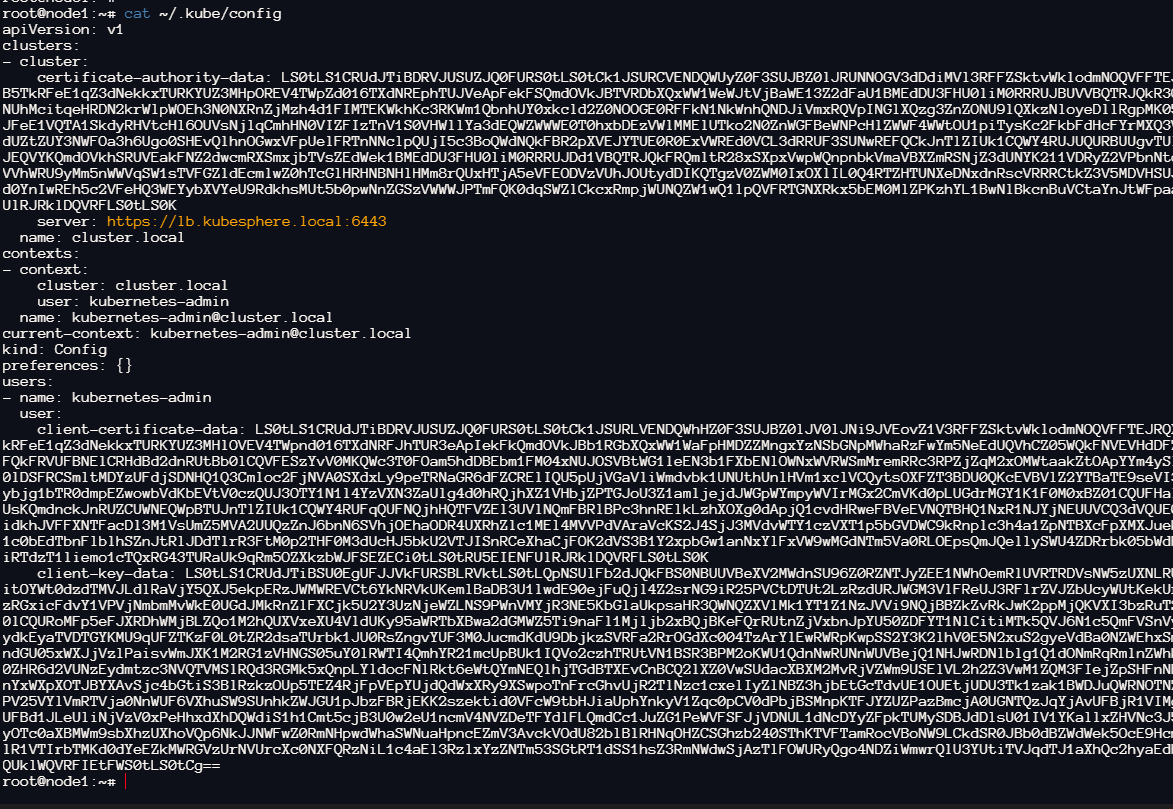
获取成员集群的kubeconfig
kubectl config view --raw
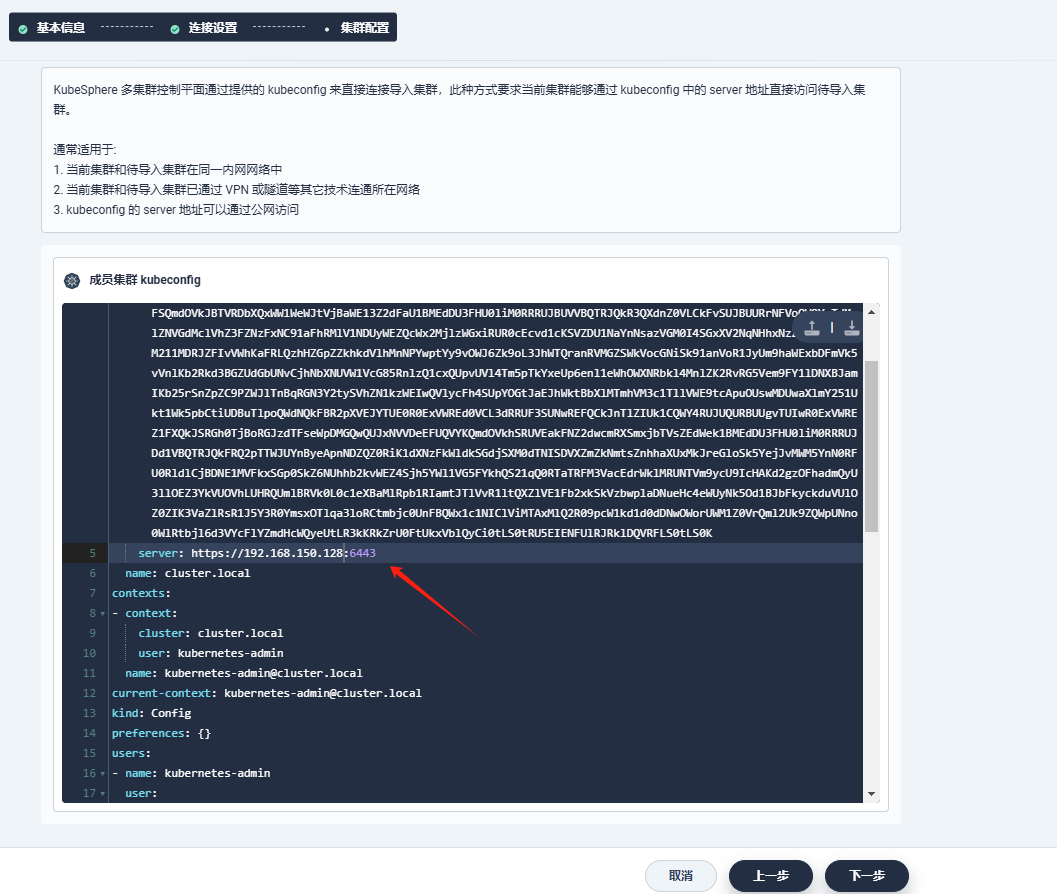
复制 Kubeconfig 信息,并修改其中的 clusters:cluster:server 参数
clusters:
- cluster:
    server: https://<member-cluster-node-ip>:6443
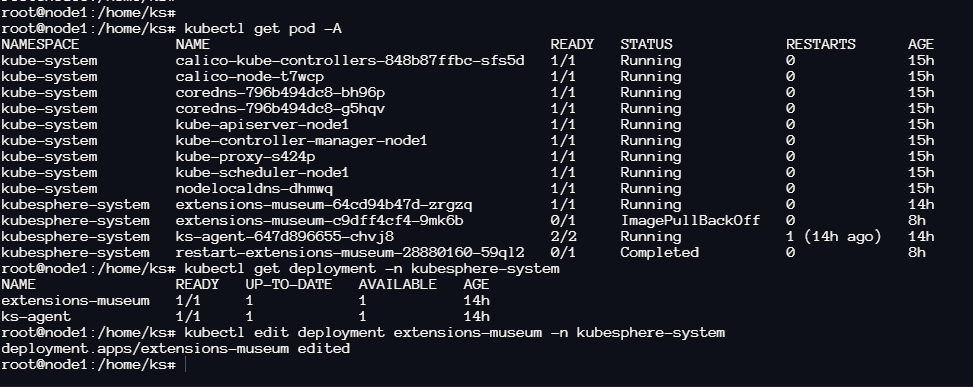
注意:成员集群不要安装 KubeSphere,否则页面点击创建时会没有反应。通过F12查看开发者选项,可以看到400错误,提示current cluster is managed by another host cluster 'host' 成员集群已经由另一个主集群管理。需要先卸载成员集群中的kubesphere部分helm -n kubesphere-system uninstall ks-core
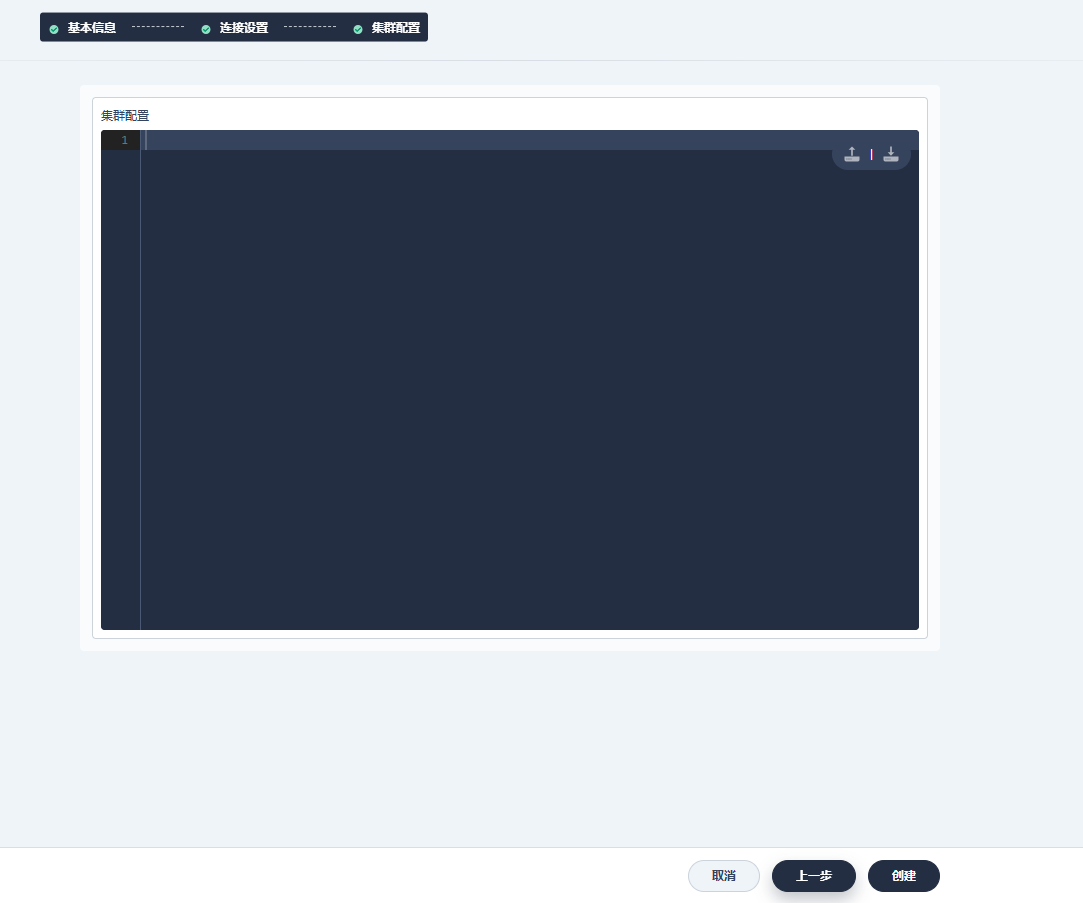
点击下一步后,集群配置不填写,直接点击创建。
注意:成员集群加入过程,成员集群会部署 KubeSphere 相关服务。而成员集群部署 KubeSphere 服务时,直接使用 hub.docker 镜像,由于访问限制,国内没梯子的话会显示一直镜像拉取失败。
修复措施:将以下相关镜像,重新打标签 。因为可以使用优先本地镜像,就不需要去 hub.docker 拉取了。
如:
docker tag swr.cn-southwest-2.myhuaweicloud.com/ks/kubesphere/kubectl:v1.27.17  kubesphere/kubectl:v1.27.17
docker tag swr.cn-southwest-2.myhuaweicloud.com/ks/kubesphere/ks-console:v4.1.2 kubesphere/ks-console:v4.1.2
然而extensions-museum设置的是每次拉取镜像,这时候,我们需要通过edit修改为优先使用本地镜像kubectl edit deployment extensions-museum -n kubesphere-system``IfNotPresent
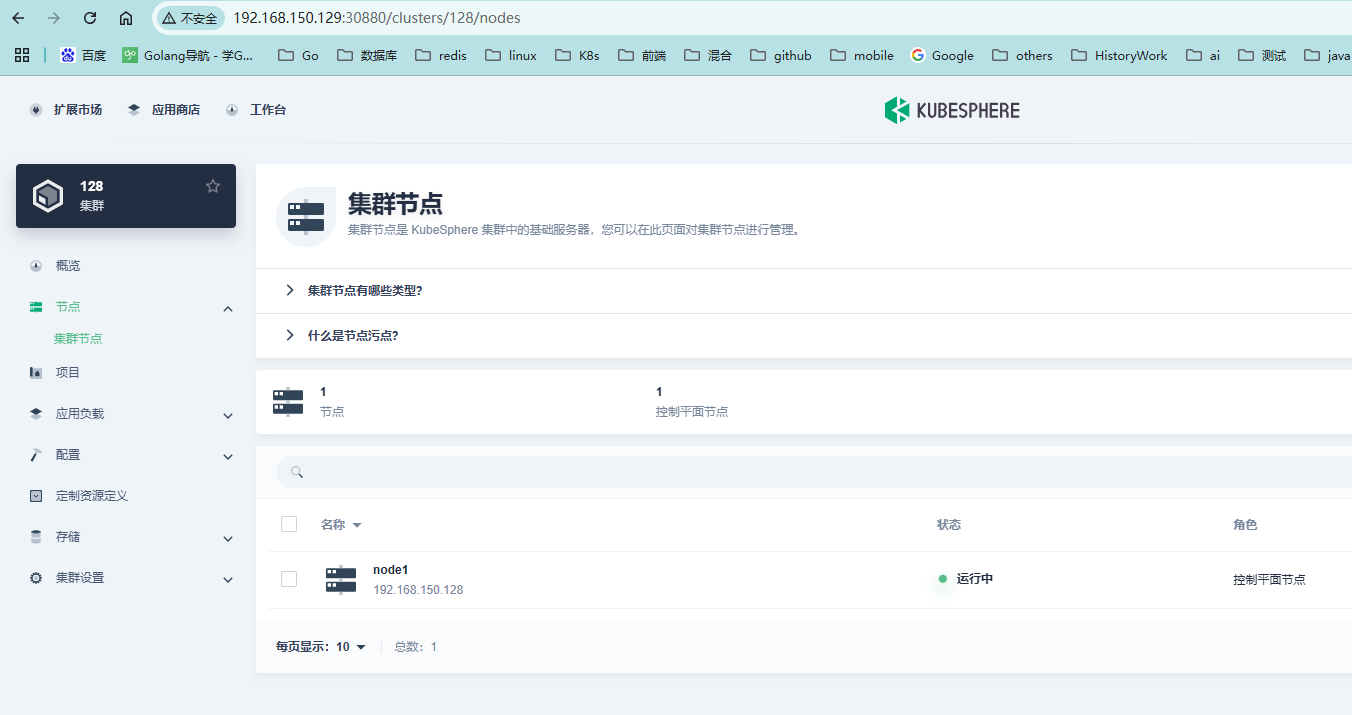
待成员集群中的kubesphere-system项目中的pod都启动正常后,返回主集群管理页面,可以看到成员集群已经准备就绪,添加成功。
点击成员集群,可以进入成员集群管理界面。
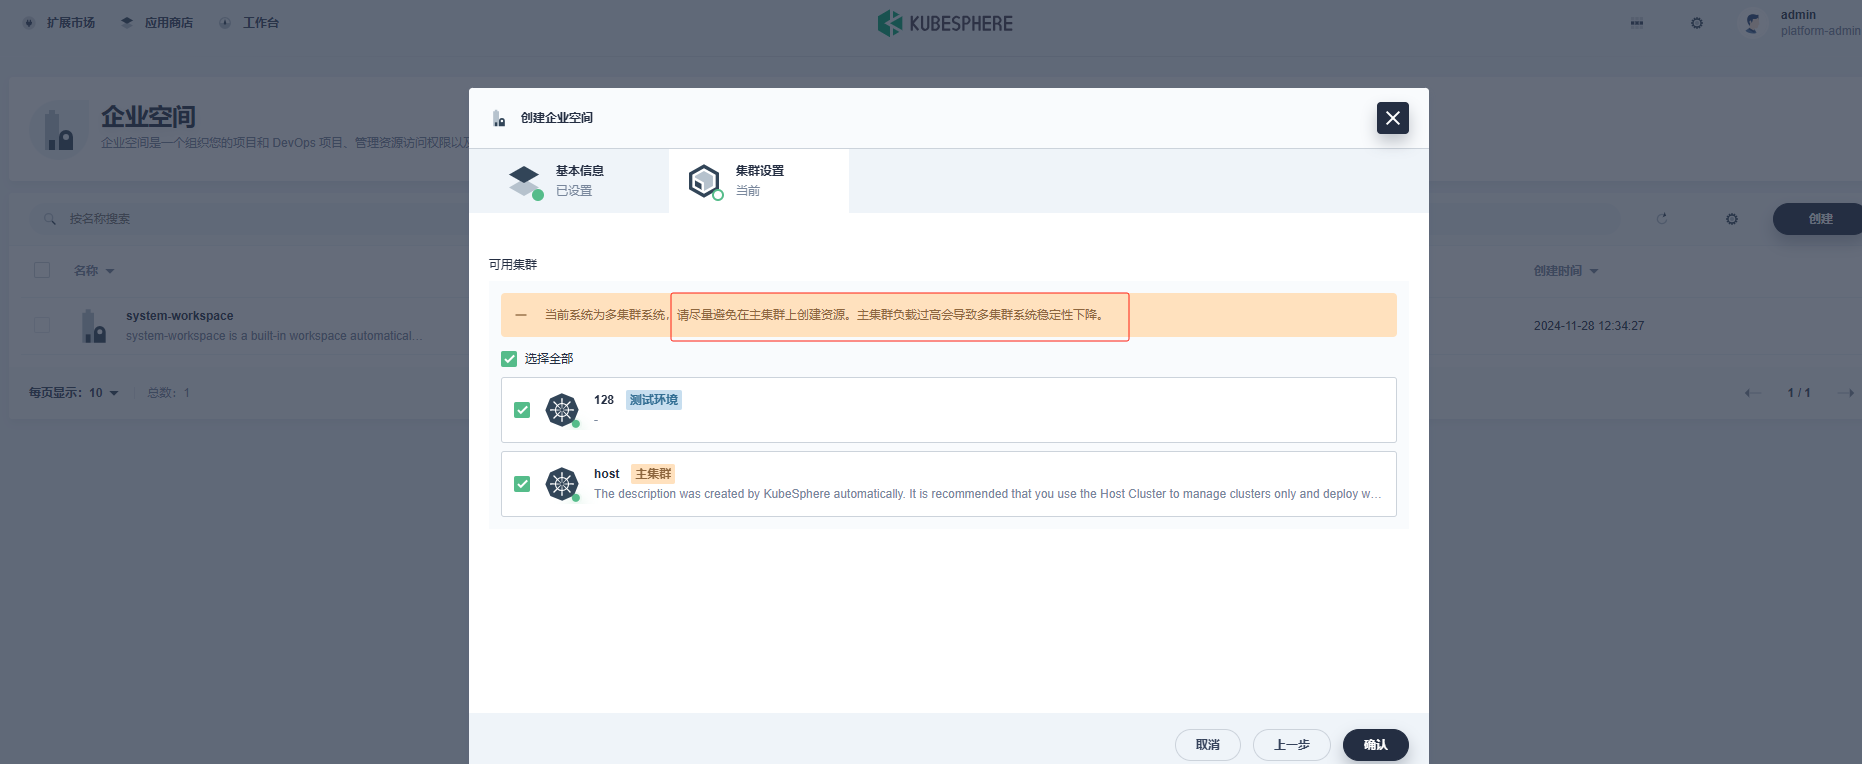
5.4 创建企业空间
点击工作台-左侧企业空间-创建企业空间,填写名称后选择要创建哪个集群。当选择主集群时会出现提示:当前系统为多集群系统,请尽量避免在主集群上创建资源。主集群负载过高会导致多集群系统稳定性下降。
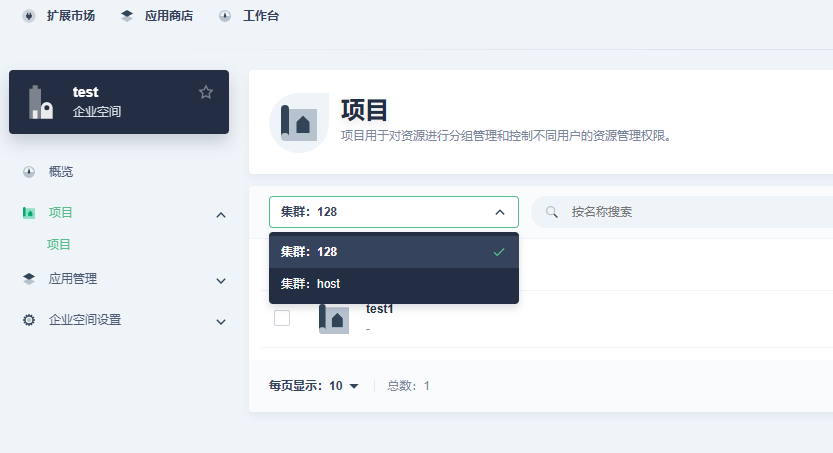
5.5 创建项目
点击新建企业空间后,进入企业空间的项目。当有多个集群有该企业空间时,可选择集群,然后创建至哪个集群。
其他创建/查看应用仓库、工作负载、服务等跟之前一样,具体可自行体验。
到这里,我们用最小化的配置完成了 KubeSphere 4.1.2的部署,联邦集群的添加。整体使用下来,令人很是心动。若是第一次使用或是学习还是推荐使用该版本的。
注意事项
- 测试体验:本文旨在测试和体验 KubeSphere 4.1.2 的新特性和功能。
部署过程中默认仅安装了 KubeSphere 核心组件,因此诸如 Prometheus 监控、告警、日志 等功能并未安装。 - 扩展组件:如需使用上述功能,可通过安装扩展组件实现,具体操作需参考官方文档或自行研究。
- 生产环境:若需用于生产环境,请在部署前进行充分的测试和验证。
本文由博客一文多发平台 OpenWrite 发布!
这篇关于低资源部署 KubeSphere 4.1.2:2 核 4G 极简云原生实战的文章就介绍到这儿,希望我们推荐的文章对大家有所帮助,也希望大家多多支持为之网!
- 2024-12-22揭秘 Fluss:下一代流存储,带你走在实时分析的前沿(一)
- 2024-12-20DevOps与平台工程的区别和联系
- 2024-12-20从信息孤岛到数字孪生:一本面向企业的数字化转型实用指南
- 2024-12-20手把手教你轻松部署网站
- 2024-12-20服务器购买课程:新手入门全攻略
- 2024-12-20动态路由表学习:新手必读指南
- 2024-12-20服务器购买学习:新手指南与实操教程
- 2024-12-20动态路由表教程:新手入门指南
- 2024-12-20服务器购买教程:新手必读指南
- 2024-12-20动态路由表实战入门教程


