用Diffusers结合CivitAI模型、LoRAs和文本反转生成更高质量的图像
2025/1/14 21:03:46
本文主要是介绍用Diffusers结合CivitAI模型、LoRAs和文本反转生成更高质量的图像,对大家解决编程问题具有一定的参考价值,需要的程序猿们随着小编来一起学习吧!
在之前的文中,我们讨论了如何使用 [diffusers](https://huggingface.co/docs/diffusers/en/index) Python 包通过稳定扩散图像生成的管线来使用 CivitAI 模型检查点 生成图像。我们进一步探讨了如何使用 CivitAI LoRAs 来定制和提升扩散模型的输出。
稳定的扩散管道极具可定制性,除了LoRAs以外,还可以使用其他适配器,如DreamBooth、文本反转或IP适配器,进一步增强和调整。每种适配器的使用方式各不相同,不同的适配器可以组合使用以扩大输出图像的增强范围。
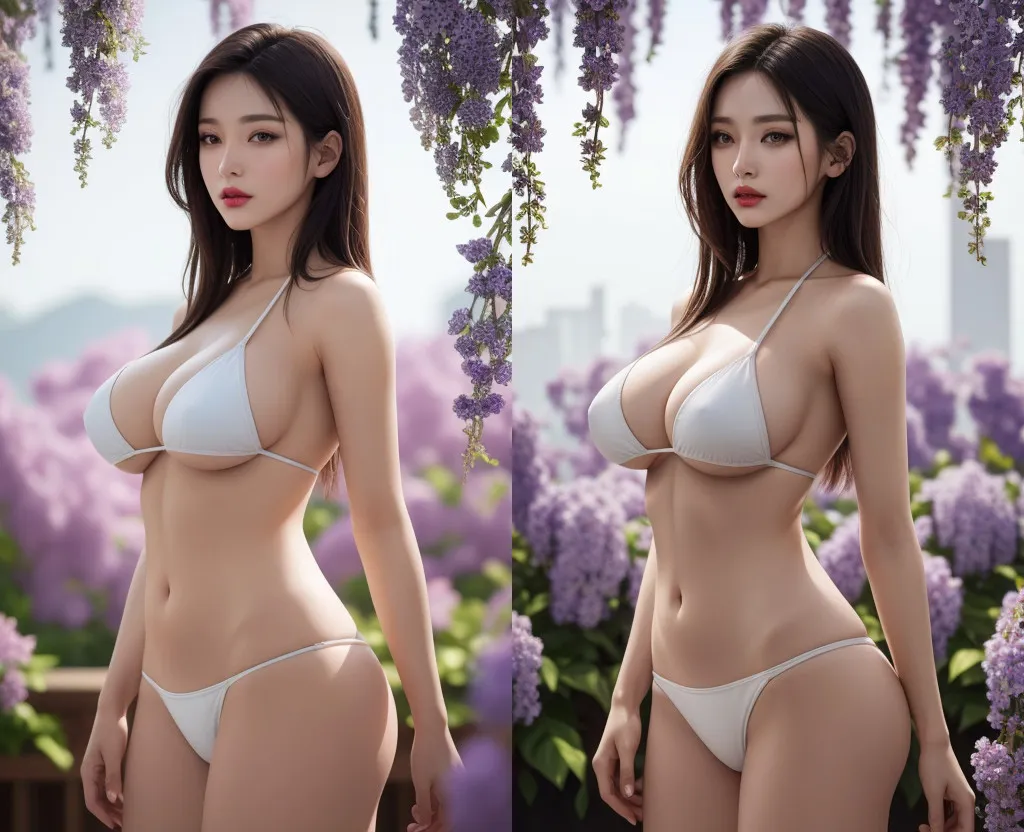
左:基础模型生成的原始图像,右:用LoRA和两个文本反转模型调整的基础模型创建的优化后的图像。作者制作。
在这篇文章中,我们将探讨如何使用这两种技术——LoRAs和文本逆向——来增强通过自定义训练的检查点生成的图像,所有这些检查点都是从CivitAI下载的。
包含Python代码、提示和负提示的Jupyter笔记本在我的GitHub仓库中可以找到。Python代码使用了来自[diffuser_tools](https://github.com/natsunoyuki/diffuser_tools)包中的Text2ImagePipe,该工具将多个有用的diffusers工具封装在一个类中,处理了大部分繁重的工作。以下是在测试代码时使用的依赖项:
以下是一些Python包的版本号:
    transformers==4.41.2
    accelerate==0.32.1
    diffusers==0.29.2
    huggingface_hub==0.23.4
    omegaconf==2.3.0
    compel==2.0.2
    peft==0.11.1
我们下载并使用了K-main模型,这是一个特别设计的1.5版本稳定扩散模型,专门用于生成逼真的K-pop偶像艺术风格图像。
在 [diffusers](https://huggingface.co/docs/diffusers/v0.29.2/en/index) 包的 StableDiffusionPipeline 中,我们跳过了 CLIP 文本编码器的最后两层,使用带有 use_karras_sigmas = True 的 [DPMSolverMultistepScheduler](https://huggingface.co/docs/diffusers/en/api/schedulers/multistep_dpm_solver) 调度器来模拟 CivitAI 模型常用的 DPM++ SDE Karras 调度器。设计了非常详细且长(超过 77 个 token)的提示语和负提示语,并使用 [Compel](https://github.com/damian0815/compel) 处理长于 77 个 token 的提示语和负提示语的嵌入。使用指导比例 scale = 7,共进行 30 次推理。
    clip_skip = 2

    scheduler = "DPMSMS"
    scheduler_configs = {"use_karras_sigmas": True}

    prompt = """(photo-realistic,real photo,masterpiece,best quality,8k,UHD,
    RAW photo,levelled out,super resolution,sharp focus,ultra detailed skin,
    realistic skin,beautiful vivid backgrounds,exquisitely detailed,
    colorful and intricate details,ray tracing,film lights,spot lights,
    lustrous skin,physically based rendering,best illustration,best shadow,
    cinematic lighting,delicate Illustration,official art,aesthetic:1.4),
    (golden-ratio face,perfect proportioned face,perfectly beautiful),
    (standing under trellis of purple wisteria flowers),clear blue skies,
    glossy and red lips,brown eyes,long brown hair,
    (mature woman,milf,gravure idol,miss korea,korean beauty),
    (white string bikini,underboob,sideboob),
    (short torso,long legs,slim waist,huge hips,huge naturally sagging breasts:1.4),
    (1girl,solo girl,solo focus),(thigh up shot,cowboy shot,side view)"""

    negative_prompt = """hands,(worst quality,low quality,normal quality,
    low resolution,worst resolution,normal resolution,collage),
    tattoo,watermark,(Dutch angle,Dutch tilt,canted angle,vortex angle,
    oblique angle:1.3),tiara,(one more girl)"""

    prompt = "".join(prompt.split("\n"))
    negative_prompt = "".join(negative_prompt.split("\n"))

    text_2_img = Text2ImagePipe(
        model_path = model_path,
        prompt = prompt,
        negative_prompt = negative_prompt,
        scheduler = scheduler,
        scheduler_configs = {"调度器配置": {"use_karras_sigmas": True}},
        clip_skip = clip_skip,
        use_prompt_embeddings = True,
        use_compel = True,
        torch_dtype = torch_dtype,
        device = device_name
    )

    images = text_2_img.run_pipe(
        steps = 30,
        width = 512,
        height = 832,
        scale = 7,
        seed = 0,
        num_images_per_prompt = 5,
        use_prompt_embeddings = True,
        verbose = False
    )
K-Main 基础模型的输出,未加载任何 LoRAs 或文本指令反转。作者创作的图像。
如上图所示,即使不使用任何适配器插件,基础的K-Main模型自己就已经能够生成相对详细的图片。接下来我们尝试在生成过程中加入LoRAs。
LoRAs 实际上是用于修正原模型的一种方法,当添加到原模型中时,会调整原模型的输出。因为它们参数量较小,所以LoRAs 训练起来更简单——例如,只需用少量训练图像就能训练出一个用来生成新图像的 LoRA。
我们下载并使用了Tangbohu 线条微调 LoRA,这款 LoRA 主要用来加强线条,同时尽量保持原图的视觉效果。使用它应该能生成对比度更高、细节更细腻的图片,比基础模型更佳。
保持其他设置和参数与上述相同,我们重新初始化图像生成管道流程,使用下载的LoRA文件的路径、LoRA适配器名称和LoRA缩放值。LoRA缩放值决定了LoRA对生成图像效果的影响程度。我们采用0.7的LoRA缩放值,以确保效果较为显著但不至于过于强烈。
    # 指定 lora .safetensors 路径、适配器名称和缩放比例。
    lora_paths = ["tangbohu-line_1.0.safetensors"]
    lora_adapter_names = ["tangbohu-line"]
    lora_scales = [0.7]

    # 重新初始化。
    text_2_img = Text2ImagePipe(
        模型路径 = model_path,
        提示 = prompt,
        否定提示 = negative_prompt,
        lora_paths = lora_paths,
        lora_adapter_names = lora_adapter_names,
        lora_scales = lora_scales,
        调度器 = scheduler,
        调度器配置 = scheduler_configs,
        跳过剪切 = clip_skip,
        使用提示嵌入 = True,
        use_compel = True,
        torch_dtype = torch_dtype,
        设备 = device_name
    )

    images_1 = text_2_img.run_pipe(
        步骤 = 30,
        宽度 = 512,
        高度 = 832,
        缩放比例 = 7,
        种子 = 0,
        每个提示生成的图像数量 = 5,
        使用提示嵌入 = True,
        详细输出 = False
    )
K-Main 基础模型的输出,未使用 LoRAs 或文本反转技术。作者创作的图像。
使用采用唐伯虎LoRA调节器的K-Main基础模型输出。相比基础模型的输出,图像现在对比度更强,细节更丰富。图像由作者创作。
加载了LoRA后,生成的图像对比度和细节确实比原图稍微多了一些。
文本反转技术(https://textual-inversion.github.io)允许稳定的扩散模型通过训练新的嵌入来表示新的概念和风格,并通过将这些新概念和风格指定为文本反转标记来生成新的概念和风格的图像。这种指定词被称为文本反转标记。
我们下载并使用了两个模型:EasyNegative 和 badhandv4,并一起使用以进一步增强模型的输出效果。EasyNegative 模型是基于不良图像训练的,在负向提示中使用它,可以避免模型生成不良图像。这应该有助于提升模型生成图像的整体质量。
同样,badhandv4 文本反转技术在负面提示词中被用来让模型避免生成手部画得糟糕的图像。使用这个文本反转技术应该可以减少生成糟糕手部的几率(不过这是否真的有效又是另一回事)。
我们再次保留基础设置和输入不变——唯一的例外是将文本反转令牌添加到负面提示中。不用多说,我们需要重新启动图像生成管道,并使用下载的文本反转模型文件路径,以及用来激活这些文本反转模型的相应令牌。
    # 指定文本反转路径和标记。
    textual_inversion_paths = ["easynegative.safetensors", "badhandv4.pt"]
    textual_inversion_tokens = ["easynegative", "badhandv4"]

    # 初始化模型推理管道,不包含任何LoRA或文本反转模型。
    # 根据需要将文本反转标记添加到提示中。
    negative_prompt = """hands,(worst quality,low quality,normal quality,
    low resolution,worst resolution,normal resolution,collage),
    tattoo,watermark,(Dutch angle,Dutch tilt,canted angle,vortex angle,
    oblique angle:1.3),tiara,(one more girl),easynegative,badhandv4"""

    prompt = "".join(prompt.split("\n"))
    negative_prompt = "".join(negative_prompt.split("\n"))

    # 使用文本反转路径和标记重新初始化管道。
    text_2_img = Text2ImagePipe(
        model_path = model_path,
        prompt = prompt,
        negative_prompt = negative_prompt,
        textual_inversion_paths = textual_inversion_paths,
        textual_inversion_tokens = textual_inversion_tokens,
        scheduler = scheduler,
        scheduler_configs = scheduler_configs,
        clip_skip = clip_skip,
        use_prompt_embeddings = True,
        use_compel = True,
        torch_dtype = torch_dtype,
        device = device_name
    )

    text_2_img.run_pipe(
        steps = 30,
        width = 512,
        height = 832,
        scale = 7,
        seed = 0,
        num_images_per_prompt = 5,
        use_prompt_embeddings = True,
        verbose = False
    )
K-Main 基础模型的输出,未使用 LoRAs 或文本提示。作者创作的图片。
作者创作的图像:使用K-Main基础模型的输出,结合easynegative和badhandv4文本提示。
在两个文本反转模型技术都生效的情况下,新的输出图像相比原图有了进一步的提升。这些图像的细节更加丰富,其中一些图像的手部描绘也更佳(不过也有人认为,强迫稳定扩散模型生成好的手部可能并不容易)。
最后,我们重新初始化图像生成管线,以便利用所有已下载的LoRAs和文本反转模型。最新的提示和负提示包含文本反转标记,用于激活这些文本反转模型。
    # 使用LoRAs和文本反转重新加载管道。
    text_2_img = Text2ImagePipe(
        model_path = model_path,
        prompt = prompt,
        negative_prompt = negative_prompt,
        lora_paths = lora_paths,
        lora_adapter_names = lora_adapter_names,
        lora_scales = lora_scales,
        scheduler = scheduler,
        scheduler_configs = scheduler_configs,
        clip_skip = clip_skip,
        textual_inversion_paths = textual_inversion_paths,
        textual_inversion_tokens = textual_inversion_tokens,
        use_prompt_embeddings = True,
        use_compel = True,
        torch_dtype = torch_dtype,
        device = device_name
    )

    # 然后,运行生成图像的管道:
    images_3 = text_2_img.run_pipe(
        steps = 30,
        width = 512,
        height = 832,
        scale = 7,  # 调整生成图像的尺度为7
        seed = 0,
        num_images_per_prompt = 5,
        use_prompt_embeddings = True,
        verbose = False  # 设置详细模式为关闭
    )
K-Main基础模型的输出,未使用LoRAs,文本翻转。图片由作者制作。
K-Main基础模型输出使用了唐勃虎线条微调LoRA和easynegative及badhandv4文本反转。图片现在看起来风格不同。图片由作者制作。
生成的输出图像可以说更加细致,并且在视觉上与基础模型的图像不同。通过结合各种适配器,可以增强并个性化基础模型的输出,从而使用户更具创意(但是否能将用AI生成的图像视为真正的创造力,又另当别论……)
摘要
在这篇文章中,我们展示了如何将CivitAI检查点(checkpoints)、LoRAs和文本翻转加载到diffusers包的[StableDiffusionPipeline](https://huggingface.co/docs/diffusers/en/tutorials/autopipeline)中,以增强基础模型的输出,。这些并不是增强和自定义稳定扩散模型的唯一方法——还有其他更高级且强大的方法,我们将在以后的文章中介绍。
[1] https://arxiv.org/pdf/2106.09685 (这是关于相关研究的论文)
[2] https://textual-inversion.github.io/ (这是一个关于文本反转的网站)
[3] https://huggingface.co/docs/diffusers/en/using-diffusers/loading_adapters#load-adapters (这是加载适配器的说明文档)
这篇关于用Diffusers结合CivitAI模型、LoRAs和文本反转生成更高质量的图像的文章就介绍到这儿,希望我们推荐的文章对大家有所帮助,也希望大家多多支持为之网!
- 2025-01-15你可能误会了!用 TypeScript 的正确姿势并不是这样子的
- 2025-01-14成本考量下,开源 CMS 内容管理系统为何脱颖而出
- 2025-01-14利用ChatGPT自动构建知识图谱的方法讲解
- 2025-01-14?? 缓存增强生成(CAG):一个崛起的RAG竞争对手?
- 2025-01-14Apache Spark及分布式计算概览
- 2025-01-14AWS入门第一篇——云基础与EC2实例详解
- 2025-01-14Apache Iceberg:现代数据栈中的“新一代Hadoop”?
- 2025-01-14深入理解 ECMAScript 2024 新特性:Promise.withResolvers
- 2025-01-13SRM vs SCM:企业管理中的差异战略与实践
- 2025-01-12深入理解 ECMAScript 2024 新特性:Map.groupBy() 分组操作


